Stages in a case life cycle
Stages in your case life cycle visualize the milestones in the journey towards your business goals. By creating stages, you organize work into sequential and logical phases that help you achieve your business objectives.
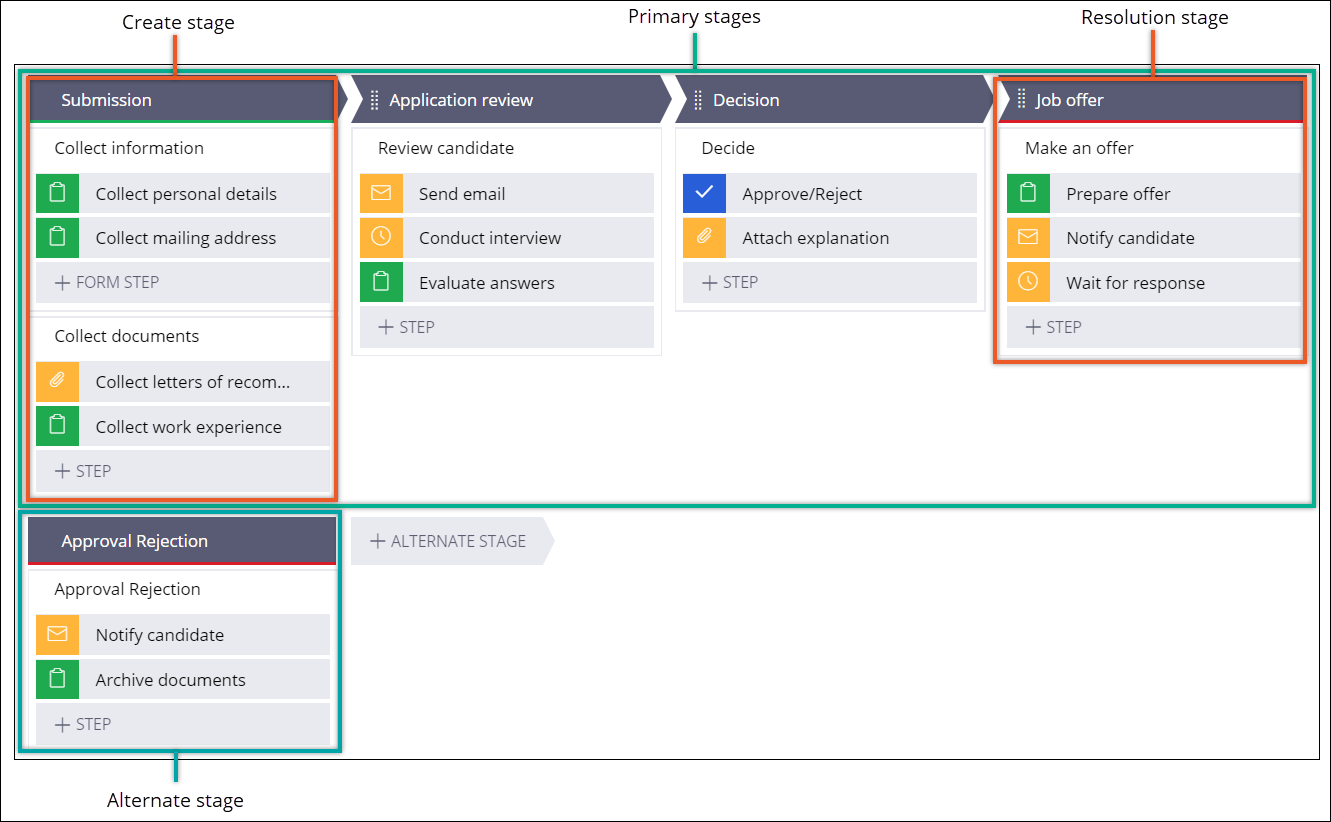
For example, if your business goal is to hire candidates for a certain role, you can divide the case into the following stages that represent the expected path of your case:- Submission
- Application review
- Interview
- Decision
- Job offer
For improved flexibility and accelerated case resolution, multiple users can work on tasks within one stage. To ensure that you can resolve your business process in an alternative way when an exception occurs, for example, if the candidate does not meet all the requirements, you can create an alternate Approval Rejection stage.
The following figure presents a case life cycle with primary stages and an alternate stage:
Stages provide modularity in your case life cycle, which improves the flexibility of your application. You can configure a case to enter a stage only after meeting specified conditions, so that users interact only with actions that are relevant in a specific scenario. Additionally, a case can re-enter a stage, for example, so that a user can change their personal details. As a result, users avoid having to reprocess an entire case life cycle from the beginning.
To speed up case creation, when you create a new case type, the Case Designer provides you with a default Create stage. The Create stage includes views and actions in which users interact before they submit a case. Consequently, you can clearly visualize what data users require to be part of the case pre-processing. For example, in the Create stage, you can configure a view that collects personal information from a job candidate.
The resolution stage in your case type defines case behavior after reaching the end of the case life cycle. When you configure the resolution stage you define a final case status as well as whether any child cases also reach resolution at the same time. Case Designer marks the resolution stage with a red bar. A case type can have more than one resolution stage if you define an alternate path for your business process. For example, in a case type for reviewing applications from job candidates, if a case reaches resolution through the primary stages, the resolution status changes to Resolved-Completed. If the case ends on an alternate path, the resolution status changes to Resolved-Rejected. Use case statuses to clearly communicate case outcomes.
Naming convention for stages
Ensure that names for stages clearly convey the meaning of a stage and are consistent throughout your case types. Typically, use nouns for stage names, for example, Submission, Review, and Decision. Avoid using verbs that describe an action or a status, for example, Order Placed, Shipped, Account Paid, or Closed.
Populate your case life cycle with stages by completing the following tasks:
The following video shows how to add a stage to your case type and what options you can configure for a stage:
- The Create stage
To speed up case creation and clearly visualize the elements that users interact with before case processing starts, your case life cycle includes a default Create stage every time you create a new case type.
- Creating a primary stage
Represent main phases of your business process by creating primary stages in a case life cycle. By creating stages, you can ensure that your work is divided into logical phases, so that you can track and resolve the tasks more conveniently.
- Creating an alternate stage
Ensure that you can resolve a business process when an exception occurs by adding an alternate stage to the case life cycle. For example, you can use an alternate stage to process cases that managers reject.
- Defining the entrance criteria for a stage
Prevent delays and improve the efficiency of the case resolution process by verifying that the user attaches relevant documentation and provides appropriate information. Validate case properties, attachments, and conditions to determine whether a case can enter a specific stage as it moves through the case life cycle.
- Configuring a case resolution
Configure a resolution method in a stage to control the final status and processing that occurs when a case reaches the end of its life cycle.
- Defining conditions for skipping a stage
Ensure that cases move to the next stage in the sequence when the current stage is not relevant, by defining the conditions that cause a case to skip a stage. When a customer service representative (CSR) can skip irrelevant stages, a case reaches its resolution faster.
- Removing a stage
Deliver a flexible application that you can conveniently adjust to dynamically changing circumstances by removing stages that are no longer relevant to your business requirements. As a result, you save time because you can edit an existing case type instead of creating a new one from scratch.
Previous topic Case life cycle elements Next topic The Create stage