Assigning a task to a robotic work queue
Integrate Pega Robotic Process Automation (RPA) with your cases to define tasks that a virtual machine (VM) can do. As a result, you can reduce the need for human input in your application and resolve cases faster.
Consider the example of a case type for requesting a new credit card. A customer service representative (CSR) needs to pause the call, log in to a system for ordering the printing of a new credit card, then switch to a system for ordering the shipment of the newly created card. These operations might take considerable time and attention from the CSR, and are prone to human error. However, the CSR can assign these tasks to a robotic work queue, providing quicker, more accurate service to the customer.
For relevant training materials about using RPA, see the Pega Robotic Process Automation module on Pega Academy.
- In the navigation pane of App Studio, click Case types, and then click the case type that you want to open.
- In the process in which you want to add a robotic assignment, click , and then click Select.
For example: The following figure shows the Assign to robot queue step in a case life cycle: Assign to robot queue shapes in a stage 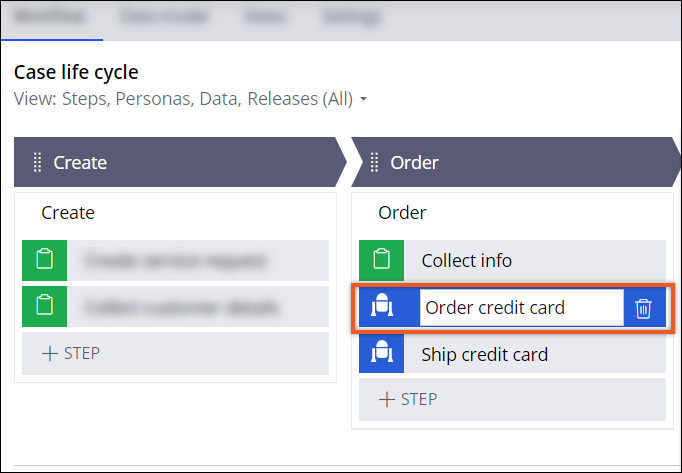
- In the Step properties pane, on the General tab, in the Route to queue field, enter the name of the work queue from which the VM retrieves assignments.
- In the Run robotic automation field, enter the automation that
the virtual machine runs after retrieving the
assignment.For more information, see How do I configure Robotic Automation for Pega Platform applications?.
- Optional: To update the status of a case by synchronizing it with the state of the robotic
assignment, click Set case status, and then, in the Set
case status dialog box, for each of the assignment states that you want to
map to a case status, perform one of the following actions:
- To select a status that a case enters when a robotic assignment reaches a certain state, press the Down arrow key in the corresponding field.
- To create a custom status, enter a unique name in the field, and then click the Open rule icon.
The following predefined robotic assignment states add the capability to automatically update your case status and track its progress in a more granular way:
Robotic assignment state Description Assignment is queued Change case status when a robotic assignment is added to a work queue. Robotic Automation is in progress Change case status when a robot pulls the assignment and starts working on it. Robotic Automation has conflicting results Change case status when a robotic assignment is completed but returns data that fails the validations that are specified for the case. Robotic Automation fails Change case status when a robotic assignment cannot be completed and fails. Robotic Automation has timed out Change case status when a robotic assignment cannot be completed in the threshold time that is specified in the assignment type (work queue). For example: The following figure shows an example set of case statuses: Case statuses mapped to robotic assignment statuses 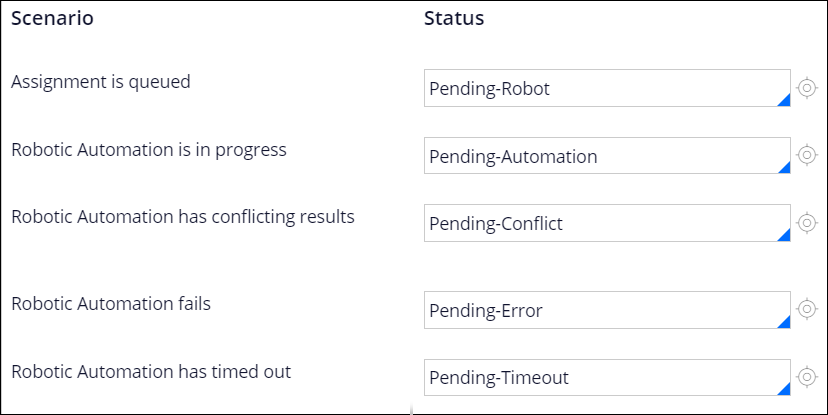
- Optional: To validate the incoming values after your automation is complete, in the
Assignment validation criteria field, select a validation
mode:
Choices Actions Use an existing validation rule - Select Existing validation.
- In the list that appears below the Assignment validation criteria field, select a validation rule.
Use custom validation - Select Custom validation.
- Click the Click to configure conditions icon.
- In the Configure condition window, specify how your application validates the automation output.
If the validation fails, the system routes the assignment to the Conflicting Robotic Assignments work queue. If an assignment fails, the system routes the assignment to the Failed Robotic Assignments work queue. - Optional: To apply a goal and deadline to the robotic assignment step, on the Goal
& deadline tab, in the Assignment service level field, press the Down
arrow key, and then select the name of a service-level agreement.For more information, see Setting service-level agreements (SLAs) for stages, processes, and steps.
- Close the Robot queue dialog box by clicking Submit.
- Click Save.
Previous topic Integrating a case with an external resource Next topic Assigning a task to an external application