Creating decision strategies for a headless decisioning scenario in Pega 7.1.8 to Pega 7.2.1
On the Pega 7 Platform, instances of the Strategy rule define a personalized decision that is delivered to an application. When building a headless decisioning scenario, you reference strategies from instances of the Data Flow rule. This tutorial explains how to use the Next-best-action and response strategies, describes their configuration details, and provides links to additional resources. You use the Next-best-action strategy to allow your application to take the best decision for every customer. The response strategy is necessary to catch the customers' responses and improve the adaptive model that is used in the Next-best-action strategy.
- Next-best-action strategy
- Creating an instance of the Strategy rule called ResponseStrategy
- Configuration details of the response strategy
- Next steps
Next-best-action strategy
This scenario uses the NextBestAction strategy in the DMOrg-DMSample-Data-Customer class that is available in the DMSample app. This Strategy rule instance selects banners to display to customers who log in to an organization's website. You can build your own strategy by using the NextBestAction strategy as a reference.
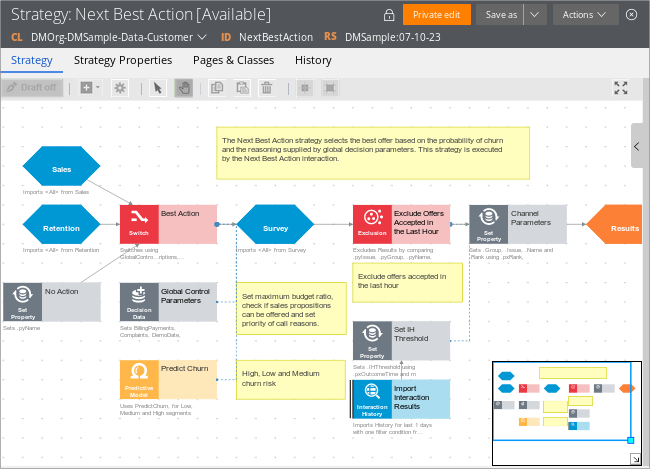
The NextBestAction strategy created in the DMOrg-DMSample-Data-Customer class
Next-best-action strategies allow applications to make the best decision about a particular business issue (such as retention, recruitment, risk, recommendation, and so on). The standard approach to find the next best action (offer a proposition) for each customer consists of several steps. First, the strategy checks propositions' eligibility for all customers and segments customers according to this information. The strategy needs to to identify which proposition or propositions can be offered to a particular customer in order to segment customers. Next, the strategy uses predictive models to check the propensity for each proposition by calculating the probability that a customer will accept the proposition. Finally, the strategy selects the action for each customer segment and the best decision path. To learn more about constructing blocks of strategies, read about strategy components in Strategy rule form - Completing the Strategy tab.
Creating an instance of the Strategy rule called ResponseStrategy
Create an instance of the Strategy rule that identifies website user actions (which banner a user clicked and which banner a user did not click) and use them to generate outcomes that update customers' interaction history and refine adaptive models. This strategy converts user actions into outcomes that are tracked in Interaction History and by Adaptive Models.
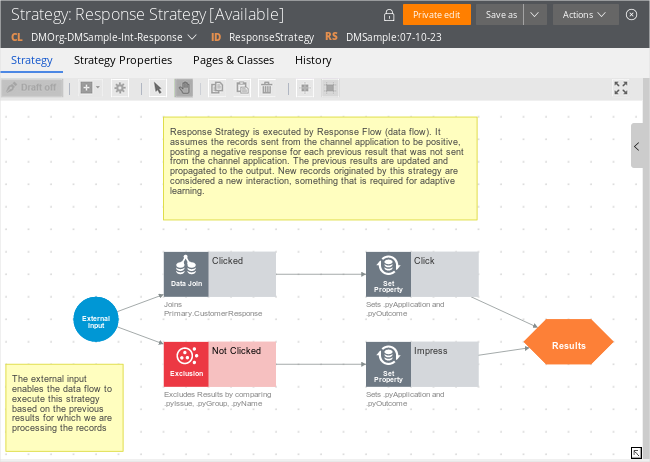
The Response Strategy strategy created in the DMOrg-DMSample-Int-Response class
- From Application Explorer, right-click the DMOrg-DMSample-Int-Response class and select > > .
Define the record configuration of the data flow:
- In the Label field, enter Response Strategy.
- Define Strategy results on a custom Strategy Results class.
- Ensure that the Apply to field contains the class in which you want to save the strategy (DMOrg-DMSample-Int-Response).
- Click .
- Right-click the canvas and select .
- Add the component:
- Right-click the canvas and click > .
- Connect the component with the component.
- Open the component.
- In the field, enter Clicked.
- In the tab, from the list, select .
- In the field, select .CustomerResponse.
- Click .
- In the column, select .pyIssue. In the column, select .Issue.
- Click .
In the column, select .pyGroup. In the column, select .Group.
Click .
In the column, select .pyName. In the column, select .Name.
Select the option.
Click .
- Add the component:
- Right-click the canvas and select > .
- Connect the component with the component.
- Open the component.
- In the field, enter Click.
- In the tab, click .
- From the list, select .
- In the column, enter .pyOutcome.
- In the column, enter "Click".
- Click .
- Connect the component with the component.
- Add the component:
- Right-click on the canvas and select > .
- Connect the component with the component.
- Open the component.
- In the field, enter Not Clicked.
- In the section, in the field, select .
- In the field, select .CustomerResponse.
- Click .
- In the column, select .pyIssue. In the column, select .Issue.
- Click .
In the column, select .pyGroup. In the column, select .Group.
Click .
In the column, select .pyName. In the column, select .Name.
Click .
- Add the component:
- Right-click the canvas and select > .
- Connect the component with the component.
- Open the component.
- In the field, enter Impress.
- In the tab, click .
- From the list, select .
- In the column, enter .pyOutcome.
- In the column, enter "Impress".
- Click .
- Connect with component.
- Click .
Configuration details of the response strategy
When you want to create a response strategy, you need to enable the External Input in your strategy. When executed from a data flow, with the appropriate configuration, this strategy starts with the result of the original decision. The previous results are made available through the External Inputs component. After you create the ResponseStrategy strategy, you can reference it from the ResponseFlow data flow. When the headless decisioning scenario is operational, the ResponseStrategy strategy gets the list of the items that the user clicked. The strategy separates the clicked banners from the ones that were not clicked. The original decision results go into the Clicked Data Join and Not Clicked Exclusion component. The Clicked Data Join outputs the original decision results that were clicked.
Data processing in the response strategy
In the Data Join component, decision results are joined with the .CustomerResponse clipboard property when the conditions that are set in the Data Join component are met. Only one decision result meets the condition; it comes out of the Data Join component, and in the Click Set Property component its outcome is set to Click. The Not Clicked Data Join component outputs the original decision results that were not clicked.
In the Exclusion component, decision results are joined with the .CustomerResponse clipboard property when the conditions that are set in the Exclusion component are met. Two decision results meet the condition; they come out of the Exclusion component and in the Click Set Property component their outcome is set to Impress.
The three original decision results that entered the ResponseStrategy strategy through the External Input component go into the Results component. The strategy does not create any new records; it sets the outcome of two records to Impress and Accept.
Results of the response strategy
The decision results from the ResponseStrategy strategy return to the ResponseFlow data flow and are written into the Interaction History data set and the Adaptive Analytics data set. The results stored in these data sets improve the adaptive model outputs and can be accounted for by the subsequent decisions.
Next steps
Now that you have prepared instances of the Strategy rule that are necessary in the headless decisioning scenario, you can reference them from instances of the Data Flow rule. For more information about data flows in the headless decisioning scenario, see Tutorial: Building a headless decisioning scenario with data flows.