Importing and configuring a PMML model
To monitor a model created in third-party tools or in other Pega Platform™ instances, import that model and define its objective in Prediction Studio.
Use case
uPlusTelco wants to improve the experience of their customer support by predicting the reason for each customer call. To achieve that goal, the data analytics team built a predictive model and want to monitor its performance by capturing actual outcomes and comparing them with the predicted outcomes.
Your first task as a data scientist is to upload the model that they want to monitor to Prediction Studio.
Before you begin
- Download and extract the following model to your desktop:

- In Pega Platform™, switch to the DMSample application to use it as the testing environment for this tutorial. For more information, see Switching between applications.
- In DMSample, create an open ruleset version. For more information, see Creating a ruleset and ruleset version.
Importing a PMML model for monitoring
- In the navigation panel of Prediction Studio, click .
- In the header of the Predictions work area, click .
- In the Create Model dialog box, click .
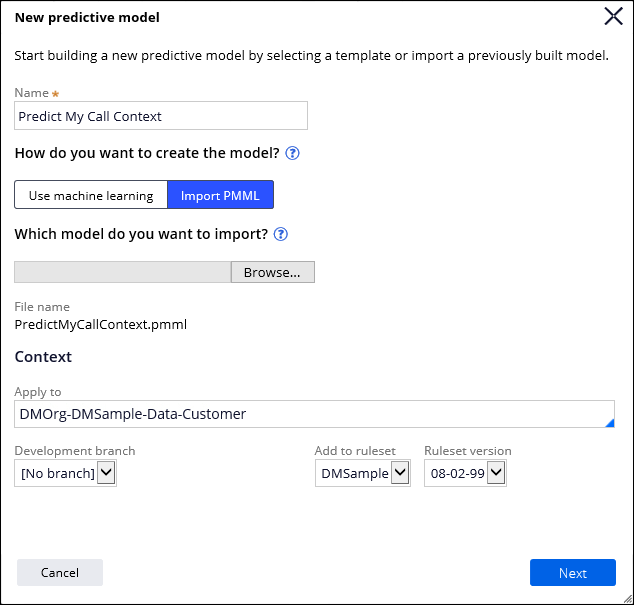
- In the New predictive model dialog box, configure the model parameters:
- In the Name field, enter an identifier for the model, for example:
Predict My Call Context
- In the How do you want to create the model section, click .
- In the Which model do you want to import section, click , select the downloaded model, and click .
- In the Context section, enter an applicable class and an open ruleset version for the model, for example:
Apply to: DMOrg-DMSample-Data-Customer
Development branch: No branch
Add to ruleset: DMSample
Ruleset version: 08-01-99
Importing a PMML model - basic settings
- In the Name field, enter an identifier for the model, for example:
- Click .
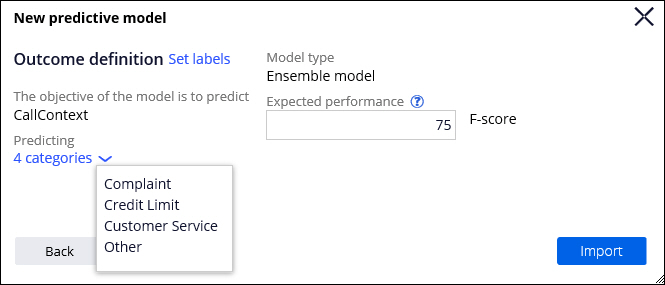
- In the Expected performance field, enter a value between 0 and 100 that represents your expected predictive performance of the model, for example:
75 (for F-score)
The expected performance value is used as a benchmark for monitoring the model. For more information, see Metrics for measuring predictive performance.
- Verify the outcome definition settings, as in the following example:
Importing a PMML model - outcome definition settings - Upload the model by clicking .
- On the predictive model page, click .
Conclusions
You have imported a PMML model. You can now use the model in a strategy to predict customers call the support line.
What to do next
Configure a strategy that references the imported model, and deploy it in a decision data flow. See Creating a strategy for predictive analytics.
To view the main process outline for this tutorial, see Monitoring predictive models.
Previous topic Monitoring predictive models Next topic Creating and implementing a decision strategy for predictive analytics