How to create a Circumstance Definition rule
Summary
How Multivariate Circumstancing Works).
These Circumstance Rules are then referenced in the circumstance setup for an activity, When, or other rule.
Suggested Approach
Before you begin
Before creating any Circumstance Definitions, you must have created a Circumstance Template (see How to create a Circumstance Template); this Template will provide the circumstance properties for all the Definitions.
You should also have determined what values you wish for these properties, and in what order they will be grouped. (See How Multivariate Circumstancing Works.)
Creating the rule
1. From Rules by Type explorer, expand the Technical link. Right-click on Circumstance Definition, and click New.
2. On the New form, complete the fields as follows:
a. In the Applies To field, enter the name of the class to which this Definitions applies. (NOTE: In most cases, this should be the same class as the Circumstance Template.)
b. In the Template Name field, enter the name of the Circumstance Template you created.
c. For Purpose, enter a name which describes the type of circumstance values which are grouped in this rule (examples: Contact type “PrintedNotice” or “Weblink”, geography regions “SouthEastAsia” or “NewEnglandStates”)
d. In the RuleSet – Name field, enter the name of the RuleSet where this rule will be saved.
e. In the Version field, enter the RuleSet version.
f. Click Create.

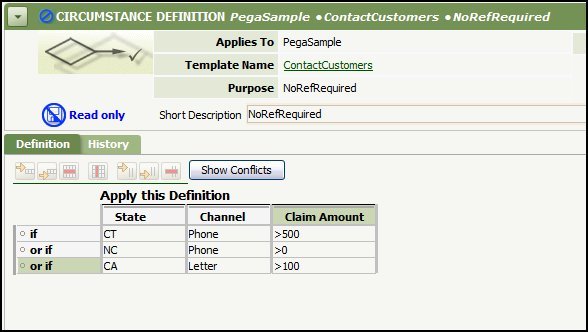
3. The form will display an empty row with the properties from the Circumstance Template as column headings. Enter the first row of values for these properties into this row.

NOTE: As with decision rules, operators may be added not only to the value fields, but also to column headings, so they apply to all fields in that column. For example, if all the Claim Amounts are for amounts “greater than” (greater than 500, greater than 100, etc.), then rather than repeating the “greater than” operator for each value in the column, apply it to the column header.
a. Click the column header. The Operator Chooser dialog box appears:

b. Select the appropriate operator from the drop-down box, or click Use Range to enter a range of values in the column.
c. Click Save. The operator should now appear in the column heading.

4. If there are additional rows of values associated with this Definition, then highlight the first property’s value (“State” in the above example). Click on the Add Row Below icon (above the properties) to add additional rows to the form. Enter the values for the additional rows.
5. Save your changes.
NOTE: If errors occur during saving, and the error message states that there are conflicts, click the Show Conflicts button to display further information about those conflicts.
