How to customize the merge branch RuleSets process
Summary
You can use extension points to customize the standard merge branch RuleSets process; for example, add behavior that enforces compliance with your organization's policies and procedures. This article describes the steps for adding pre-processing behavior, post-processing behavior, and customizing input validation in the wizard's user interface.
Suggested Approach
The article Using branch RuleSets and merging for parallel development describes how to use branch RuleSets for parallel development situations. The Merge Branch RuleSet wizard is used to merge the changes in a branch to the base RuleSets when development in the branch is complete and stable.
The standard Merge Branch RuleSets process provides extension points at which you can provide customized behavior. You can:
- Add pre-processing behavior
- Add post-processing behavior
- Customize validation on the inputs in the Merge Branch RuleSets wizard user interface
Flow for the Merge Branch RuleSets process
The Merge Branch RuleSets process is defined by the standard flow rule PegaAccel-Management-Refactor-Instances-Merge.pzMergeInstances.
pzMergeInstances flow

For pre- and post-processing behavior, the flow has two extension points (as subprocesses) to which you can add custom steps: pyPreMergeInstances and pyPostMergeInstances. By saving a copy of the standard rule and customizing your copy, you can override the standard behavior with custom behavior; for example:
- Pre-processing: Customize a copy of pyPreMergeInstances to provide processing that occurs before the wizard starts, such as verifying that a person's operator ID is performing the merge instead of a generic account.
- Post-processing: Customize a copy of pyPostMergeInstances to provide processing that occurs after the wizard completes, such as sending an email notifying the team about the status of the merge.
Example of providing post-processing behavior: Send an email notification with status of the merge process
To provide processing that occurs after the wizard completes:
- Save a copy of the standard pyPostMergeInstances to a RuleSet available to your application.
- Add the steps you want the system to perform to that copy.
In this example, the project lead wants the system to send him an email notification that lets him know the status of the merge process. This example uses a Utility shape and the CorrNew activity; however, you are not limited to this method. For information about other ways to send correspondence and notifications from this flow, see How to configure flows that automatically generate correspondence.
- Locate and open the standard pyPostMergeInstances flow by using the Designer Studio's Search field and clicking the flow name to open the rule.

- Click SaveAs (
 ) to save a copy of pyPostMergeInstances into a RuleSet available to your application. In this example, the copy is saved to the organization's RuleSet (
GLBX).
- In the rule form for the saved copy of pyPostMergeInstances, check out the rule and then update the process diagram to add a Utility shape to implement the email notification to the project lead.

- Update the properties for the Utility shape to specify the CorrNew activity for the Rule (use the SmartPrompt list under the Work class to select Notify), and to give the shape a specific name (
Send email to PL).
- After selecting CorrNew for the rule, entry fields for the parameters related to that CorrNew activity are displayed. In this example, values that are unique to this team's application and that are defined in their system are specified: a correspondence rule named
MergeRuleSetsStatusis selected (this correspondence rule already exists in this system), and the PartyRole is set toProjectLead. Because this correspondence rule is an Email type, additional fields are displayed after theMergeRuleSetsStatuscorrespondence rule is specified. Here, the team sets an email subject ofStatus of Merge Branch RuleSets operation.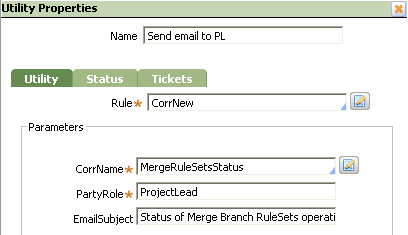
- Save the updated utility properties, and then save the flow.
- Create a work parties rule in the PegaAccel-Management-Refactor-Instances-MergeApplies To class to define the parties to receive the email. Specify the
Project Leadrole as is set in the Utility shape properties.

When the Merge Branch RuleSets process completes, the system performs the post-processing step and an email is sent to the project leader via the work parties rule.
Customizing input validation in the wizard user interface
For customized validation on inputs into the wizard user interface, override the extension point activity pyValidateMergeOptions.