Using Branch RuleSets and Merging for Parallel Development
When a development organization has two or more teams who are working on rules in the same application RuleSets, changes performed by one team might result in conflicts with changes performed by another team. These rule conflicts can become disruptive to the overall project, as resources must be spent to identify and resolve conflicts.
By using branches, rule development can take place within an isolated space (the branch) without affecting functionality in the source rules.
Note: This article describes a V6.2SP2 feature. For approaches to parallel development in earlier releases, see How to support parallel development and deployment of two separate projects for one application.
Suggested Approach
This branching ability is especially useful when teams need to work simultaneously on the same rules, and all members on one team need to see each other's work, while also isolating their development changes from other teams. In this way, one team's rule changes do not affect the other teams until the changes are stable, conflicts resolved, and approval granted to make the new functions available to the entire development project team.
For example, Team Alpha wants to work on feature ABC at the same time Team Beta wants to work on feature DEF — and both features involve rules in the same RuleSets. The teams' day-to-day development activity is largely independent. Whichever team completes its work first wants to incorporate its rules into the application first. With the features of branches and branch RuleSets, each team creates their own branch in which to do the work to implement their feature. When their work is done, the team resolves any conflicts that the system detects between their branch's rules and other instances of the rules, and then down merges their branch's rules into the base application.
Key Terms
A branch is a container for RuleSets with rules that are undergoing change and development. The RuleSets associated with a branch are called branch RuleSets. A branch RuleSet is a RuleSet that is:
- Is based off of — "branched from" another RuleSet
- Contains rules that are in active development in the associated branch
Overall Approach
The following steps outline the overall approach for each team:
- Create a team application that is built on the main application.
- Create an access group for this application and add it to the operator records for the team members.
- Create the branches in your team application.
- Create the branch RuleSets for the branches.
- Perform rule development using the branch RuleSets.
- Merge branches when development in the branches is complete and stable.
Step 1: Create a team application built on the main application
The team applications are typically named in a way that reflects the base application, team name, or the focus of the team. For example, for a base application named NewHireOnboard and Team-A development team working on a feature involving layout of their user portal, the name of the team application might be something like OnboardCoolPortalFeature.
- In the Application Explorer, create a new application rule by right-clicking the Application Definition category and selecting New > Application from the context menu. In the New form that opens, enter the name for the team application (like OnboardCoolPortalFeature) and save into an available RuleSet. (You can update the RuleSet for the application using the Advanced tab on its rule form. It has no effect on the team's using branches for development.) The Application rule form displays in the Designer Studio.
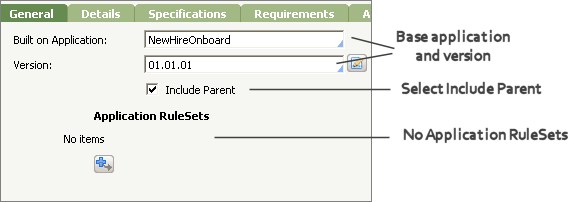
- In the Application rule form, update the Built on Application and Version fields to reference the main base application. Select the Include Parent checkbox.
- Remove the empty row Application RuleSets list by clicking the
 next to it. Make sure there are no items listed for the Application RuleSets before saving the rule form.
 - Save the application rule for the team application.
Example: Application rule for team application:
A warning appears in the rule form to alert you that the application rule is saved to a RuleSet that is not part of the application's RuleSet list. This situation is acceptable for a team development application. To remove display of the warning, you can use the Justify Warnings link.
Step 2: Give team members access to the team application
For example, for a team application named OnboardCoolPortalFeature:
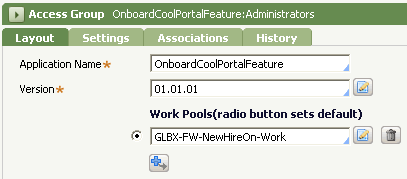
- Create an access group that references the team application. The typical name for the access group uses the application name plus the standard user type, such as OnboardCoolPortalFeature:Administrators.
Make sure the access group:
- Uses access roles that are sufficient for developing and testing your application. (These might be the same ones that are specified in the access group for the base application.)
- References the work pool for the main application.
- Has the Default Portal Layout field set to the portal that you want team members to use when developing in the branches (typically the Developer portal rule).
- Update the team member's operator IDs to include the access group.
- Switch to the team application either by using Application > Switch Application (if you added the access group to your operator ID), or by logging out of the system and logging into the team application using one of the operator ID's that has the access group (if you did not add the access group to your own operator ID).
Step 3: Create the branches in the team application
You create the development branches using the Branch list on the General tab of the application rule form for the team application. To create a branch:
- On the General tab of the application rule, click Add Branch. The Add a Branch ID window opens.

- In the Add a Branch ID window, type a name for the new branch and click OK to add it to the Branch list.
A branch name must start with a letter and contain only alphanumeric and dash characters, up to a maximum of 16 characters. A best practice for the name is to relate it to the planned development work taking place in that branch. For example, when you use a project management tool to organize planned enhancements by identifier, you might base the branch name on that identifier, such as
FeatureABC.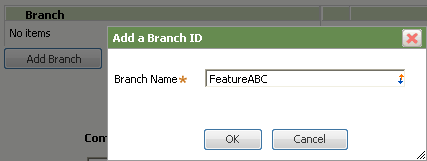
The system adds the branch to the Branch array. Save the application rule. (If the system has re-displayed an initial row in the Application RuleSets list, remove it by clicking ![]() , and then save the rule.)
, and then save the rule.)
When using multiple branches in the application rule:
Make sure the order of the branches as listed in the Branch list matches the order in which the rules should be resolved for this development application's users (the developers on the team). When a developer logs into this development application, the system assembles the developer's RuleSet list, and the branch RuleSets according to the sequence in which the branches are listed in the Branch list. In the Branch list, you can drag and drop the branches to set the desired order.
Step 4: Create the branch RuleSets for the branches
The development application must have at least one branch before you create a branch RuleSet. A branch RuleSet is "branched from" a RuleSet in the main (base) application, or any of its built-on applications. The team determines which RuleSets contain the rules they expect to modify for a planned enhancement and creates the branch RuleSets based off of those RuleSets.
In the application rule for the team application, on the General tab:
- Click Create Branch RuleSet. The New form opens.
- Leave the Branch RuleSet checkbox selected. Select the branch with which you want to associated this branch RuleSet, and select the appropriate base RuleSet.
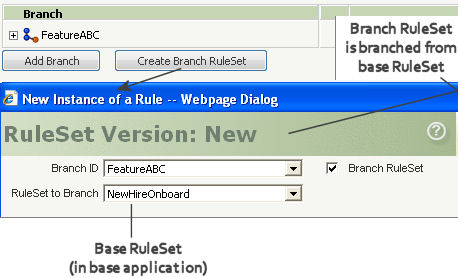
- Click Create. The system opens the RuleSet form for the branch RuleSet. In the RuleSet form, click
 to save the branch RuleSet to the system.
The name of the branch RuleSet is set to a combination of the name of the base RuleSet from which it is branched and the name of the branch. There is only one RuleSet version for a branch RuleSet. The Use check-out checkbox is selected by default. (It is a best practice to use check-out and check-in when doing team development.)
- Repeat steps 1 - 3 to create the branch RuleSets for all of the main RuleSets that contain rules the team expects to modify in that branch.
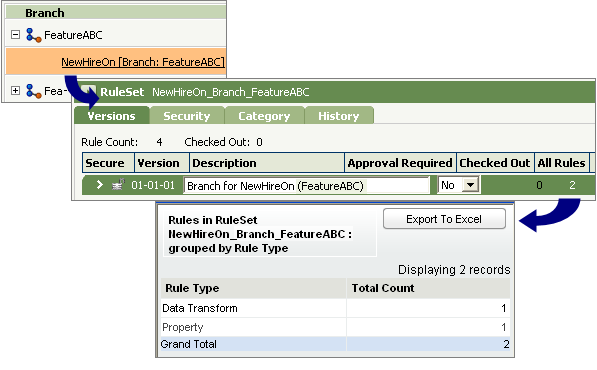
- Confirm that the branch RuleSet are associated with the development branch by opening the rule form for the team application. In the Branch array, expand the branch you selected for the branch RuleSets. All of the branch RuleSets associated with that branch are displayed.
Step 5: Perform rule development using the branch RuleSets
With these items in place:
- A team development application, built on the main application
- Branches defined in that team development application
- Branch RuleSets branched off of the appropriate base RuleSets, and associated with the appropriate branches
The team members can implement the planned enhancements by performing rule development in the branches using the branch RuleSets.
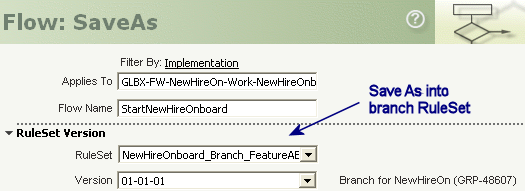
For example, to update an existing rule, save a copy (![]() ) of the base rule (in its base RuleSet) into the associated branch RuleSet, and work on that copy. To create new rules that are needed to implement the enhancement, save them directly in the branch RuleSet that is branched from the base RuleSet that will contain the new rules when development is complete.
) of the base rule (in its base RuleSet) into the associated branch RuleSet, and work on that copy. To create new rules that are needed to implement the enhancement, save them directly in the branch RuleSet that is branched from the base RuleSet that will contain the new rules when development is complete.
Example: Saving a copy of a flow rule into a branch RuleSet
As this team works with rules from shared RuleSets (the base RuleSets) in its branches, other teams are working on rules from the base RuleSets in their branches. The system displays a warning in a rule form when it detects whether a merge conflict might occur when the rule is merged from the branch into the base RuleSet, so that the team can proactively assess what conflict resolution might be needed before the merge operation.
For example, if a rule has been copied into two different branches, the rule form warns there might be a merge conflict with the rule:

Step 6: Merge branches when development in the branches is complete and stable
The branch's contents (the new and updated rules) are usually moved into the base RuleSets when development activity in the branch has reached a stable point, to make the newest updates available to the wider development team.
Preparation before merging a branch
Before merging a branch, it is a best practice to determine the answers to the following questions:
- Do any of the rules in the branch display warnings about merge conflicts?
A branch cannot be merged unless all conflicts are resolved. When you open a rule that might have a merge conflict, the system displays a warning, so that you can assess the actions you might need to take to resolve the conflict. In addition, the Merge Branch RuleSets wizard itself alerts you to which rules have conflicts at the time of the merge. See Resolving identified conflicts.
- Will you lock the branch RuleSets before merging the branch?
The best practice is to lock the branch RuleSets as a signal to others working in the same branch environment that the development in the branch is complete to that point in time, and should not be altered using that branch.
- Do you want the merge process to create a new RuleSet version in the base RuleSet? So that after a successful merge of the rules from the branch RuleSet, the new RuleSet version contains the rules updated and created in the branch?
The best practice is to always create a new RuleSet version in the base RuleSet to contain the rules from the corresponding branch RuleSet, because doing so makes it easy to deliver enhancements in a precise, modular way.
- Will you lock the new RuleSet version created in the base RuleSet?
The best practice is to lock the new RuleSet version in the base RuleSet, because locking the RuleSet version alerts others that the features in that version are complete as of the point in time the version was created.
- Are any rules in the branch RuleSets checked out?
If the Merge Branch RuleSets wizard encounters checked-out rules in the to-be-merged branch RuleSets, it displays a warning and provides a report of the checked-out rules. All rules must be checked in before you can complete the merge. If you exit the wizard to complete steps to check in the rules, you must restart the Merge Branch RuleSets wizard from the beginning.
- Do you want the branch and branch RuleSets (with their rules) to be available after the merge?
The default is to delete the branch and branch RuleSets after a successful merge.
Tip: For archival purposes, it is a best practice to make a Product rule of the RuleSets in the branch, and export a Zip archive using that Product rule. You can now create a Rule-Admin-Product rule (RAP) of a branch with a single click. However, there are times when creating a product rule for the entire development application may be more appropriate.
To move a branch's contents into the base RuleSets:
- On the General tab of the team's application rule, select Actions next to the branch that you want to merge and then click Merge. The Merge Branch RuleSets wizard opens in a new tab.
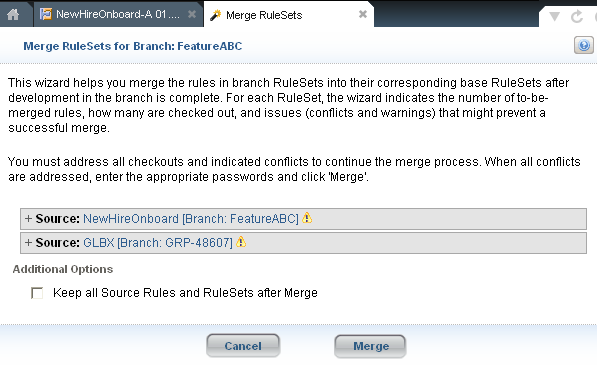
- Expand the section for each RuleSet and:
- Enter any required passwords.
- Select whether to create a new base RuleSet version for the merged rules, or to merge rules into an existing base RuleSet version.
- Examine the identified conflicts and warnings (if any).
In the wizard, the Source is the branch RuleSet being merged, and the Target is the base RuleSet (the one in the base application) into which the branch RuleSet's rules are being merged.
- Address any identified issues and resolve any conflicts reported by the Merge Branch RuleSets wizard (and optionally address warnings). You must address checked-out rules from the branch RuleSet and resolve reported conflicts before proceeding with the merge process.
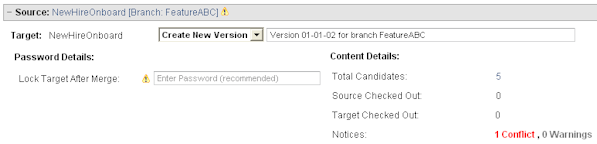
 For each branch RuleSet, the wizard displays:
- The number of rules in that RuleSet that are candidates to be merged to the base RuleSet. These include the rules from the base RuleSet that were copied into the branch RuleSet and rules that were created directly in the branch RuleSet.
- The number of rules in that RuleSet that are checked out (if any), both from the branch RuleSet (Source Checked Out) and from the base RuleSet (Target Checked Out). Those rules must be checked in before the branch can be successfully merged.
- The number of problems that might be blockers for a successful merge. Counts of both conflicts and warnings are displayed. These are issues you need to be aware of and must decide how to address before completing the merge.
Tip: The displayed report of conflicts and warnings depends on the target RuleSet version selected for the merge. For example, merging a rule into target RuleSet version 01-01-01 might display no conflicts and one warning, while merging that rule into target RuleSet version 01-01-02 might display one conflict and no warnings. You must select the target RuleSet version for the merge to get an accurate report of the potential conflicts and warnings.
- After resolving all of the reported conflicts for each to-be-merged RuleSet, click Mergeto complete the merge process.
When there are resolved conflicts, the report refreshes to indicate how many are resolved. You can see if all conflicts are resolved by verifying if the number of Resolved conflicts matches the number of reported conflicts for all of the branch RuleSets.
![]()
Note: Warnings do not have to be resolved before merging the rules. Warnings are to inform you that a problem could be introduced later (for example, when another team merges after you), and to help ensure proper communication across the teams working on enhancements that involve the same base rules.
After you click Merge, the system performs the merge. A confirmation message displays and you can expand the sections for each branch RuleSet to examine details about what was merged.
To see a list of the merged rules for a merged branch RuleSet, and the status of merging each rule, click the Merged n of n link to open the Merge Results window.

Resolving identified conflicts
Conflicts are considered "blockers". Because multi-team development environments often have teams working on the same rules concurrently, more than one team might have branched the same RuleSets, and introduced changes to rules that conflict with one another. Use the Notices window to examine and resolve any conflicts between your changes and theirs before moving your changes into the base RuleSet.
The Notices window displays a section for each rule that the wizard has identified as having an issue. Expand each section to work with each rule in which there is a reported conflict or warning.
Example: Conflict information for data transform rule pyDefault

To resolve conflicts for a rule:
- Examine the conflicts reported for the rule by expanding its section in the Notices window.
- Click Compare next to the first conflict to examine the differences between your branch copy of the rule and the one in the base RuleSet. Alternatively, click the RuleSet name (next to the
 ) to open the base rule and directly examine it.
 - Review and resolve all of the differences between the base rule and your branch rule.
If the changes are minor (such as a typo), open your branch rule and apply the same changes to it so that it matches the base rule.
If the changes are more complex, or if they conflict with the choices or logic in your branch rule, contact the individual who modified the base rule and negotiate what the final set of changes should be and the testing procedure for testing them. After reaching a mutual decision, make the agreed-upon changes in your branch rule and test.
- Repeat steps 2 and 3 for any other conflicts reported for that rule.
- When changes to your branch rule are completed and tested, select the Conflict resolved. Merge this rule. checkbox to indicate you have resolved the conflict.
When all conflicts reported in the Notices window are marked resolved, click OK to close the Notices window and return to the Merge Branch RuleSets wizard to continue with the merge process.
Pega 7 enhanced capabilities
PRPC 7.1 provides new capabilities that help ensure faster and easier development in distributed environments. A set of actions are available on the Application form that let you:
- Lock all RuleSets within a branch
- Package the contents of branch RuleSet rules
- Delete a branch, its RuleSets and their rules
- Remove a branch from an application
- Merge branches
To access these actions, open the Application form. On the Definition tab select the menu next to the branch you want to update.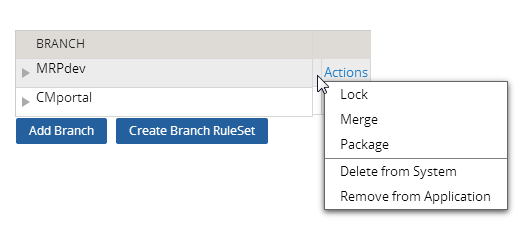
Lock all the RuleSets within a branch
To lock all of the RuleSets within a branch, do the following:
- Make sure that all the records in the branch RuleSets are checked in. You cannot lock a RuleSet if any of its records are checked out.
- Select the next to the branch you want to lock. This opens the Lock a Branch dialog.
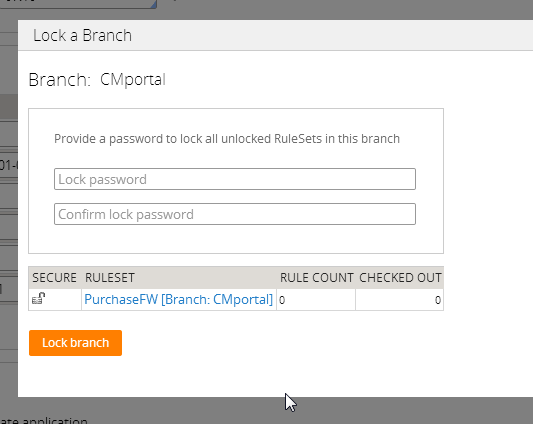
- Specify the password and then click Lock branch. A confirmation dialog appears.
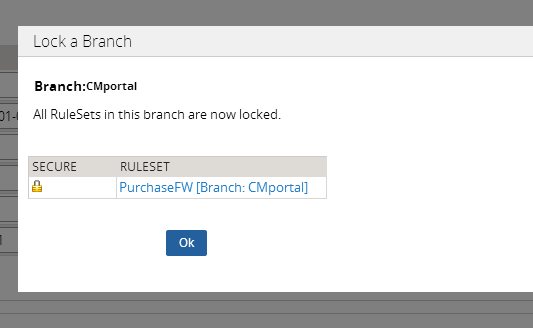
- Click OK to confirm the lock and close the dialog.
Package a Branch
- Select the .
- A browser window opens showing the progress of the packaging process. When the process is complete, click the link to save the product file to a local directory.
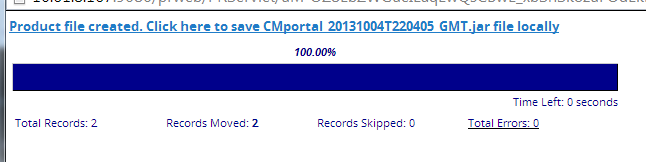 If any of the records in the branch RuleSets are checked out, then the latest version of the checked-in record is included in the package.
Delete a branch from the system
- Verify that all of the records in the branch RuleSets are checked in.
- Select next to the branch you want to delete.
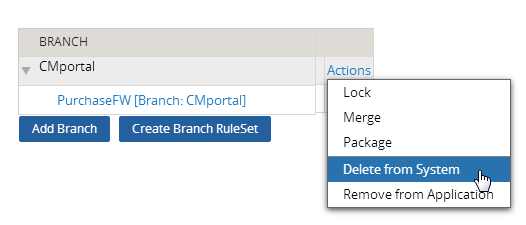
The Delete a Branch dialog appears.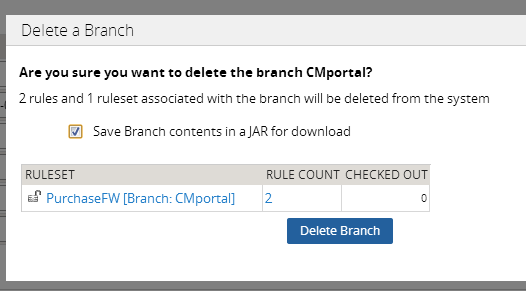
- To package the branch, select the Save Branch contents in a JAR for download checkbox.
- Click Delete Branch.The Branch is removed from the list.
Remove from Application
You can remove an association between a branch and an application. When removed, the branch (and its RuleSets) are not available when you create or copy records in the application. Removing a branch does not delete its contents from the system.
Select next to the branch you want to remove. The branch is removed from the list.
Additional information
![]() How to support parallel development and deployment of two separate projects for one application
How to support parallel development and deployment of two separate projects for one application
Previous topic How to model the user interface of your application before all properties are defined (PRPC 5.5) Next topic Tutorial: Merging branches