Make Payment Microjourney - Insurance
Configure and extend the Make Payment Microjourney™, which is part of the Customer Service for Insurance™ application.
- Business value
- Personas, channels and use cases
- Self-service chatbot example
- Assisted service example
- Stages and steps
- Data model
- Extending the Microjourney
- FAQ
Business value
By using the Make Payment Microjourney™, customers can make a payment on one or more of their policies from a self-service or assisted channel. Multiple self-service channels help lower an insurance company's operating costs. Accepting payment on multiple policies during one assisted interaction helps to reduce the customer service representative (CSR) average handle time (AHT).
Payment options include selecting the amount to pay, selecting the payment date, and setting up an automatic payment schedule. Payment methods include credit card and bank payments.
Personas, channels, and use cases
The following table shows the personas, channels, and use cases for this Microjourney.
| Persona | Channel and type | Use case |
|---|---|---|
| Customer | Assisted channels and self-service | Make a payment for one or more policies in less than five minutes. |
| Customer service representative (CSR) | Assisted channel through the Interaction portal | With one interaction, support customers making a payment on one or more policies. |
Self-service chatbot example
To save time and increase convenience, customers can make online payments using the self-service chatbot. While making an online payment only takes a few seconds, customers also have the option to enroll in the autopay program to make future payments effortless.
- A payment is past due. Customer gets prompted to make payment when visiting the self-service website.
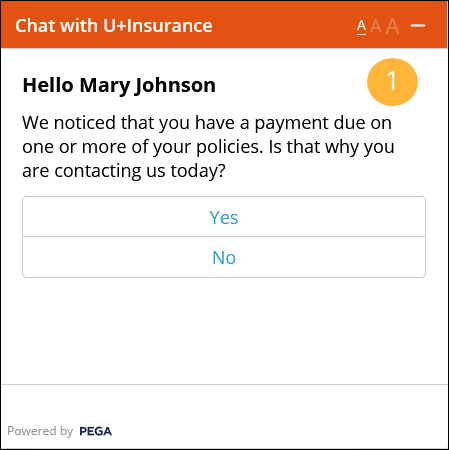
Customer accesses chatbot via the self-service website - Customer makes a payment by interacting with the chatbot.
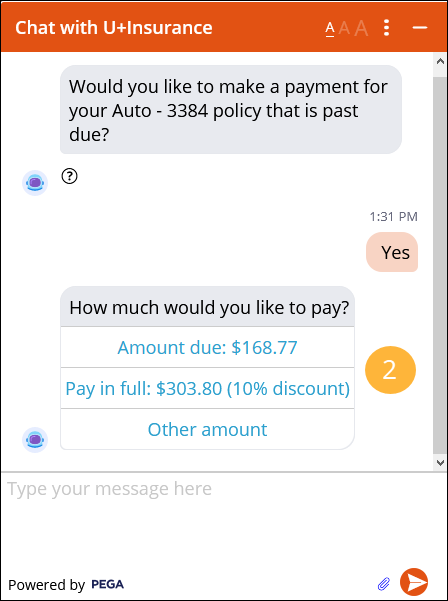
Customer selects payment amount - Customer can enroll in autopay option for future payments to eliminate the need to manually pay the bill.
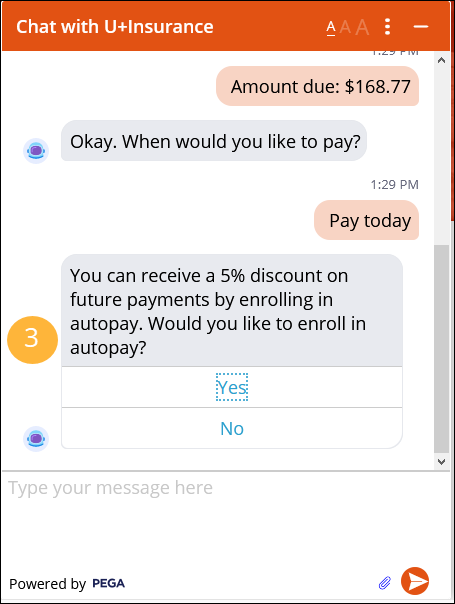
Customer can optionally enroll in autopay
Assisted service example
A customer requires assistance with making an online payment. A CSR can easily manage the online payment process, as in the following figure:
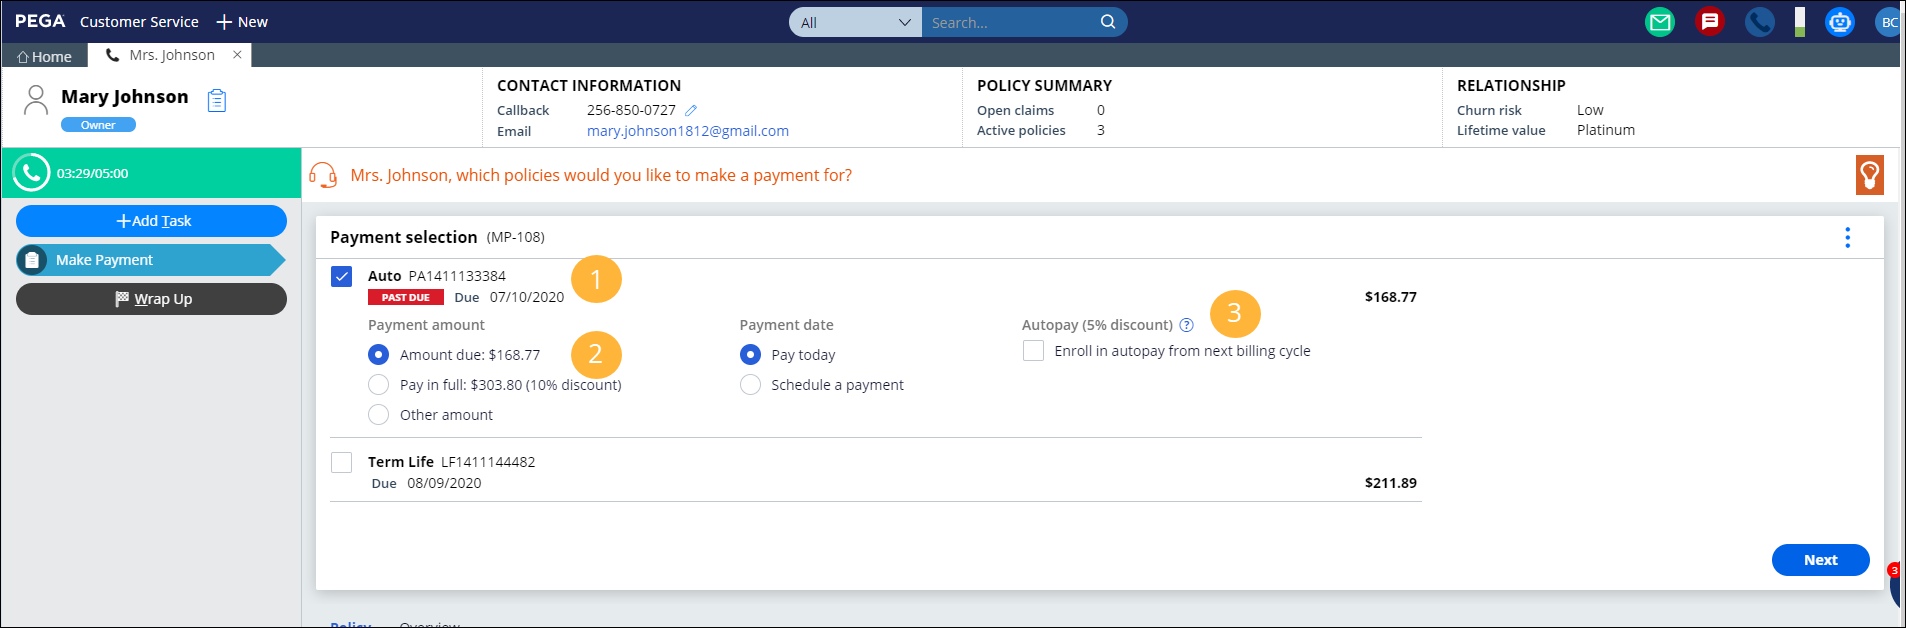
- The CSR asks the customer to identify the policy or policies to which the payment will be applied.
- The CSR selects the payment amount, either the amount due or the entire premium balance.
- The CSR can quickly enroll the customer in autopay, starting with the next billing cycle.
Stages and steps
This Microjourney includes the following stages and steps:
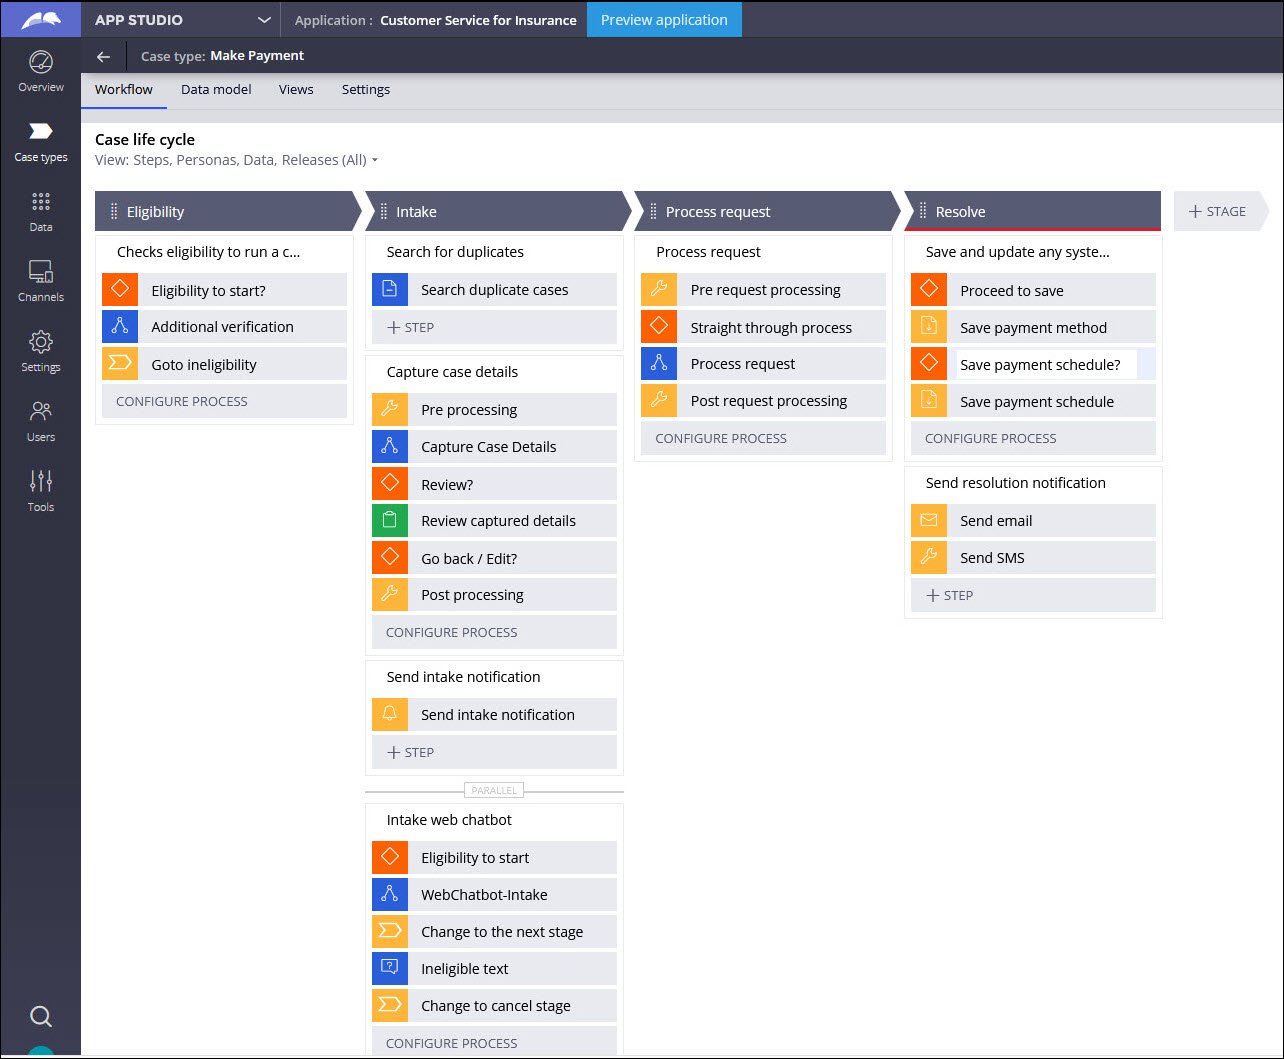

A customer gets a similar experience while navigating using the Web chatbot and self-service channels.
The project team can modify and extend most areas of this Microjourney in App Studio, thereby supporting users to Build for Change®
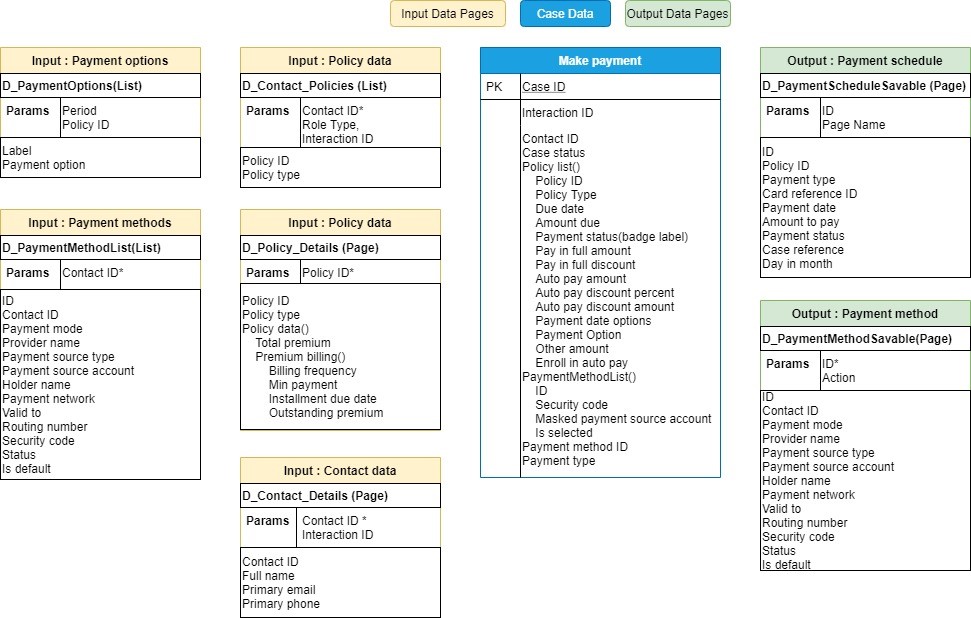
Data model
Use the Data model page in App Studio to quickly view and understand the relationship between all data objects in the application. You can add, update, and delete data objects without exiting the visual data model.
For information about the Data model page, see Data modeling. For information about connecting to external data entities, see Updating connections and field mappings for a data source.
The following figure shows the entity relationship diagram (ERD) for this Microjourney. For each data object, the ERD shows only the properties that apply to this Microjourney.
Extending the Microjourney
Extension points make it faster and easier to configure this Microjourney to meet your specific business needs, and easier to upgrade this Microjourney in the future. For more information, see Extension points.
This section includes steps to update data sources by using both App Studio and Dev Studio. Updating a data source in App Studio involves selecting the appropriate data object. For a data object to display in App Studio, the following conditions must be met:
- The class associated with the data page must be included in the list of data classes used in the application. If it is not already included, in Dev Studio, click the drop-down list next to the application name, click Definition > Cases & data tab, and add the class to the Data section. If you are not sure of the class name, you can find it in the Object type field in the data page definition.
- The data object name must not exceed 56 characters. The data object name is the label, or the short description, of the class. If the data object name exceeds 56 characters, edit the data source by using Dev Studio.
The following key inputs drive the flow for this Microjourney
- List of policies for which payments are due or have an outstanding balance
- Amounts due and the corresponding due dates for each policy
- List of available payment options
- List of payment methods associated with the policyholder
- Schedule of remaining payments if the customer enables autopay
- Processing of the payment and integration with an external payment system
- Scheduling of payments and customer notification
For information about extending features, see the following sections:
- Customer eligibility
- Customer intake
- Policy details and outstanding payments
- Payment methods
- Processing the request
- Persisting the request
- Notifying the customer
Customer eligibility
The eligibility check verifies that the user is a policyholder. If the user is determined to be ineligible because they are not a policyholder, the case is redirected to an alternate Ineligible stage. Customize the Ineligible stage if you require for further processing.
Extend the Eligibility_Flow flow and DetermineEligibilityToRun decision table to customize the eligibility criteria for initiating a payment.
Customer intake
The case type for this Microjourney is the templatized Make Payment case type. A templatized case type includes switches to enable and disable common case features. Configure these switches from the Case processing options page. For information, see Configure case processing options.
To further customize the customer intake process, this Microjourney includes the extension points described below. Several of these extension points can be used to modify the default behavior of a switched feature, such as duplicate case checking.
Rule name | Type | Description |
AllowDuplicateSearch | Case configuration | If enabled, lists the duplicate cases based on the case match rule configured in the case type |
PreProcessingIntake | Activity | Initializes data before customer intake |
PostprocessingIntake | Activity | Processes the data after customer intake |
ReviewIntake | Case configuration | Allows a CSR to review customer inputs before submitting |
SendIntakeNotification | Case configuration | Sends a notification to the customer after capturing the customer inputs |
PreAccountSelection | Data transform | Processes the data displayed on the policy selection screen |
CaptureCaseDetails | Flow | Customizes the entire intake flow |
Policy details and outstanding payments
Payment processing requires the list of outstanding payments and upcoming payments for the policies held by the policyholder. This information typically resides in a policy administration system that is external to the Pega application.
For auto and life policies, Pega Customer Service for Insurance includes out-of-the-box integration points to fetch policy payment details from an external system. Use extension points to extend this functionality to other lines of business.
These extensions apply to the Capture Case Details step of the Intake stage.
Populating the policy and payment details
List of policies
The D_Contact_Policies data page retrieves the list of policies associated with a policyholder. This list typically includes all active policies for the policyholder.
The D_Contact_Policies data page has the following parameters:
- CustomerID - Required for this data page to fetch the details related to that specific policyholder.
- RoleType - Additional parameter to get the list of policies for which the customer is a policyholder and not a beneficiary.
Add an external integration source to the D_Contact_Policies data page to retrieve data from an external system:
- In the navigation pane of App Studio, click Data > Data objects and integrations.
- Click the Insurance Policy data object to open it, and then click the Data views tab.
- For the List of policies for contact data view, in the Source column, click Replace source.
- Enter the System details and Connection details. For information, Updating connections and field mappings for a data source.
After you modify the source of the data page, the following fields will be populated from the new source:
- Policy ID
- Policy Type
To customize the policies that are listed for processing, modify the PayableAccountList data transform.
Payment information
The D_Policy_Details data page retrieves the details of the outstanding and upcoming payments for a given policy, and has the following parameter:
- PolicyID - Required parameter for this data page to fetch the details related to a specific policy.
To source the D_Policy_Details data page from an external system, add an external integration source:
- In the navigation pane of App Studio, click Data > Data objects and integrations.
- Click the Insurance Policy data object to open it, and then click the Data views tab.
- For the Policy Details data view, in the Source column, click Replace source.
- Enter the System details and Connection details. For information, Updating connections and field mappings for a data source.
After you modify the source of the data page, the following fields are populated from the new source:
- Installment amount (BillAmount)
- Billing Frequency
- Installment due date
- Minimum payment
- Next satement date
- Outstanding premium
Populating the available payment options
The Make Payment Microjourney has the following out-of-the-box payment options, but you can add more payment options:
- Due amount
- Pay in full
- Other amount
The D_PaymentOptions data page populates the list of available payment options.
Payment information comes from the following fields on this data page:
- PaymentOption – The payment option name, such as Due amount
- pyLabel – Displays the label on the UI with any discounts, if applicable
To modify the discounts for each payment option, customize the SetDiscountsToPaymentOptions data transform and the DetermineDiscountsForPayment decision table.
Extend the PopulatePaymentOptions data transform to add more payment options to this list.
Turn on the ShowAutopayOptions When rule to enable the autopay option.
Payment methods
The default payment methods are Credit card and Bank. Use extension points to add payment methods for different regions, and to save the changes based on user preference.
Populating the existing payment methods for a policyholder
The D_PaymentMethodList data page retrieves the saved payment methods for the policyholder. The data page has this parameter:
- ContactID – Required parameter to get the policies related to a customer.
Modify the PreferredPaymentMethods decision tree to filter the payment methods based on the use case.
To source the data page from an external system, add an external integration source:
Navigate to App studio > Data objects and Integrations > Payment method > Replace source
- In the navigation pane of App Studio, click Data > Data objects and integrations.
- Click the Insurance Policy data object to open it, and then click the Data views tab.
- For the Payment method data view, in the Source column, click Replace source.
- Modify the System details and Connection details fields. For information, Updating connections and field mappings for a data source.
After you modify the source of the data page, the following fields are populated from the new source:
- Contact ID
- Holder name
- ID
- Is default
- Payment mode
- Payment network
- Payment source account
- Payment source type
- Provider name
- Routing number
- Security code
- Status
- Valid to
Adding a new payment method
To update or add payment methods, modify the AddPaymentMethod navigation rule.
To initialize values for the new payment method, extend the SetPaymentMethodDetails data transform.
Modify the existing section rules to support the new payment methods in the user interface:
- AddCardPaymentMethod
- AddBankPaymentMethod
- OtherPaymentMethod
Updating payment preferences
The D_PaymentMethodSavable data page saves the updated payment methods. This data page has the following parameters:
- ID – ID of the payment method to be updated
- Action – Add/Edit/Delete
The D_PaymentMethodSavable data page is saved in the SaveAndUpdate process that is invoked in the post processing of the make payment request.
To extend the payment method removal logic, modify the RemovePaymentMethod activity.
Processing the request
After the Intake stage, the Process request stage processes the user-provided details and then routes that information to relevant parties for necessary action.
To run preprocessing business logic before starting to process the request, modify the PreProcessingProcessRequest rule.
Modify the ProcessRequest flow to add processing business logic for the request. This flow is not utilized if the Microjourney is configured for straight-through processing, meaning that no manual intervention is required to process the case.
To configure post processing business logic that is triggered after the request is processed, modify the PostProcessingProcessRequest flow.
To place a payment request to an external service, configure the ProcessPayment REST connector.
Persisting the request
After all request processing is complete, the case moves to the final resolution stage. The request is saved to the system of record and the corresponding notifications are sent to the customer. The case is processed in one of the following ways:
- Pay Today – An entry is added to the payment schedule table with a payment type of Pay today, meaning that this payment is a one-time payment that can be processed today.
- Schedule a payment – An entry is added to the payment schedule table with a payment type of Schedule payment and the date when the payment will be processed.
- Autopay – If the customer selected the autopay option, an additional entry is pushed to the payment schedule table with the date on which the payment will be processed each month.
The IsSavePaymentSchedule When rule determines whether the above schedule must be saved or not.
Modify the SavePaymentScheduleData data transform to extend and modify the logic.
To customize the resolution behavior, modify the SaveAndUpdate flow.
Notifying the customer
A switch on the Case processing options page determines whether the customer receives a resolution notification. For information, see Configure case processing options.
To change the notification channels, modify the SendResolutionNotification rule.
FAQ
Can I add a new payment method, in addition to the checking and credit card methods?
For information about how to add a new payment method, see the Adding a new payment section of this topic.
Previous topic Change Policy Address Microjourney Next topic Personal Auto Claim - Status Inquiry Microjourney