Report a Death Claim Microjourney
Configure and extend the Report a Death Claim Microjourney™, which is part of the Pega Customer Service™ for Insurance application.
- Business value
- Personas, channels, and use cases
- Self-service example
- Assisted service example
- Straight-through processing use case
- Stages and steps
- Data model
- Extending the Microjourney
Business value
The Report a Death Claim Microjourney enables beneficiaries to easily notify insurance companies about the death of a policyholder and open death claims for multiple life insurance policies with a single interaction. A fast and easy claim process increases net promoter score (NPS).
This Microjourney uses the Pega Email Bot capability to save the insurance company thousands of hours of processing time. When a policyholder's death is reported through a direct email from a beneficiary, the email bot uses optical character recognition (OCR) and natural language processing (NLP) to scan the email content and automatically initiate a death claim.
This Microjourney integrates self-service, front-office, and claims operations to seamlessly process death claims.
Personas, channels, and use cases
The following table shows the personas, channels, and use cases for this Microjourney:
| Persona (Actor) | Channel | Use case |
| Beneficiary | Self-service and assisted service | Report a policyholder's death, and open a death claim on one or more life insurance policies. |
| Customer service representative (CSR) | Interaction Portal | Support customers who want to report a policyholder's death, and open a death claim on one or more life insurance policies. |
Self-service example
Beneficiaries can easily notify the insurance company about the death of a policyholder and open a death claim for multiple life insurance policies by logging into a self-service portal.
The typical flow for this interaction is as follows.
- The beneficiary selects the policy or policies for which they want to open a death claim.
- The beneficiary enters the details of the death, including assignee details where applicable. When the beneficiary submits the information, a claim is opened through an integration with the claims system.
- The system sends an email to the beneficiary to request the death certificate.
- After the beneficiary provides the death certificate, the claims team starts working on the case and processes the claim.
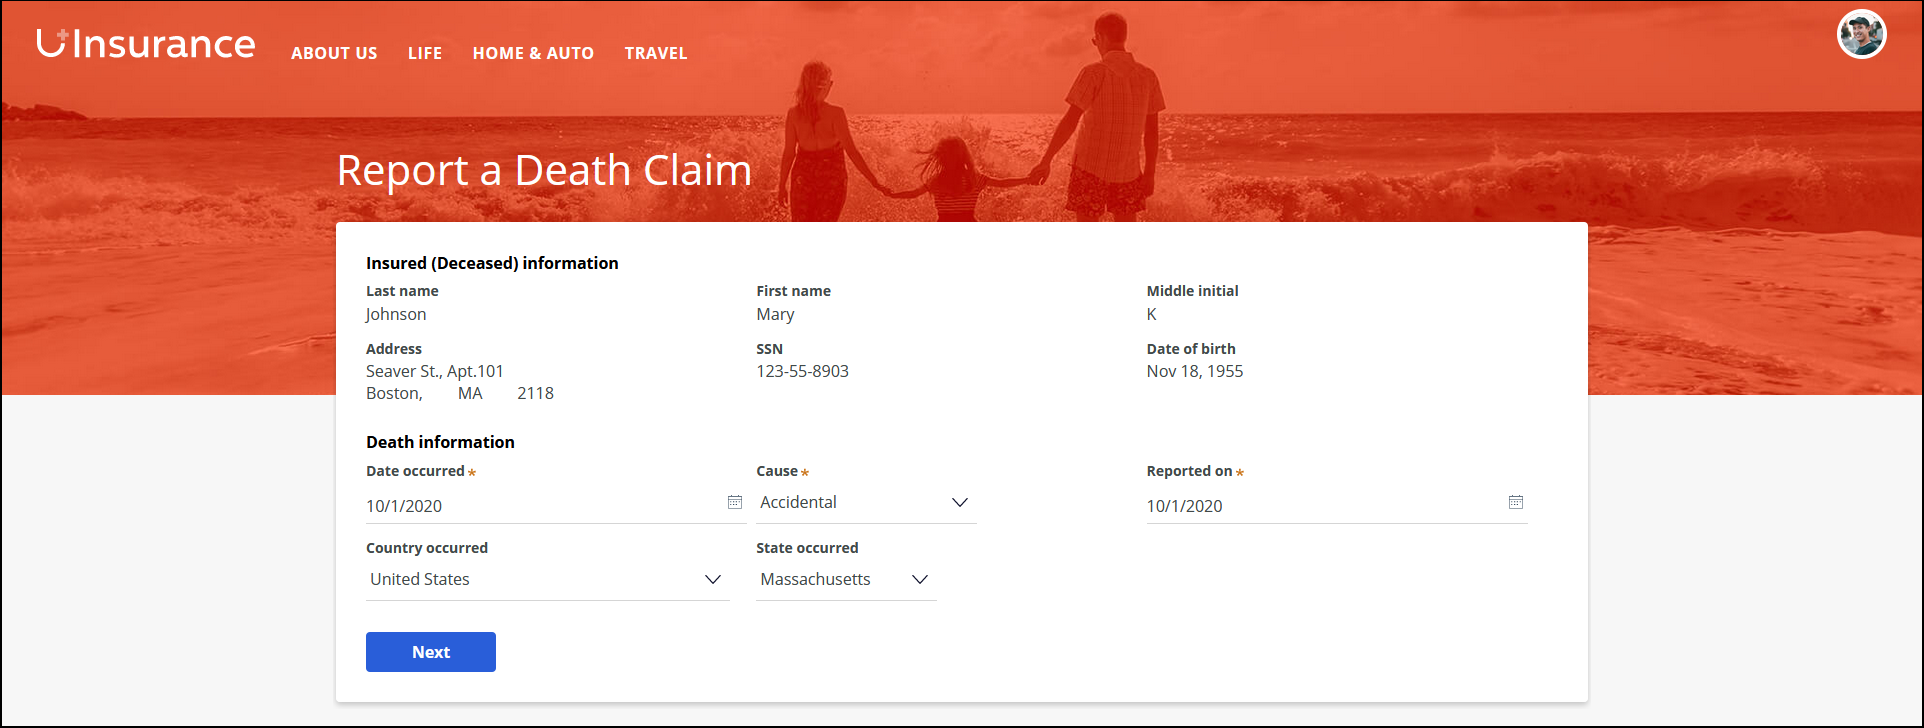
The following figure shows the death claim page for a specific policy in a self-service portal:
Assisted service example
Beneficiaries can easily notify the insurance company about the death of a policyholder and open a death claim for one or more life insurance policies by contacting the customer service team. Pega makes handling the death claim interactions easy for CSRs through a guided process that enables them to service more than one policy within the same interaction.
The typical flow for this interaction is as follows:
- The CSR asks the beneficiary to identify the policy or policies for which they want to open a death claim.
- The CSR enters the details of the death, including assignee details where applicable, and opens a claim through an integration with a claims system.
- The system sends an email to the beneficiary to request the death certificate.
- After the beneficiary provides the death certificate, the claims team starts working on the case and processes the claim.
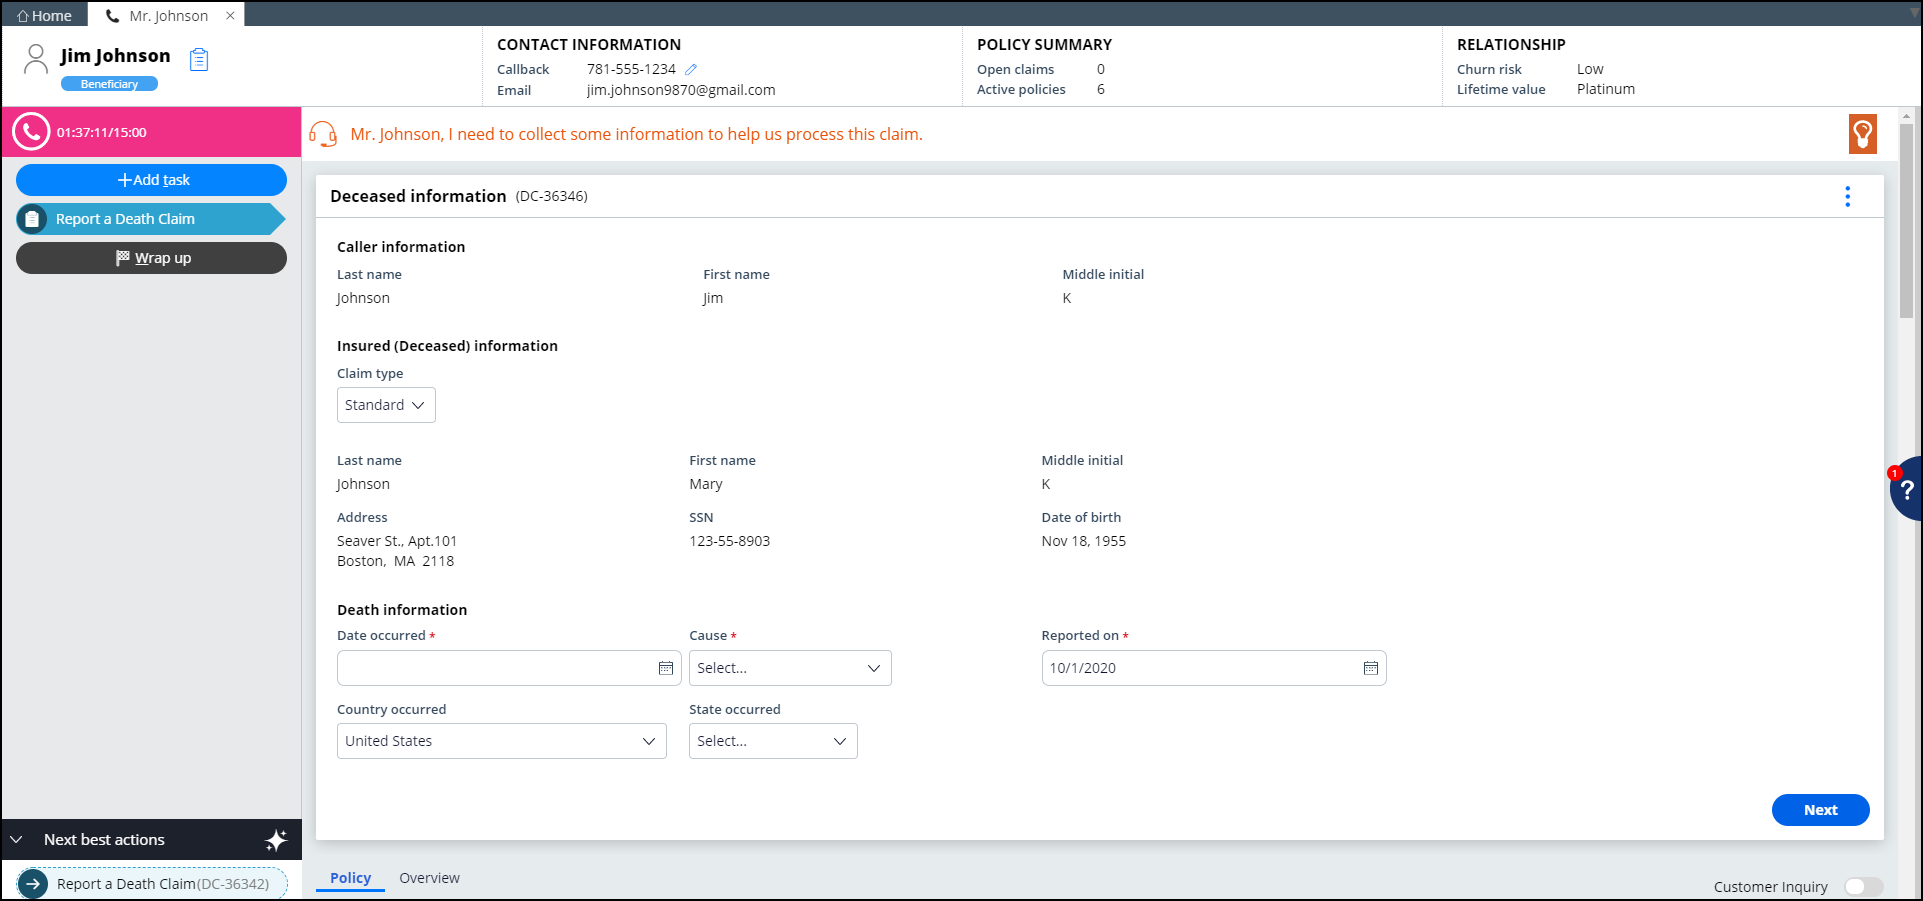
The following figure shows the death claim intake page for a specific policy in the Interaction Portal:
Straight-through processing use case
Instead of using a self-service portal or contacting the customer service team, a beneficiary can send an email directly to the insurance company to report the death of a policyholder. The Pega Customer Service for Insurance Email Bot parses the email and automatically initiates a death claim. Using optical character recognition (OCR) and natural language processing (NLP), the email bot scans key elements in the email, such as the subject, body, and attachment, and then populates the death claim case properties, resulting in substantial cost savings for insurance companies.
You can map email elements to the case properties in your email channel configuration. Then, by using a data transform, you can map the case properties to specific fields in user portals.
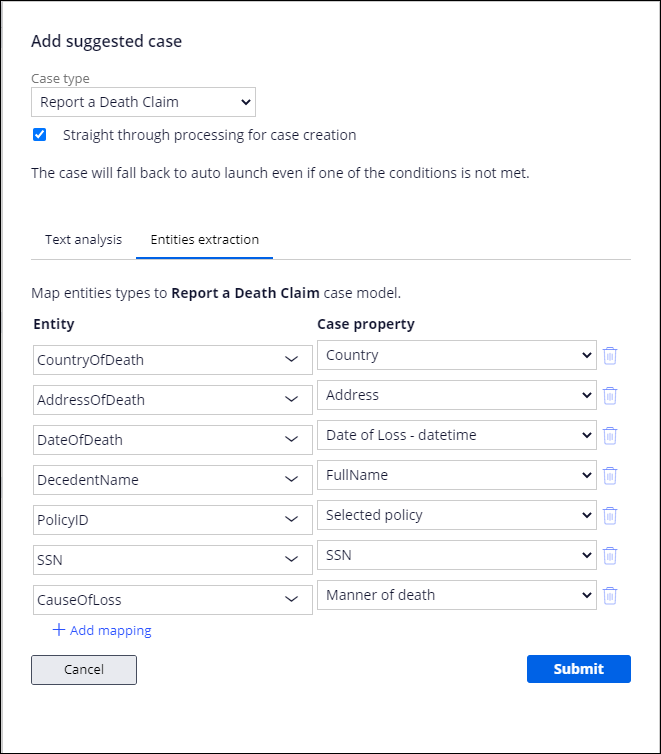
The following figure shows a sample email channel used by the email bot where the Report a Death Claim case type has been configured to derive its properties from mapped fields in the customer email:
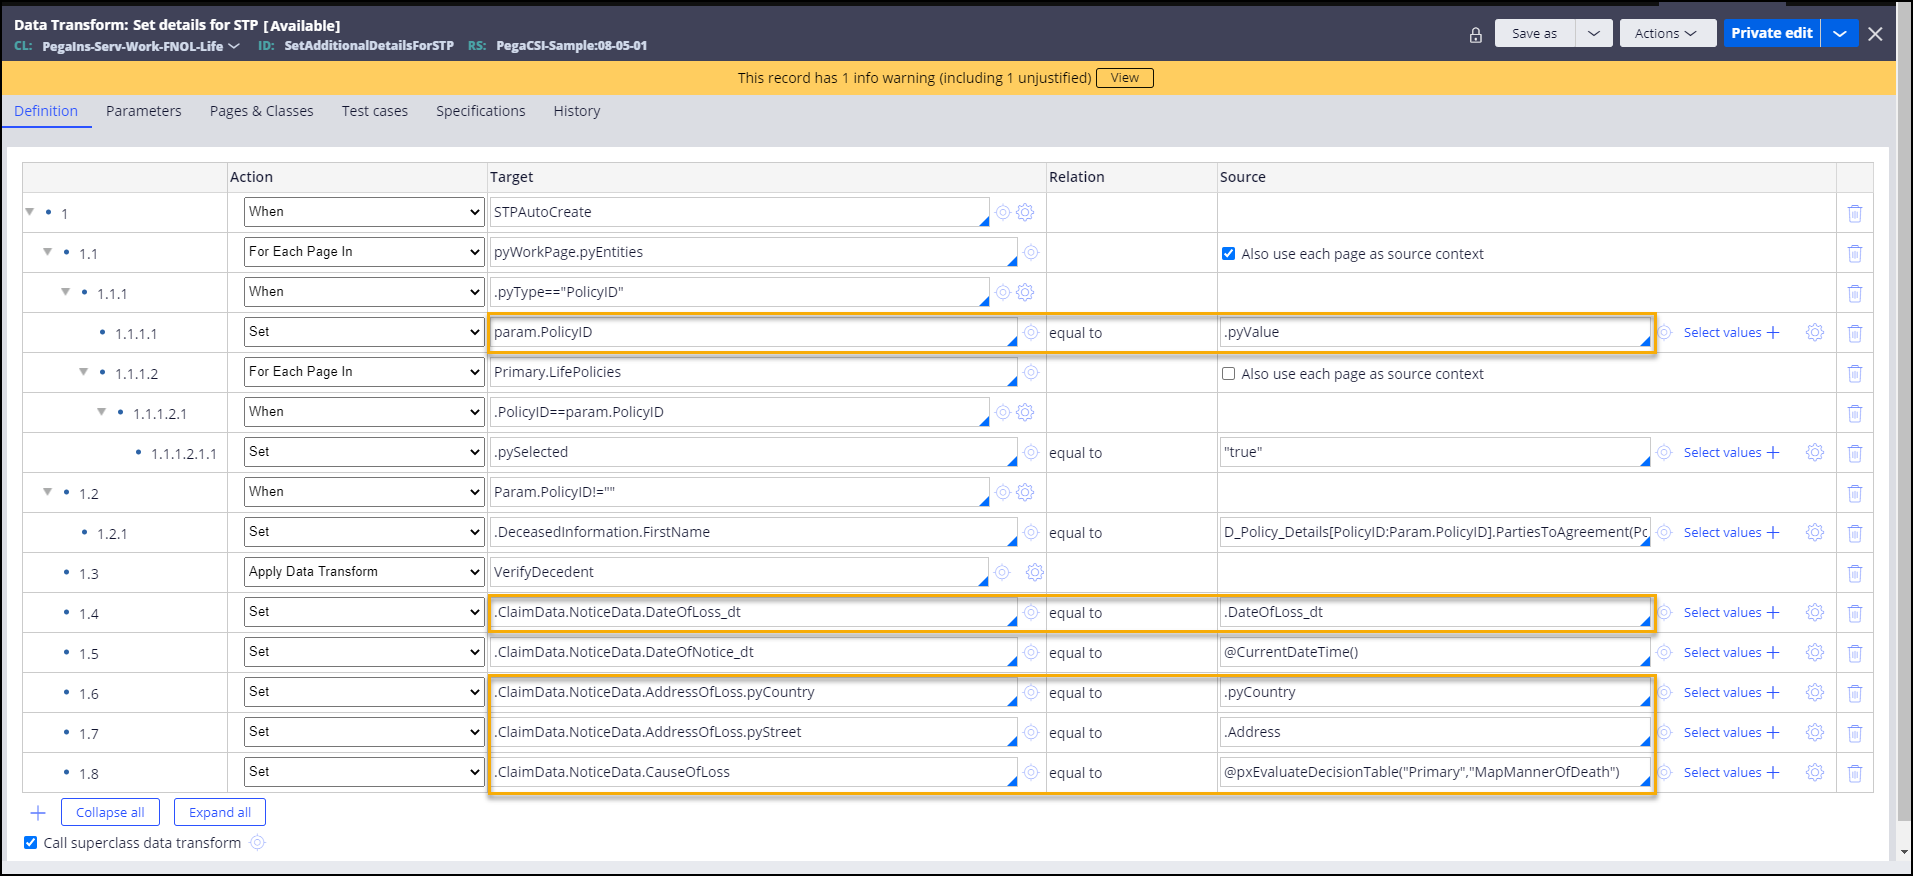
The following figure shows the SetAdditionalDetailsForSTP data transform, where the case properties are mapped to fields in user portals. In this example, the SSN and full name properties are only used for verification purposes and do not need to be displayed in a user portal. Therefore, they are not configured in the data transform.
Stages and steps
The following figure shows the stages and steps in the Report a Death Claim case type designed for this Microjourney:
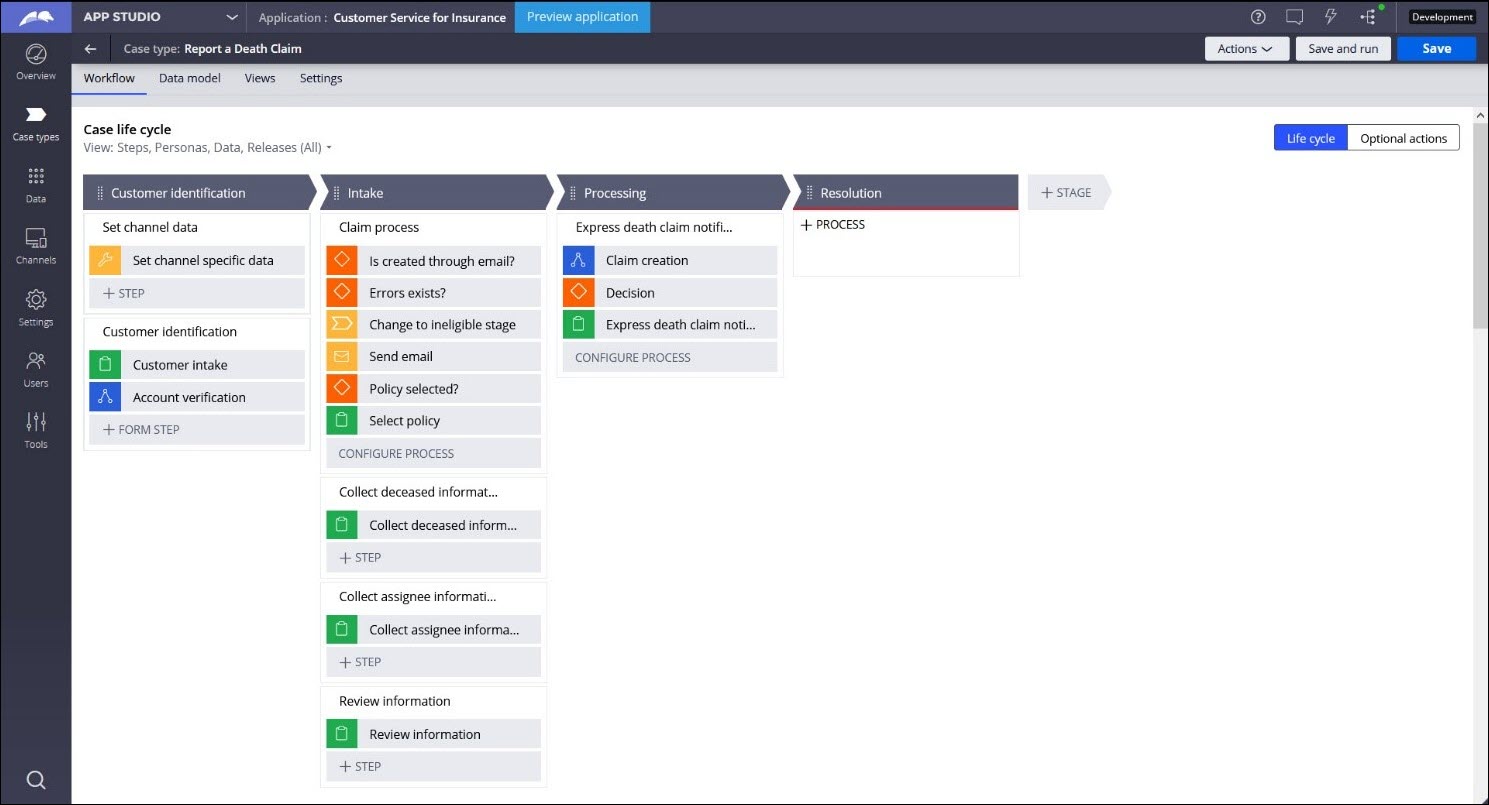
The project team can modify and extend most areas of this Microjourney in App Studio, thereby supporting users to Build for Change®.
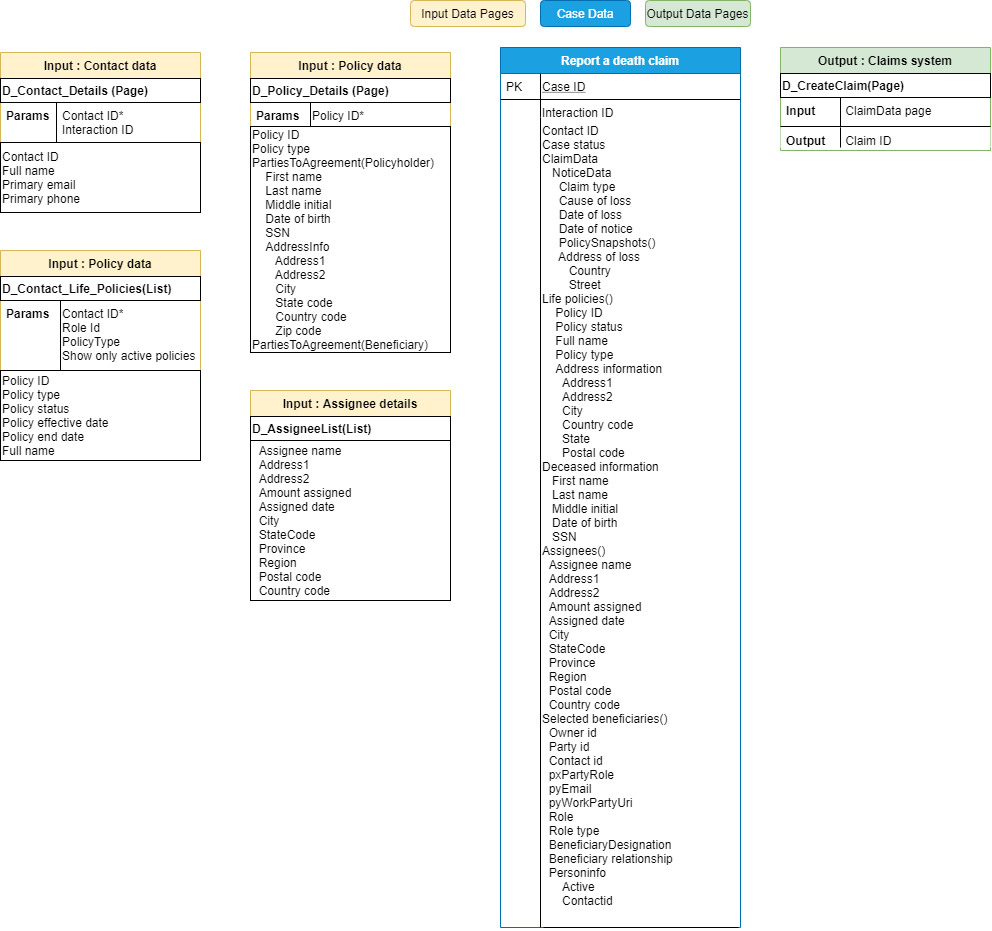
Data model
Use the Data model page in App Studio to view the relationship between all data objects in the application. You can add, update, and delete data objects without exiting the visual data model.
For information about the Data model page, see Data modeling. For information about connecting to external data entities, see Managing data and integrations with the Integration Designer.
The following figure shows the entity relationship diagram (ERD) for this Microjourney. For each data object, the ERD shows only the properties that apply to this Microjourney.
Extending the Microjourney
Extension points make it faster and easier to configure this Microjourney to meet your specific business needs and easier to upgrade this Microjourney in the future. For more information, see Extension points.
The Report a Death Claim Microjourney is designed for common insurance scenarios and enables you to customize the following items:
- Data sources – Use external sources to retrieve policy details and process claims
- Email actions – Map various fields in beneficiary emails to properties in the case type and to relevant fields in user portals
- Claim creation flow – Customize the claim creation process to include additional steps
This section includes steps to update data sources by using both App Studio and Dev Studio. For a data source to be replaceable through App Studio, the following conditions must be met:
- The class associated with the data page must be included in the list of data classes used in the application. If it is not already included, in Dev Studio, click the drop-down list next to the application name, click Definition > Cases & data tab, and add the class to the Data section. If you are not sure about the class name, you can find it in the Object type field in the data page definition.
- The data object name must not exceed 56 characters. The data object name is the label, or the short description, of the class. If the data object name exceeds 56 characters, edit the data source by using Dev Studio.
- The data source must be a simulated one. You can configure this by selecting the Simulate data source check box for the data source in the data page definition in Dev Studio. If you do not want to do this, replace the data source by using Dev Studio.
The following sections provide more information about the extension points in the Report a Death Claim Microjourney:
- Populating beneficiary, policy, and assignee details
- Mapping properties in the straight-through processing use case
- Customizing the claim creation process
- Connecting an external claims system
Populating beneficiary, policy, and assignee details
You can configure the application's data model to fetch policy information, including beneficiary details, from an external data source. The D_Contact_Details, D_Contact_Life_Policies, D_Policy_Details, and D_AssigneeList data pages serve as extension points for this configuration.
Populating beneficiary information
The D_Contact_Details data page retrieves the personal details of the beneficiary.
This data page has the following parameters:
- ContactId – Required parameter to fetch the details of the specific beneficiary
- InteractionId – Optional parameter to maintain interaction-specific contact data
To retrieve the data from an external source, replace the data source of the D_Contact_Details data page:
- In the navigation pane of App Studio, click Data > Data objects and integrations.
- Click the Contact data object to open it, and then click the Data views tab.
- For the Contact details data view, in the Source column, click Replace source.
- Enter the system details and connection details. For more information, see Updating connections and field mappings for a data source.
After you modify the source of the data page, the following fields are populated from the new source:
- FirstName
- MiddleInitial
- LastName
- PrimaryEmail
Populating the policy list
The D_Contact_Life_Policies data page retrieves the list of life insurance policies that are associated with a beneficiary. This list typically includes all active policies for a specific beneficiary with a specific policy type.
This data page has the following parameters:
- CustomerID – Required parameter to fetch details related to that specific beneficiary
- RoleType – Optional parameter to get the list of policies where the customer is a beneficiary
- PolicyType – Optional parameter to get the list of policies with a specific policy type: Whole Life or Term Life
- ShowOnlyActivePolicies – Optional parameter to get the list of active policies
To retrieve the data from an external source, replace the data source of the D_Contact_Life_Policies data page:
- In the navigation pane of App Studio, click Data > Data objects and integrations.
- Click the Life Insurance Policy data object to open it, and then click the Data views tab.
- For the Life policies of contact data view, in the Source column, click Replace source.
- Enter the System details and Connection details. For more information, see Updating connections and field mappings for a data source.
After you modify the source of the data page, the following fields are populated from the new source:
- Policy ID
- Policy type
- Policy status
- Policy effective date
- Policy end date
- Full name
To customize the policies that are listed, modify the UpdateLifePoliciesList data transform. For more information about configuring data transforms, see Configuring a data transform.
Populating policyholder information
The D_Contact_Life_Policies data page fetches a default set of details about each life insurance policy. You can use the D_Policy_Details data page to fetch additional details, including the deceased policyholder's details, from an external source.
This data page has the following parameter:
- PolicyID – Required parameter to fetch details related to a specific policy
To retrieve the data from an external source, replace the data source of the D_Policy_Details data page:
- In the navigation pane of App Studio, click Data > Data objects and integrations.
- Click the Insurance Policy data object to open it, and then click the Data views tab.
- For the Lookup Policy Information data view, in the Source column, click Replace source.
- Enter the system details and connection details. For more information, see Updating connections and field mappings for a data source.
After you modify the source of the data page, the following fields are populated from the new source:
- Last name
- First name
- Middle initial
- Date of birth
- Social Security Number (SSN)
Populating assignee information
The D_AssigneeList data page retrieves a list of assignees to optionally select from. If an assignee is selected, the policy amount is disbursed to the assignee, who then deducts the relevant expenses and remits the remaining amount to the beneficiary.
By default, the D_AssigneeList data page points to the pr_Data_Assignee table, which contains a list of sample assignees. If your workflow uses assignees, select the external source of the assignee data by replacing the data source of the D_AssigneeList data page:
- In the navigation pane of App Studio, click Data > Data objects and integrations.
- Click the Assignee data object to open it, and then click the Data views tab.
- For the List Assignee data view, in the Source column, click Replace source.
- Enter the system details and connection details. For more information, see Updating connections and field mappings for a data source.
After you modify the source of the data page, the following fields are populated from the new source:
- Address1
- Address2
- Assignee name
- City
- Country
- State
- ZIP code
- Assigned amount
- Assigned date
Mapping properties for the straight-through processing use case
To modify the mapping of email fields to case properties in the straight-through processing use case, edit the entity and case properties specified in the Behavior tab for the Report a Death Claim Microjourney in your email channel configuration. For more information, see Setting up entity property mapping.
To modify the mapping of case properties to relevant fields in the user portals, edit the SetAdditionalDetailsForSTP data transform. For more information about configuring data transforms, see Configuring a data transform.
For more information, see Straight-through processing use case.
Customizing the claim creation process
When the CSR or beneficiary submits the details, a claim is created in the claims system. To modify this process, for example, to add an approval process, edit the ClaimCreationProcess flow, seen in the following figure:
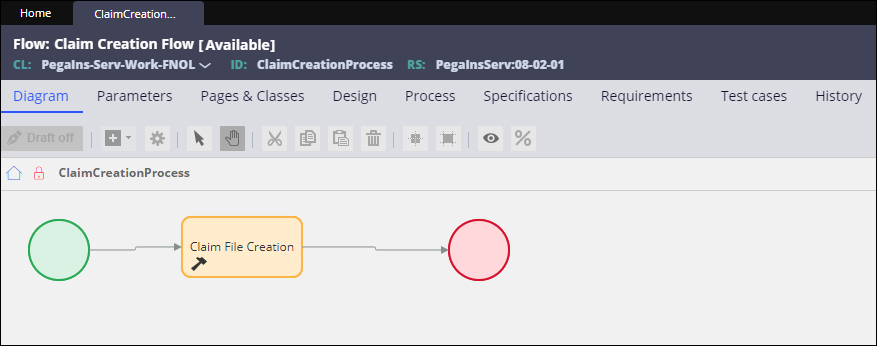
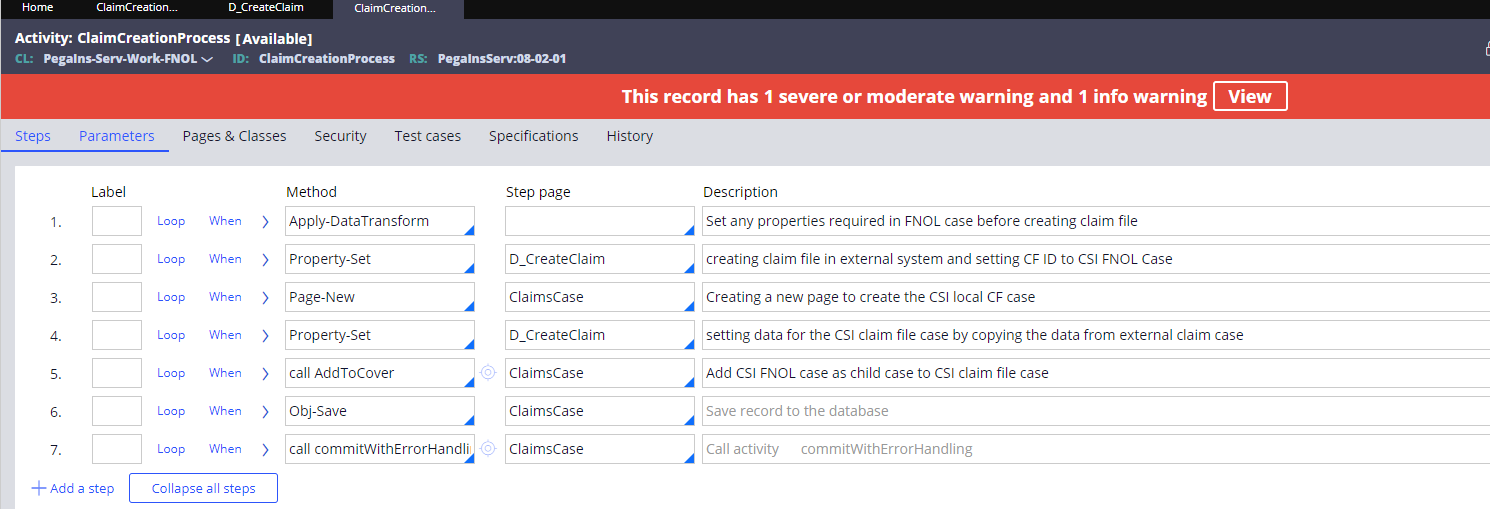
The ClaimCreationProcess flow calls the ClaimCreationProcess activity. This activity first uses the SetDataToCreateClaim data transform to set the required values for claim creation, and then uses the D_CreateClaim data page to create the claim in an external system.
The following figure shows the ClaimCreationProcess activity. You can edit this activity to modify the steps in the claim creation process.
Connecting an external claims system
The D_CreateClaim data page creates claims in the claims system. To connect this data page to your claims system, you can either update the logic of the SetServiceCaseProperties data transform to connect it to your claims system or replace the source of the D_CreateClaim data page.
For more information about configuring data transforms, see Configuring a data transform.
To update the data source for the D_CreateClaim data page:
- In the navigation pane of Dev Studio, go to the Application Explorer, and then search for the PegaIns-Serv-Work-FNOL class.
- Expand the data model for the class, and then navigate to the D_CreateClaim data page.
- Optional: In the data page's Definition tab, in the Data Sources section, replace the existing system name with the name of your claims system.
- In the Source field, select the new source, for example, a REST connector that will update the data in the external system.
After the source of this data page has been modified, the claim is created in the external claims system, and the following fields are populated in the data page from the new source:
- ClaimID
- CFStatus
- AssignedTo
The claim ID is included in the email that is sent to the beneficiary after the claim is created.
Previous topic Policy Loan Microjourney Next topic Surrender Policy Microjourney