Sample Robotic Automation solution: HTML table click
This sample solution shows how to interrogate an HTML table that contains buttons in the data cells and then use the Click event of a table button to retrieve data from a corresponding cell using Pega Robot Studio. The solution also shows how to use the Query parameter of the data cell’s Text property to locate a particular cell value in the table.
Project items
- Web application: Dashboard
- StartPage: http://training.openspan.com/dashboard.html
- For details about interrogating the HTML table that is contained in the web application, see the Steps section
- Windows form: Windows form1
- Automation: Get Cell Value
Automation details
Get Cell Value
This automation provides the logic to display a selected product ID based on the row under the Upgrade History column in which you click the button. The automation also retrieves the value from the Support Plan Charge column when provided with a specific product ID.
This automation is triggered when you click a button in the Upgrade History column of the OpenSpan Dashboard HTML table. The automation then returns the value of the Product ID cell from the row in which the View button was selected.
Next, if you click the button on the Windows form, the value from the Support Plan Amount column is returned for the corresponding product ID. The automation uses the Query parameter of the DataCell control’s Text property to find the Support Plan Amount that corresponds to the specified product ID. The query syntax is “dataCell_ProdID=@dataCell_ProdID” as displayed in the following image:

The resulting connection block is displayed in the following image:

Note that the at sign (@) prefix creates a parameter for the Query. The product ID from the Windows form text box is used for the Query parameter. The resulting text for the dataCell_SuppoprtPlanChange is output to a label on the Windows form.
After you have set the query, you can add an event that triggers if the item searched for by the query is not found. Highlight and right-click the dataCell_SupportPlanChange connection block, then select Handle KeyNotFoundException.

When you select this option, a new event output is added to the connection block as displayed in the following image:

You can then connect this event to another control to handle the situation where the query input is not found. In the sample solution, the event is connected to a MessageDialog that displays this text: Item not found.
Steps
- Set the StartPath property for the web adapter to: http://training.openspan.com/dashboard.html
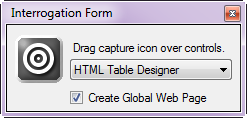
- Start the Interrogator. On the Interrogation Form, select the Create Global Web Page option.
- On the Interrogation Form, select HTML Table Designer as the interrogation option.
- Drag the bullseye over the table to under the Upgrade Summary heading.
- Select the first of the two Table HTML tags.
- The table opens in the HTML Table Designer. Highlight and right-click the first row of cells, then select Define Match Cell(s).
- Select and right-click the second row of cells, then select Define Table Section.
- Select and right-click the row of cells in the TableSection1, then select Define Data Cell(s).
- Click Apply Changes. The rest of the cells in the table are matched as repeating data cells in TableSection1.
- Click .
- Select the first MatchCell that is listed in the Table Schema matchCell1. In the Properties grid, rename the control so it reflects the contents, which in this case is Product ID. In the provided sample solution, the cell was renamed: matchcell_ProdID.
- Repeat this process for the rest of the match cell controls.
- Select the first DataCell that is listed in the table section of the table schema and rename it to reflect its contents. In the provided sample solution, the cell was renamed: dataCell_ProdID.
- Repeat this process for the rest of the data cells in the table section.
- Apply the changes and save the schema, then exit the HTML Table Designer.
- Return to the Interrogation Form and change the setting to Default.
- Interrogate the first button that is listed in the Upgrade History column.
This completes the interrogation process. Your Object Explorer should resemble the following image. Make sure that the button is added under the tableSection1:

You can download completed solutions for each version in the following table:
| Studio version | Built by using this build | Sample solution download |
|---|---|---|
| 8.0 | 8.0.1037 | HTML Table Click Example 8.0 |
| 8.0. SP1 | 8.0.2037 | HTML Table Click Example 8.0 SP1 |
| 19.1 | 19.1.2.0 | HTML Table Click Example 19.1 |
Previous topic Sample Robotic Automation solution: HTML grid to Excel Next topic Sample Robotic Automation solution: xmlDocumentComponent