Integrating Pega Sales Automation with Gmail by using the Chrome extension
Pega Sales Automation™ provides a Pega for Google Chrome extension so that you can boost sales productivity and bring more efficiency to the entire process. As a Gmail user, you no longer have to leave Pega Sales Automation in order to see Gmail insights in your explorer view.
The Pega for Google Extension supports the following features:
- Single sign-on (SSO) – after you log in to the extension side panel for the first time, you can access it from any other device, without re-entering your login credentials.
- Pinnable task pane – when you switch between messages, you can leave the extension side panel open in your mailbox.
Use the Pega for Google Chrome extension to perform the following actions:
- Search, open, and display Pega Sales Automation leads, contacts, opportunities, organizations, and accounts.
- Associate emails or appointments with contacts, leads, opportunities, organizations, and accounts.
- Create contacts, leads, opportunities, activities, and tasks.
Prerequisites
To integrate Pega Sales Automation with Gmail, perform the following steps:
- Install Pega for Google Chrome extension
- Configure extension options
- Configure Google Identity services
- Configure Pega Sales Automation
Installing Pega for Google Chrome extension
- Open the Chrome Web Store and search for the Pegasystems extension.
- Click .
If you are a Google administrator, you can install the Pegasystems extension for multiple users by searching for automatically installing apps and extensions or managing extensions in your enterprise in the Google Chrome Enterprise Help documentation. For more information, search for Chrome policy management in the Google Chrome Enterprise Help documentation.
For Microsoft Windows users, you can update the policy in the Extension Settings or Individual Policy (ExtensionInstallForcelist). The Extension Settings policy overrides the Individual Policy. For more information, refer to the suggested articles in the Google Chrome Enterprise Help documentation listed above.
For Mac users, to update the policy, use the mcxpreference setting in the configuration profile, or individual policy plist settings in the managed preferences. For more information about how to install extensions for multiple users and Google Chrome policy management, see the ExtensionInstallForcelist section in the Policy List article on The Chromium Projects webiste.
After the process is complete, a button for the Pega for Google extension displays in the top-right corner of the Chrome menu bar, with any other existing extension buttons.
Configuring extension options
- Open Chrome and then open the Pega for Google extension.
When you open the extension for the first time, the configuration panel displays.
- Choose either the Default or Custom authentication type.
- Default authentication uses Google Identity services to log in. After you log in with your credentials and approve the terms and conditions, your Google account is associated with your Pega user account.
- Custom authentication is recommended for enterprise purposes.
- Depending on the authentication type, in the Environment field, enter your environment in the following format:
- For default: https://*****.******.***/prweb
- For custom: https://*****.****.***/****/SSO
- Leave the check box cleared.
- Optional: To configure authentication settings for multiple users, complete the following steps:
- For Microsoft Windows users, push registry entities by using the GPU.
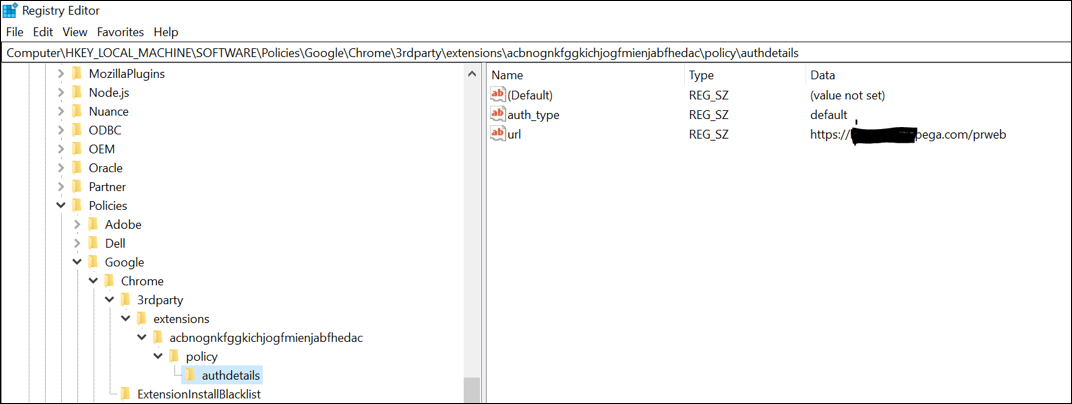
Viewing the auth details for Microsoft Windows For more information, refer to the Configuring Apps and Extensions by Policy topic in the documentation for administrators on The Chromium Projects website.
For Mac users, use the plist file or a configuration profile. Add the following code to the plist file.
<?xml version="1.0" encoding="UTF-8"?>
			<!DOCTYPE plist PUBLIC "-//Apple//DTD PLIST 1.0//EN" ""http://www.apple.com/DTDs/PropertyList-1.0.dtd"><plist version="1.0">
			<dict>
			<key>com.google.Chrome.extensions.acbnognkfggkichjogfmienjabfhedac</key>
			 <dict>
			  <key>authdetails</key>
			  <dict>
			      <key>state</key>
			      <string>always</string>
			      <key>value</key>
			        <dict>
		              <key>auth_type</key>
			          <string>Default/Custom</string>
			          <key>url</key>
			          <string>https://****.***.pega.com/prweb</string>
			        </dict>
		        </dict>
			  </dict>
			</dict>
			</plist>
For more information about the quick start with Chrome browser on Mac, see the documentation provided on the Google Chrome Enterprise Help.
- For Microsoft Windows users, push registry entities by using the GPU.
Configuring Google Identity services
- Open https://console.developers.google.com and log in as an administrator.
- Click Menu > APIs & Services > .
- Select an existing project or create a new project, and then open it.
- In the navigation panel, click and then search for and enable the Gmail API and Calendar API.
- In the navigation panel, click and select Create credentials > OAuth client ID.
- Optional: If you are logging in for the first time, configure the consent screen by performing the following steps:
- Choose an application type.
- Add the following scopes:
- https://www.googleapis.com/auth/gmail.readonly
- https://www.googleapis.com/auth/calendar.events
- https://www.googleapis.com/auth/calendar.readonly
- https://www.googleapis.com/auth/gmail.modify
- https://www.googleapis.com/auth/gmail.compose
- https://www.googleapis.com/auth/gmail.labels
If the scope is set to public, then these scopes are validated by the Google team to verify client IDs.
- In the Authorized domains field, enter your private domain.
- Add your organization's homepage and privacy policy links.
For a public application type, this information goes through a verification process.
- Save the form and then click .
- On the OAuth client ID page, perform the following steps:
- Select a Web application application type.
- Enter the name of your application.
- Enter the authorized JavaScript origins and authorized redirect URLs.
- Click .
The system generates the client ID and client secret code. Use the client ID for Google Identity services authentication.
Configuring Pega Sales Automation
- In App Studio, click Settings > Application Settings.
- On the tab, in the section, paste the client ID that you generated as part of the Configuring Google Identity services task.
- Optional: Ensure that the D_LoadAuthorizationConfig data page has the same client ID as the GoogleClientID dynamic system setting. If not, remove this data page and start again from the Configuring Google Entities task.
- In Dev Studio, add the GmailExtension portal to the available portal's list.
- Optional: If you are using the default authentication type, add the servlet entry to the web.xml file to support the Google Identity sign-in process.
<servlet> <servlet-name>GmailExtension</servlet-name> <display-name>GmailExtension</display-name> <description>Internet Application Composer, using custom authentication techniques</description> <servlet-class> com.pega.pegarules.internal.web.servlet.WebStandardBoot </servlet-class> <init-param> <param-name>PegaEtierClass</param-name> <!-- COMPONENTS: This was previously com.pega.pegarules. services.HttpAPI --> <param-value> com.pega.pegarules.session.internal.engineinterface. service.HttpAPI</param-value> </init-param> <init-param> <param-name>AuthenticationType</param-name> <param-value>PRCustom</param-value> </init-param> <init-param> <param-name>RuntimeServletName</param-name> <param-value>GmailExtension</param-value> </init-param> <init-param> <param-name>AuthService</param-name> <param-value>GmailExtensionService</param-value> </init-param> </servlet> <servlet-mapping> <servlet-name>GmailExtension</servlet-name> <url-pattern>/GmailExtension</url-pattern> </servlet-mapping> <servlet-mapping> <servlet-name>GmailExtension</servlet-name> <url-pattern>/GmailExtension/*</url-pattern> </servlet-mapping>
- Optional: If you are using the custom authentication type, perform the following steps:
- In the header of Dev Studio, search for and select the GmailExtension.js text file and find the following lines:
var snapstartURL = prpcURL.concat("/prweb").concat("?pyActivity=").concat("Data-Portal.OutlookViewInBrowser");var clientURL = prpcURL.concat("/prweb").concat("?pyActivity=").concat("Data-Portal.OutlookViewInBrowser&outlookWO=" +insHandle); - Add your custom servlet in each line based on the following example:
var snapstartURL = prpcURL.concat("/prweb/SSO").concat("?pyActivity=").concat("Data-Portal.OutlookViewInBrowser");var clientURL = prpcURL.concat("/prweb/SSO").concat("?pyActivity=").concat("Data-Portal.OutlookViewInBrowser&outlookWO=" +insHandle. - Click .
- In the header of Dev Studio, search for and select the GmailExtension.js text file and find the following lines:
Previous topic Integrating Pega Sales Automation 7.31 and 7.4 with Microsoft Outlook by using the Pega for Outlook Office add-in Next topic Pega Sales Automation modified rules for BAC prevention (7.4-8.3)