Using the Rule Security Mode Utility to secure rules in Pega applications
+
This content applies to On-premises, Client-managed cloud and Pega Cloud environments
You can make Pega Platform™ more secure by using the Rule Security Mode Utility. Security administrators can use this convenient tool that is included in the latest versions of Pega Platform to establish authentication rules, which you can then use to automatically assign role-based access privileges to specific users. To configure the tool as described in this article, your application must be running one of the following patch or minor versions of Pega Platform:
- Pega Infinity patch versions: 8.1.9, 8.2.7 or later, 8.3.4 or later, 8.4.2 or later;
- Pega Infinity minor versions: 8.5.x or later;
- For the Pega Platform 7.x series, contact GCS.
Pega application security
Pega takes application and system security extremely seriously.
Each successive release of Pega Platform has augmented the security features and capabilities that are available to harden applications and systems against improper access, and designed to protect the data that those applications manage.
The best way to ensure you utilize the full suite of Pega’s offerings is to be on Pega Infinity – our Pega 8.x release.
Rule Security Mode (RSM) Utility background
One of the important steps in securing your application is to verify that users cannot run rules which they are not authorized to run. Pega provides a powerful and precise set of tools to help you specify exactly how much access is allowed to each individual user.
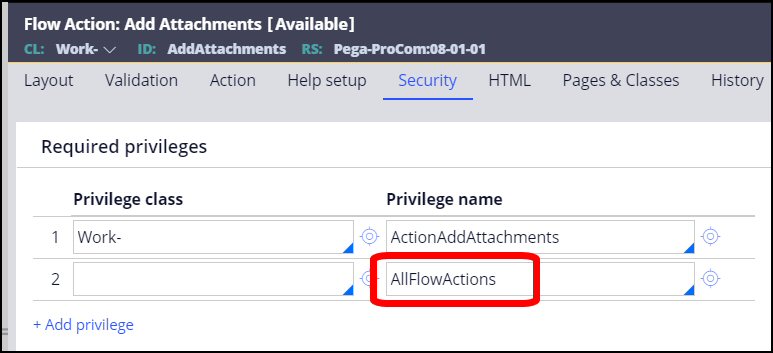
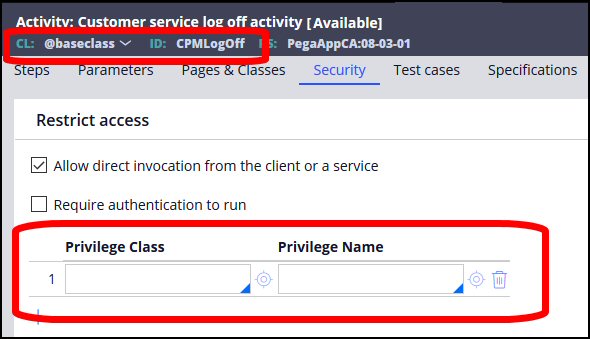
Several rule types in Pega Platform, such as activities, flows, report definitions, and others, allow you to specify privileges on the Security section of the rule form. These explicit privileges can then be assigned to rules and granted to users’ access roles.
It is Pegasystems leading practice to design applications from the ground up with appropriate access control, using privileges and roles.
However, if you have an existing application that was not initially designed with security in mind, applying privileges and roles can be a daunting task if you have thousands of users, and are using applications with thousands of rules.
Therefore, starting in version 6.3, Pega provided the Rule Security Mode (RSM) Utility to:
- verify that users don’t have unauthorized access to applications
- set role privileges automatically, creating “implicit” privileges
The Rule Security Mode Utility is not meant to be used in place of thoughtful design, but can help secure your existing applications.
You should use this utility to fully secure and harden your applications.
Quick review of Pega access security
There are a number of rules involved in Pega access security:
Each authorized user has an Operator ID.
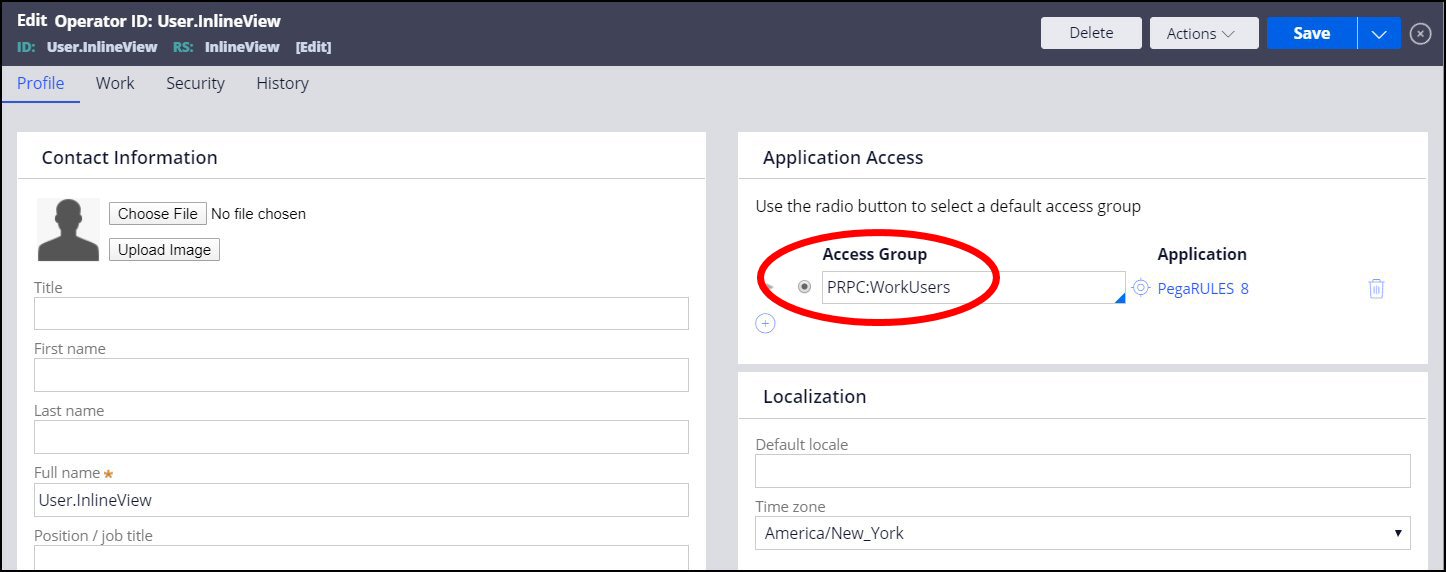
The Operator ID is assigned to at least one Access Group(s).
The Access Groups contain Roles.
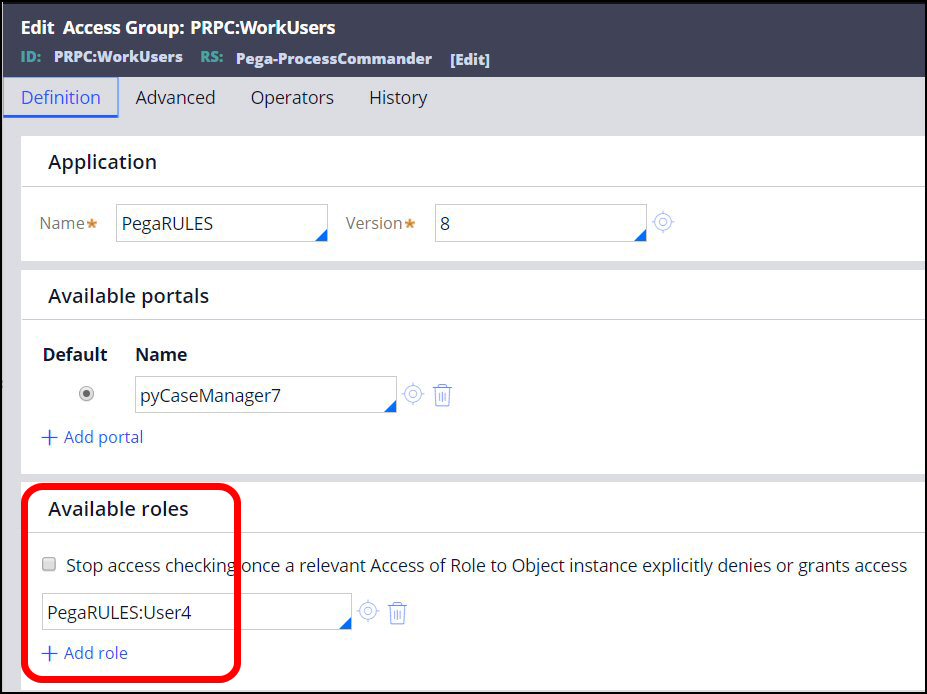
The Roles are assigned Privileges.
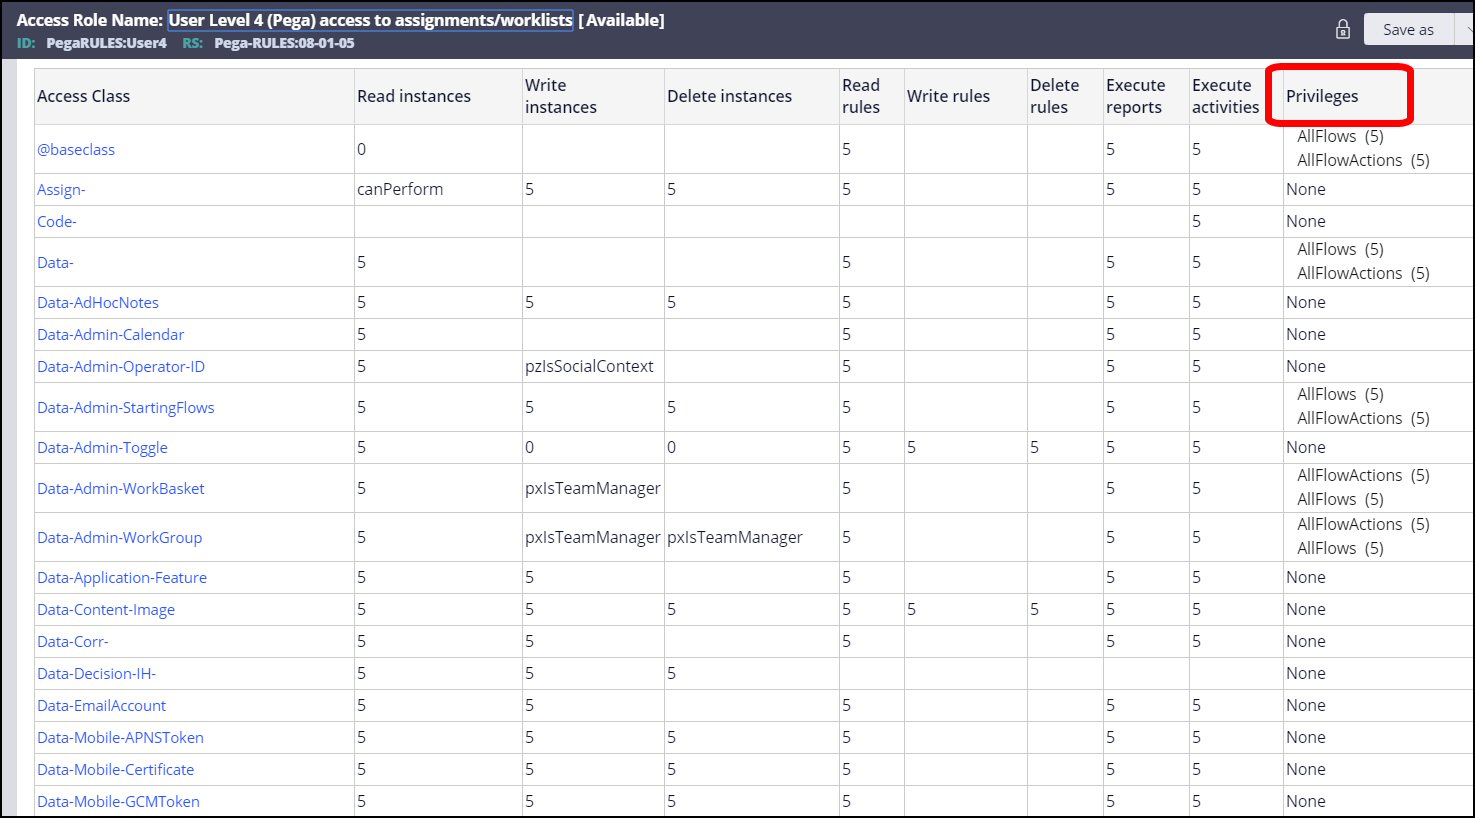
This assignment is done based on the classes in the application. For each class, there can be an Access of Role to Object rule, which assigns the privileges to the role for that class.
These rules are in the class Rule-Access-Role-Obj, sometimes known as RARO.
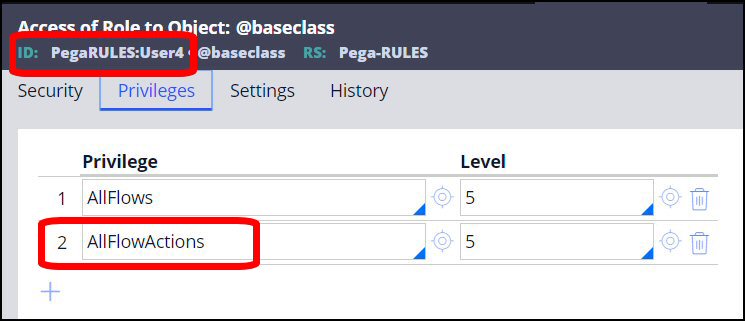
The privileges shown above are explicit privileges, and are assigned on rules.
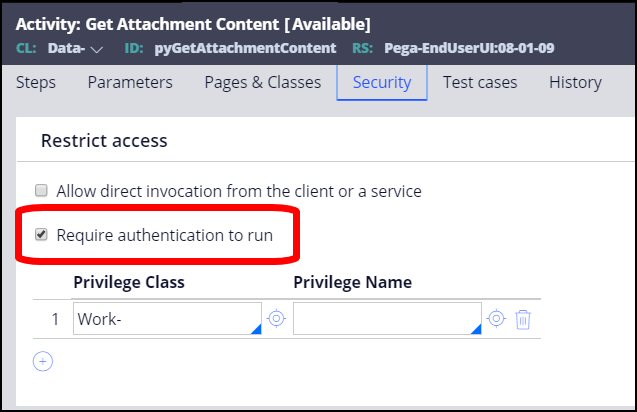
In addition to the privileges, there are added protections available for activities, which state that they require authentication to run, meaning unauthenticated users – users who are not properly logged into the system - cannot run them. All activities should require authentication, with the exception of a few activities which will need to be run by users who are not yet authenticated, as part of the process of authenticating when logging into or logging out of the system.
Goal of the Rule Security Mode Utility
The goal of the Rule Security Mode Utility procedure is to determine which rules in your application can be run by which user groups, and to automatically assign implicit privileges for those rules and grant them to those users. Implicit privileges are only created by this utility; when users are logged into the application in a production environment, these implicit privileges grant permission for the user to execute these rules, and prevent them from executing rules where privileges are not assigned.
Assigning the implicit privileges is done by turning on "logging" of the application functionality (by setting the Rule Security Mode field to Warn in the form), and then having users run the application as normal, using all the functionality they normally use, to determine which rules are called. The Rule Security Mode utility provides implicit privileges for those rules.
Setting role privileges
These tasks should be performed by Security Administrators, who need to be granted the OpenDeveloperForm privilege to run this utility.
1. Run this procedure in the lower environments (DevTest, Staging). The privileges created there are defined on the Access Roles.
There are procedures for two types of users:
- Unauthenticated users (all users before they log in)
- Authenticated users (users who have successfully logged in with their userID and password)
As the procedure has many steps, there is also an Overview and then Detailed Steps for each user type.
2. Once the procedures for both types of users are run in the lower environments, migrate these changes to the production environment.
Lower environment: Unauthenticated users
The lower environments are the environments where most development and testing are done, such as DevTest or Staging.
Before users log into a Pega application, they are unauthenticated, because the user has not yet logged in and been approved. As described at the end of the Quick Review section, there are a few activities which need to be run during the login process for unauthenticated users; there are also some activities that may be run as part of the logout process, when users are no longer authenticated.
In the latest Pega Infinity version of this utility, some implicit privileges have been included in the PegaRULES:Guest role, which is for all unauthenticated users. However, to verify that unauthenticated users cannot run activities other than the few that are appropriate, Pega strongly recommends that you create an RSM_Unauthenticated role, and run the Rule Security Mode Utility for the Unauthenticated Access Group for your application.
IMPORTANT: You must run this procedure for the Unauthenticated rules before the Authenticated procedure. Since the users are unauthenticated, you cannot limit the utility by a userID, meaning that if there are WARN messages for other rules in the log file, the unauthenticated users will be given implicit privileges for those rules. Be very careful to only provide implicit privileges for the rules an unauthenticated user should have access to.
Overview steps
These Overview steps provide a quick checklist of how to set role privileges for unauthenticated users. Details for each step are in the following section.
- Verify that you have downloaded and installed the hotfix for this utility.
- Provide an open RuleSet.
- Set the Rule Security Mode field to Warn for the Unauthenticated Access Group for the application.
- Note the date and time before beginning your testing.
- Have testers run all the login and logout work flows in the application.
- Review the PegaRULES log for WARN messages.
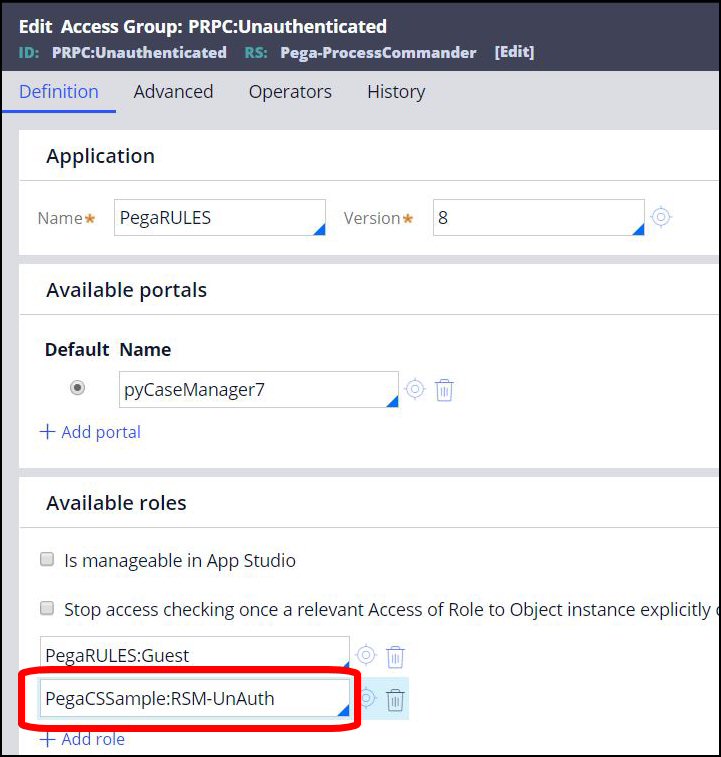
- Create a role for the Unauthenticated Access Group.
- Add the RSM_Unauthenticated role to the Unauthenticated Access Group.
- Run the activity pyRuleExecutionMessagesLoggedfor the RSM_Unauthenticated role.
- Review the proposed changes.
- Commit the changes.
- Repeat steps 4 – 11 until no warnings show in the PegaRULES log.
- Set Rule Security Mode field to Denyin the Unauthenticated Access Group.
- Have testers run all the login and logout work flows in the application.
- If errors occur, check the AlertSecurity log for information and re-run utility.
Detailed steps
The Detailed steps below provide a comprehensive description of each part of the procedure for setting role privileges for unauthenticated users.
1. Verify that you have downloaded and installed the hotfix for this utility.
2. Provide an open RuleSet.
There are a number of changes to Rule- and Data- instances in this procedure that must be saved. Provide an open RuleSet for these changes, by:
- creating a new RuleSet for these security changes, or
- using an existing open RuleSet, or
- opening an existing RuleSet
3. Set the Rule Security Mode field to Warn for the Unauthenticated Access Group.
In each access group, on the Advancedtab, there is a field called Rule security mode. This field has three values:
- Allow
- Warn
- Deny
Allowis the “open” setting, and will allow any user in this access group to use the available rules (rules that do not require a privilege to run).
Warnis to be used as a recording mechanism. It keeps track of all the rules requested by the users, and writes a warning message to the PegaRULES log for any rule which has no privileges specified.
Denywill deny execution for any rule for which the user has no privileges (implicit or explicit) specified, and writes an error message to the PegaRULES log.
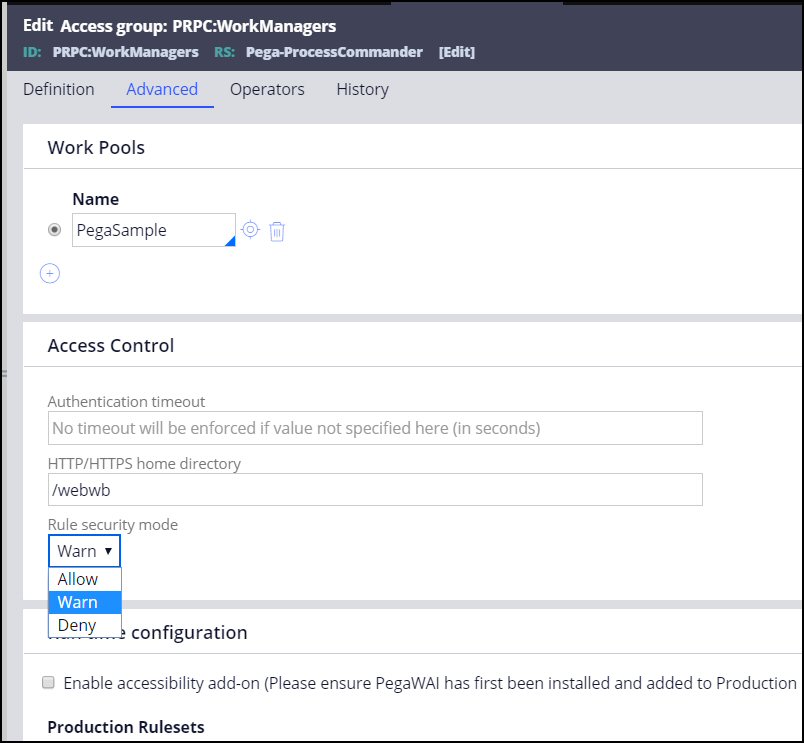
In this procedure, the eventual goal is to set the value to Deny. However, first, it is necessary to determine which rules users need to access for their work in the application, so the WARNvalue must be set to track this information and write it to the log.
There are a number of Unauthenticated access groups available for Pega applications. Examples:
- PegaCRM:Unauthenticated
- PegaCRM-SFA:Unauthenticated
- PRPC:Unauthenticated
In the Unauthenticated access group for your application, set Rule Security Mode to WARN and save that change.
4. Note the date and time before beginning testing.
There are several parameters for the Rule Security Mode utility (explained in Step 9). One of the parameters that will be used in the Authenticated procedure is the UserID, but for Unauthenticated users, they haven’t been connected to their UserID yet (as they are Unauthenticated). Therefore, to make sure that the Unauthenticated users are only given implicit privileges for the few rules which apply to them, you must run this procedure for the Unauthenticated rules first, before the Authenticated procedure. To provide further control, you will limit the utility to the date and time of the Unauthorized testing only.
Before beginning testing, carefully note the date and time.
5. Have testers run all the login and logout work flows in the application.
Once the Rule Security Mode is set to Warn, it is important to have testers go through all the login and logout processes, including items such as “Forgot Password?” This will determine all the rules that your unauthenticated users need to access. The point of this part of the procedure is to generate Warnings for each unrestricted rule that is used when users are logging in or out of the system. If your testers miss an infrequently-used case, your end users may find they don’t have access to do things like reset their password after the system has been hardened.
6. Review the PegaRULES log for WARN messages
After the testing is complete, review the WARN messages in the PegaRULES.log file. (If you are limiting the start and end times in the utility, that information should be determined from the log.)
Below is an example of WARN messages in the log. Each entry for this procedure contains the following information:
- The application where the message was generated (“PegaCSSample”)
- The userID and WARN setting (“CACSR – RuleSecurityModeWarn:RuleExecutionPermitted”)
- The class, type, and name of the rule which is generating the warning (“Rule-Obj-Activity:Code-Security.PZSHOWFORGOTPASSWORD”)
- The RuleSet and version that contains the rule (“PegaRulesEngine 08-01-01”)
2020-06-17 16:06:28,052 [http-nio-8080-exec-4] [ STANDARD] [ ] [ PegaCSSample:01.01.01] ( internal.mgmt.Executable) WARN 10.60.215.187|10.2.202.42 - RuleSecurityModeWarn:RuleExecutionPermitted PZSHOWFORGOTPASSWORD Code-Security Rule-Obj-Activity:Code-Security.PZSHOWFORGOTPASSWORD Pega-RulesEngine 08-01-01 2020-06-17 16:06:45,903 [http-nio-8080-exec-7] [ STANDARD] [ ] [ PegaCSSample:01.01.01] ( internal.mgmt.Executable) WARN 10.60.215.187|10.2.202.42 - RuleSecurityModeWarn:RuleExecutionPermitted PZVALIDATEOPERATORANDSENDOTP Code-Security Rule-Obj-Activity:Code-Security.PZVALIDATEOPERATORANDSENDOTP Pega-RulesEngine 08-01-01 2020-06-17 16:07:36,070 [http-nio-8080-exec-6] [ STANDARD] [ ] [ PegaCSSample:01.01.01] ( internal.mgmt.Executable) WARN 10.60.215.187|10.2.202.42 - RuleSecurityModeWarn:RuleExecutionPermitted ENDSESSION Code-Security Rule-Obj-Activity:Code-Security.ENDSESSION Pega-RULES 08-01-01
7. Create a RuleSecurityMode role for the Unauthenticated Access Group.
For your Unauthenticated Access Group, create a Rule Security Mode (RSM) Access Role Name for your application (saving it into the open RuleSet), which will be used for the implicit privileges.
Suggested naming structure: <ApplicationName>:RSM_<AccessGroup> (this naming structure is explained in the Authenticated user section below)
Example: SampleApp:RSM_Unauthenticated
8. Add the RSM_Unauthenticated role to the Unauthenticated Access Group.
9. Run the activity pyRuleExecutionMessagesLogged for the RSM_Unauthenticated role.
In the navigation of Dev studio, click , then select pyRuleExecutionMessagesLogged activity.
Use the version which is in the Pega-LP-ProcessAndRules RuleSet.
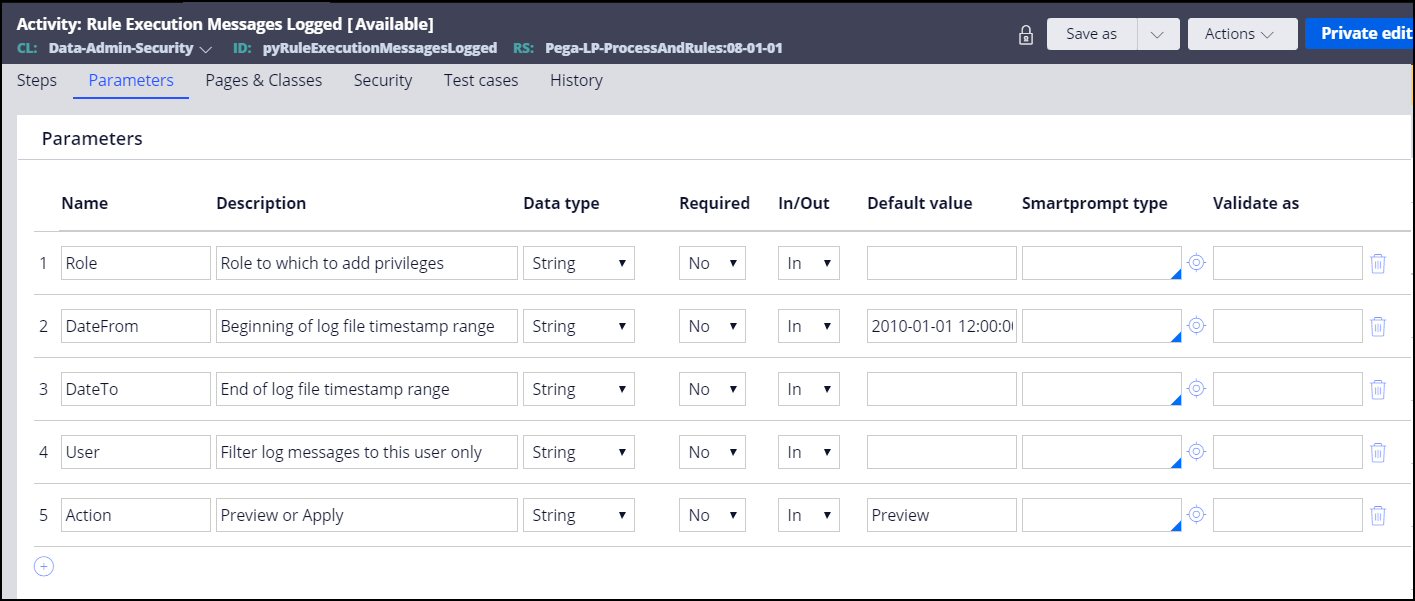
There are several parameters for this activity, including the Role. This activity will process the Warn statements in the PegaRULES log file and create privileges for the rules which were flagged, based on the specified user.
From the Actions drop-down menu, choose Run.
The Run Activity screen will display:
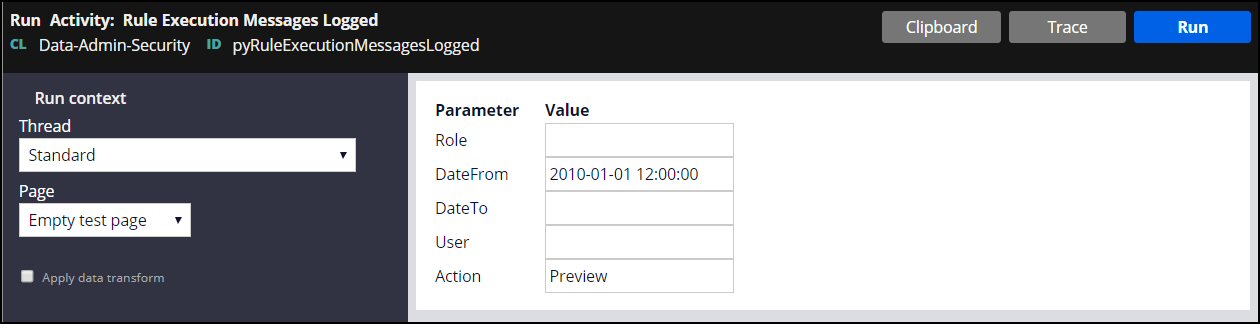
The DateFrom and DateTo fields allow you to choose a time-based subset of the warning messages in the log for this activity to process.
Enter the RSM Role<SampleApp>:RSM_Unauthorized, and click Run.
The utility will display a preview of the proposed implicit privileges.
10. Review the proposed changes.
The utility will display the pending authorization changes. For each of the rules which did not have a privilege, one will be created, as follows: <ruletype>:<AppliesToClass>:<nameOfRule>
Example:
Rule-Obj-Activity:Code-Security:PZSHOWFORGOTPASSWORD
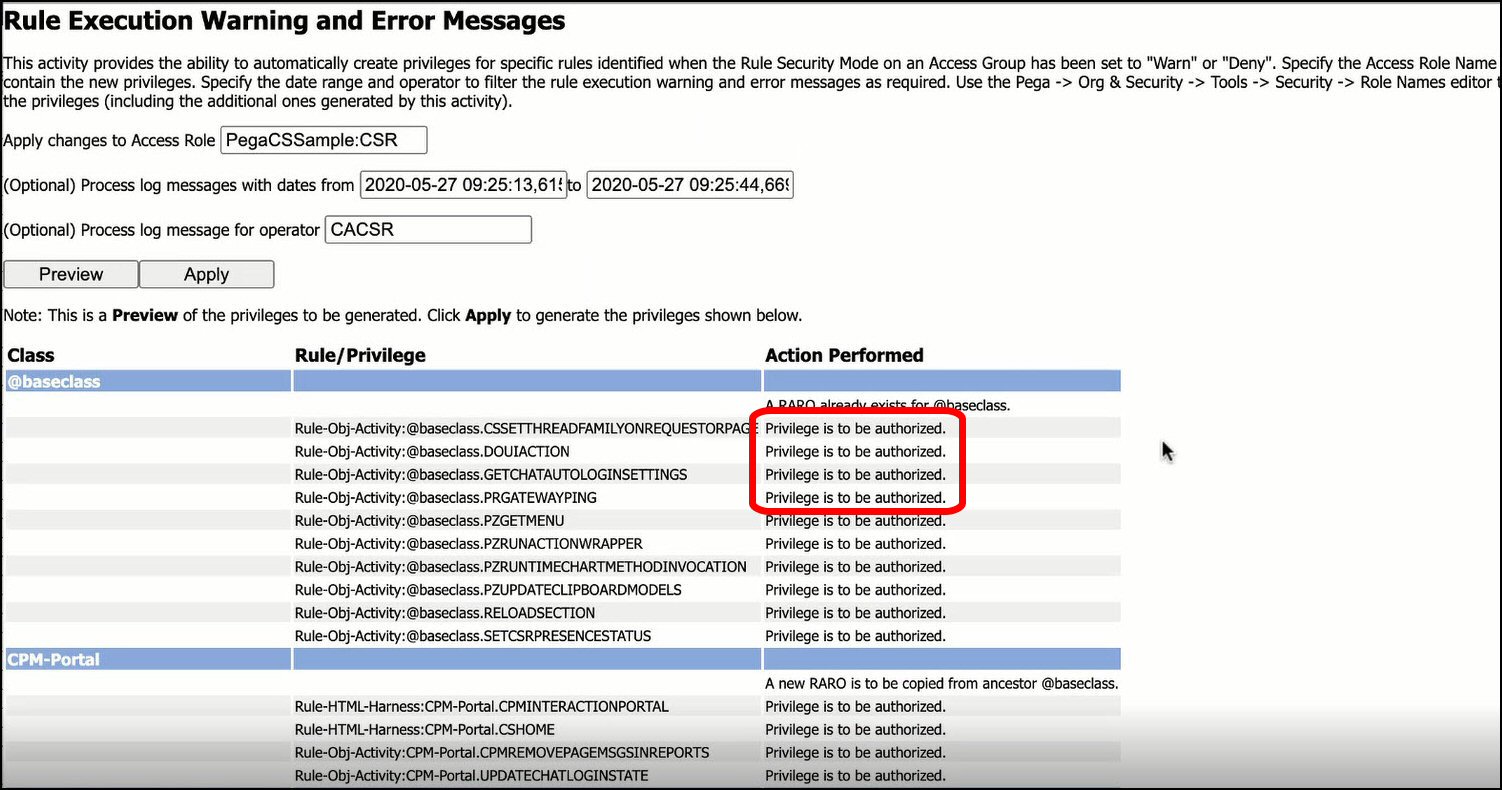
After carefully reviewing all the pending changes, click Applyto create the implicit privileges.
The privileges will be applied, and the message “Privilege has been authorized (added to the RARO’s list)” will display for each rule.
Note that these implicit privileges will not display in the Privilege rules, as only Explicit privileges are stored there; they will also not appear on the executed rule.
12. Repeat steps 4 – 11 until no warnings show in the PegaRULES log.
In the testing environment, repeat the prior steps until no warnings are logged.
13. Set Rule Security Mode field to Deny in the Unauthenticated Access Group.
After there are no longer any Warn statements in the PegaRULES log, change the Rule Security Mode to Denyfor the Unauthenticated Access Group in your application in the testing environment.
14. Have testers run all the login and logout work flows in the application.
Have testers go through all the login and logout processes, including items such as “Forgot Password?”, to verify they have access to all the rules they need. If errors occur, and users cannot complete their tasks, this means that some privileges were missed and the procedure must be re-run.
15. If errors occur, check the AlertSecurity log for information, and re-run the utility.
Example error:
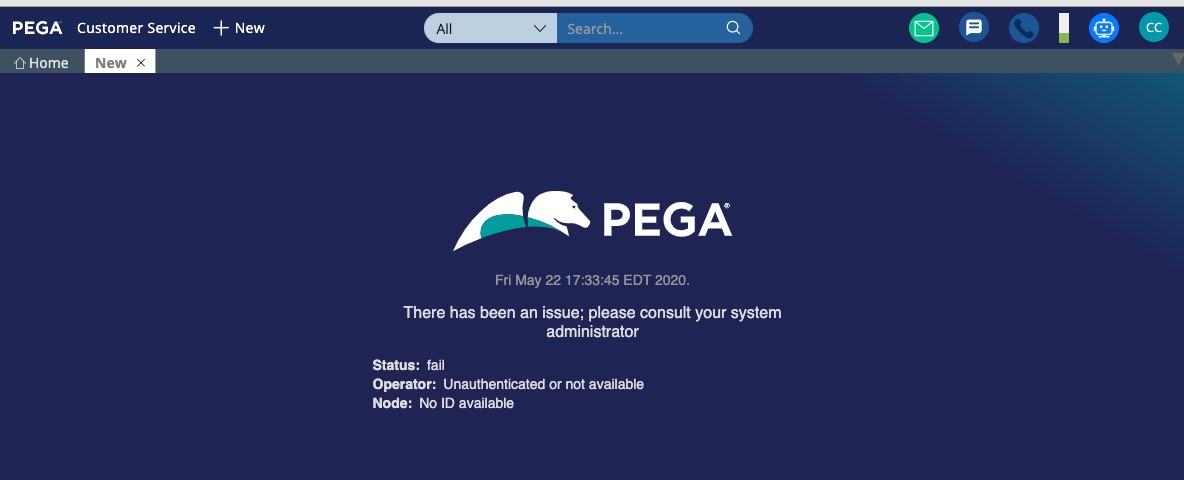
If the tester gets this error, check the AlertSecurity Log to determine which rule was missed.
Below are example security alerts which are written to the Alert Security log when requests are rejected in DENY mode due to the implicit privilege check.
The alert SECU0007 is the designation for DENY issues, and shows:
- the underlying rule which cannot be executed (in the first example, Work – SaveNew)
- the reason for the alert (“A rule could not be executed because Rule Security Mode is DENY”)
- where the problem rule was called from (in the first example, PegaCA-Work-Interaction-Outbound-Call)
2020-05-22 21:28:10,583 GMT*8*SECU0007*0*0*4202fb97c1f5b04e01faefae56cd05ab*NA*NA*H0DN5206GC6SUGTZ1TMYIBAG8T0YKVKYRA*CACSR*PegaCA-Work*PegaCSSample:8*5cecf0c194c6444f06a1b9727a70afc7*N*18*H0DN5206GC6SUGTZ1TMYIBAG8T0YKVKYRA*317*http-nio-8080-exec-7*TABTHREAD1*com.pega.pegarules.session.internal.mgmt.Executable*10.60.215.147|127.0.0.1*[email protected]*Rule-Obj-Activity:ApplicationSetup*WORK- SAVENEW #20180713T133059.224 GMT Step: 3 Circum: 0*0****NA*NA*PegaCA-Work-Interaction-Outbound-Call*pyWorkPage*PegaCA-Work-Interaction-Outbound-Call*pyWorkPage*doActivity Rule-Obj-Flow;Java;RULE-OBJ-ACTIVITY WORK- SAVENEW #20180713T133059.224 GMT Step: 3 Circum: 0;doActivity Rule-Obj-Activity:SaveNew;call Work-.SaveNew;18 additional frames in stack;*NA*A rule could not be executed because Rule Security Mode is in WARN or DENY and this rule was not implicitly allowed : RuleSecurityModeDeny:RuleExecutionDeniedCPMINTERACTION PegaCA-Work-Interaction-Outbound-Call Rule-Obj-Flow:PegaCA-Work-Intera445f65712ec4129755ce31d1cb25fc3d PegaAppCA * 2020-05-22 21:28:10,591 GMT*8*SECU0007*0*0*4202fb97c1f5b04e01faefae56cd05ab*NA*NA*H0DN5206GC6SUGTZ1TMYIBAG8T0YKVKYRA*CACSR*PegaCA-Work*PegaCSSample:8*5cecf0c194c6444f06a1b9727a70afc7*N*18*H0DN5206GC6SUGTZ1TMYIBAG8T0YKVKYRA*319*http-nio-8080-exec-7*TABTHREAD1*com.pega.pegarules.session.internal.mgmt.Executable*10.60.215.147|127.0.0.1*[email protected]*Rule-Obj-Activity:ApplicationSetup*@BASECLASS SHOW-HARNESS #20190329T193145.186 GMT Step: 9 Circum: 0*0****NA*NA*PegaCA-Work-Interaction-Outbound-Call*pyWorkPage*PegaCA-Work-Interaction-Outbound-Call*pyWorkPage*getStream Rule-HTML-Harness:New;java;RULE-OBJ-ACTIVITY @BASECLASS SHOW-HARNESS #20190329T193145.186 GMT Step: 9 Circum: 0;doActivity Rule-Obj-Activity:Show-Harness;call Show-Harness;12 additional frames in stack;*NA*A rule could not be executed because Rule Security Mode is in WARN or DENY and this rule was not implicitly allowed : RuleSecurityModeDeny:RuleExecutionDenied NEW PegaCA-Work Rule-HTML-Harness:PegaCA-Work.NEW PegaAppCA 08-01-01*
If rules were missed, re-run the pyRuleExecutionMessagesLogged activity, using the user ID in the log and the appropriate Role for that user’s Access Group.
Lower environment: Authenticated Users
The process for Authenticated users has some different steps than the Unauthenticated users. There will be multiple Access Groups for the application, which means you must create multiple RSM roles. In addition, since the users are authenticated, include the UserID when running the utility (instead of the date and time).
Overview steps
1. Verify that there is an open RuleSet.
2. Make changes to all Access Groups in the application:
a. Add the Pega-provided RSM role to all Access Groups.
b. Set the Rule Security Mode field to Warn for all Access Groups.
3. Have testers run all the work flows and other user functionality in the application.
4. Review the PegaRULES log for WARN messages.
5. From the log, create a list of users and their Access Groups. (This list will be used to help manage the work done in Step 8.)
6. Create a RuleSecurityMode role for each Access Group.
7. Add the appropriate role to each Access Group.
8. For each RSM role you created, run the activity pyRuleExecutionMessagesLogged for each user in that access group who has generated a WARN message.
9. Review the proposed changes.
10. Commit the changes.
11. Repeat steps 3 – 11 until no warnings show in the PegaRULES log.
12. Set Rule Security Mode to Deny in all relevant Access Groups.
13. Have testers run all the work flows in the application.
14. If errors occur, check the AlertSecurity log for information and re-run utility.
15. Reset the Access Groups back to WARN.
Detailed Steps
1. Verify that you have an open RuleSet.
2. Make changes to all Access Groups in the application.
Two changes are needed for all Access Groups in your application:
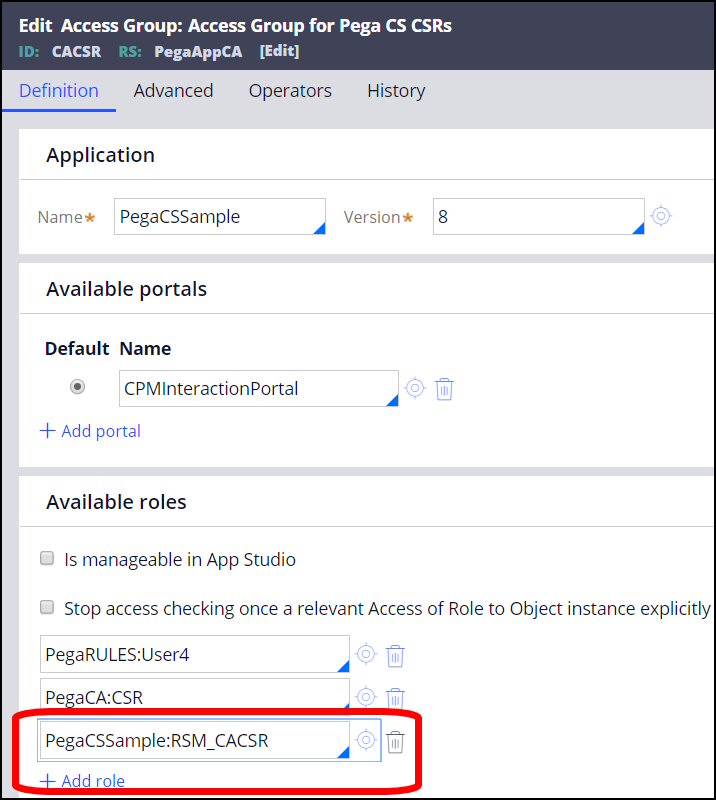
a. Add the Pega-provided RSM role to all Access Groups.
Pega has created the PegaRULES:RSM-User role, which contains a predefined set of implicit privileges. Adding this role into your Access Group before you run the Rule Security Mode utility will reduce the number of entries generated by the utility during the procedure, and make running the utility easier for you.
If you would prefer to create all privileges yourself, you can certainly do that. If you’re using a Pega application such as Customer Service, there may be a role with a predefined set of implicit privileges specific to that application; add that role into your Access Groups instead of PegaRULES:RSM-User.
Realize that whether or not you assign this Role to your Access Groups, you should still run this utility to secure any rules you may have customized.
b. Set the Rule Security Mode field to Warn for all Access Groups.
For each Access Group, set Rule Security Mode field to WARNand save that change.
3. Have testers run all the work flows in the application.
Once the Rule Security Mode fieldis set to WARN, it is important to have testers go through all their use cases and user functionality, using each of the various roles in your application (examples: WorkUser, Manager), to determine all the rules that your users need to access.
The point of this part of the procedure is to generate Warnings for each unrestricted rule that is used when users are working in the system.
If your testers miss an infrequently-used case, your end users may find they don’t have access to that work after the system has been hardened.
4. Review the PegaRULES log for WARN messages
After the testing is complete, review the WARN messages in the PegaRULES.log file.
Below is an example of WARN messages in the log. Each entry for this procedure contains the following information:
- The application where the message was generated (“PegaCSSample”)
- The userID and WARN setting (“CACSR – RuleSecurityModeWarn:RuleExecutionPermitted”)
- The class, type, and name of the rule which is generating the warning (“Rule-HTML-Harness:CPM-Portal.CPMINTERACTIONPORTAL”)
- The RuleSet and version that contains the rule (“PegaAppCA 08-01-01”)
2020-05-22 14:42:15,035 [http-nio-8080-exec-3] [ STANDARD] [ ] [ PegaCSSample:8] ( internal.mgmt.Executable) WARN 10.60.215.147|127.0.0.1 CACSR - RuleSecurityModeWarn:RuleExecutionPermitted CPMINTERACTIONPORTAL CPM-Portal Rule-HTML-Harness:CPM-Portal.CPMINTERACTIONPORTALPegaAppCA 08-01-012020-05-22 14:42:15,663 [http-nio-8080-exec-3] [ STANDARD] [ ] [ PegaCSSample:8] (pages.DeclarativePageUtilsImpl) WARN 10.60.215.147|127.0.0.1 CACSR - Required parameter'InteractionId' for data page 'D_Interaction' cannot be blank. 2020-05-22 14:42:16,511 [http-nio-8080-exec-6] [ STANDARD] [ ] [ PegaCSSample:8] ( internal.mgmt.Executable) WARN 10.60.215.147|127.0.0.1 CACSR - RuleSecurityModeWarn:RuleExecutionPermitted PRGATEWAYPING @baseclass Rule-Obj-Activity:@baseclass.PRGATEWAYPING Pega-ProCom 08-01-01 2020-05-22 14:42:16,526 [http-nio-8080-exec-9] [ STANDARD] [ ] [ PegaCSSample:8] ( internal.mgmt.Executable) WARN 10.60.215.147|127.0.0.1 CACSR - RuleSecurityModeWarn:RuleExecutionPermitted INITIALIZE ChannelServices-Device-Phone-UI Rule-Obj-Activity:ChannelServices-Device-Phone-UI.INITIALIZE PegaFW-CTI 08-03-01 2020-05-22 14:42:16,634 [http-nio-8080-exec-8] [ STANDARD] [ ] [ PegaCSSample:8] ( internal.mgmt.Executable) WARN 10.60.215.147|127.0.0.1 CACSR - RuleSecurityModeWarn:RuleExecutionPermitted GETCHATAUTOLOGINSETTINGS @baseclass Rule-Obj-Activity:@baseclass.GETCHATAUTOLOGINSETTINGS PegaAppCA 08-03-01 2020-05-22 14:42:16,672 [http-nio-8080-exec-7] [ STANDARD] [ ] [ PegaCSSample:8] ( internal.mgmt.Executable) WARN 10.60.215.147|127.0.0.1 CACSR - RuleSecurityModeWarn:RuleExecutionPermitted SETCSRPRESENCESTATUS @baseclass Rule-Obj-Activity:@baseclass.SETCSRPRESENCESTATUS PegaAppCA 08-02-01 2020-05-22 14:42:16,685 [http-nio-8080-exec-1] [ STANDARD] [ ] [ PegaCSSample:8] ( internal.mgmt.Executable) WARN 10.60.215.147|127.0.0.1 CACSR - RuleSecurityModeWarn:RuleExecutionPermitted RELOADSECTION @baseclass Rule-Obj-Activity:@baseclass.RELOADSECTION Pega-UIEngine 08-03-01 2020-05-22 14:42:16,797 [http-nio-8080-exec-5] [ STANDARD] [ ] [ PegaCSSample:8] ( internal.mgmt.Executable) WARN 10.60.215.147|127.0.0.1 CACSR - RuleSecurityModeWarn:RuleExecutionPermitted RELOADSECTION @baseclass Rule-Obj-Activity:@baseclass.RELOADSECTION Pega-UIEngine 08-03-01 2020-05-22 14:42:16,862 [http-nio-8080-exec-6] [ STANDARD] [ ] [ PegaCSSample:8] ( internal.mgmt.Executable) WARN 10.60.215.147|127.0.0.1 CACSR - RuleSecurityModeWarn:RuleExecutionPermitted PZUPDATECLIPBOARDMODELS @baseclass Rule-Obj-Activity:@baseclass.PZUPDATECLIPBOARDMODELS Pega-EndUserUI 08-01-01
5. From the log, create a list of users and their Access Groups.
Even if users are in the same Access Group, they may not be doing exactly the same work.
It is very important that all the required rules be given implicit privileges; therefore, you will need to run the utility for every user who is identified in the log.
Extract all the userIDs from the log, and associate them with their Access Groups. (This information will be required when running the utility.)
Example:
User Name Access Group
CAABC SampleApp:SalesRep
CABCD SampleApp:Salesrep
CARUS SampleApp:OfflineSalesRep
MRABC SampleApp:SalesManager
MRTUI SampleApp:SalesManager
MRWER SampleApp:OfflineSalesManager
6. Create a RuleSecurityMode role for each Access Group.
For each Access Group, create a Rule Security Mode (RSM) Access Role Name (saving it into the open RuleSet), which will be used for the implicit privileges.
Pega recommends creating one RSM role for each access group, as the users in those groups should have different access privileges.

Suggested naming structure: <ApplicationName>:RSM_<AccessGroup>
Examples:
SampleApp:RSM_SalesRep
SampleApp:RSM_OfflineSalesManager
7. Add the appropriate role to each Access Group.
8. For each RSM role, run the activity pyRuleExecutionMessagesLogged for each user in that access group who has generated a WARN message.
In the navigation of Dev studio, click , then select pyRuleExecutionMessagesLogged activity.
Use the version which is in the Pega-LP-ProcessAndRules RuleSet.
There are several parameters for this activity, including the Role and the Username. This activity will process the Warn statements in the PegaRULES log file and create privileges for the rules which were flagged, based on the specified user.
As stated in Step 5, users in the same Access Group might be doing different work. So you must run the utility for each of the users which received a WARN message, divided by Access Group:
Example:
User Name Access Group RSM Role
CAABC SampleApp:SalesRep SampleApp:RSM_SalesRep
CABCD SampleApp:SalesRep SampleApp:RSM_SalesRep
CARUS SampleApp:OfflineSalesRep SampleApp:RSM_OfflineSalesRep
MRABC SampleApp:SalesManager SampleApp:RSM_SalesManager
MRTUI SampleApp:SalesManager SampleApp:RSM_SalesManager
MRWER SampleApp:OfflineSalesManager SampleApp:RSM_OfflineSalesManager
From the Actions drop-down menu, choose Run.
The Run Activity screen will display:
Enter the RSM Role and the User chosen for this procedure, and click Run.
The utility will display a preview of the proposed implicit privileges.
9. Review the proposed changes.
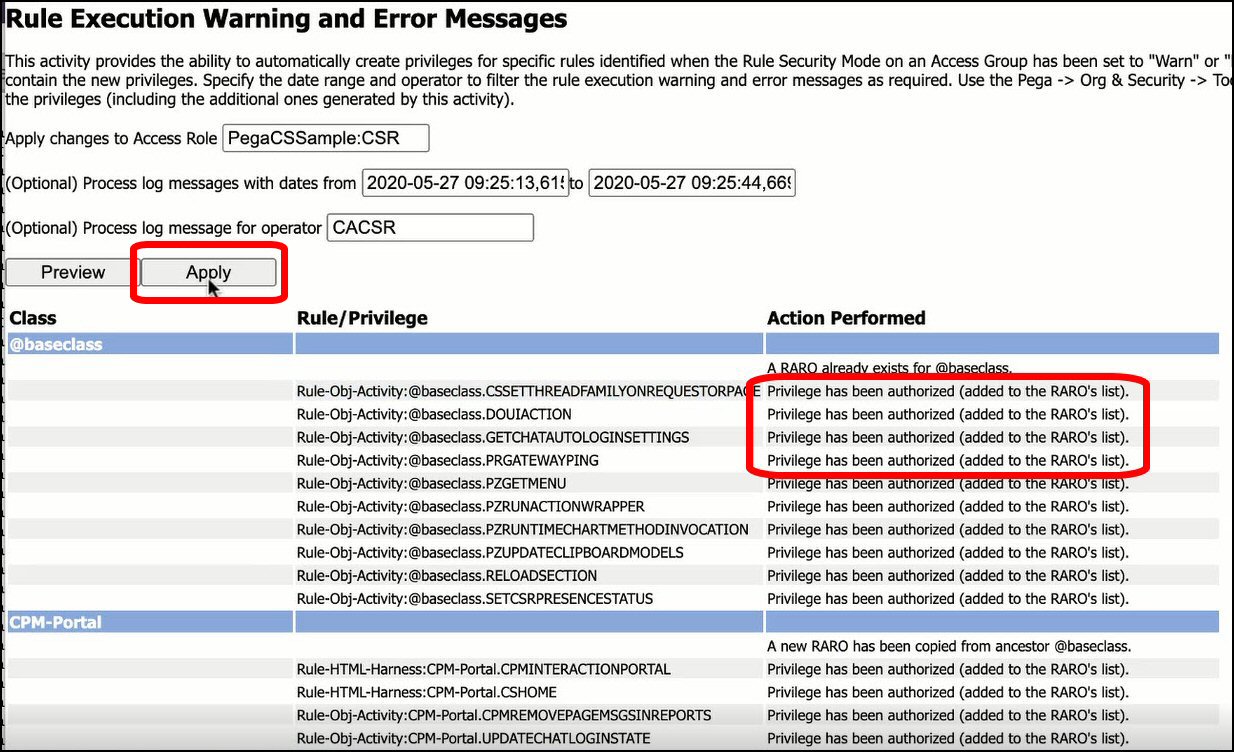
The utility will display the pending authorization changes. For each of the rules which did not have a privilege, one will be created, as follows: <ruletype>:<AppliesToClass>:<nameOfRule>
Example:
Rule-Obj-Activity:@baseclass:PRGATEWAYPING
After carefully reviewing all the pending changes, click Applyto create the implicit privileges.
The privileges will be applied, and the message “Privilege has been authorized (added to the RARO’s list)” will display for each rule.

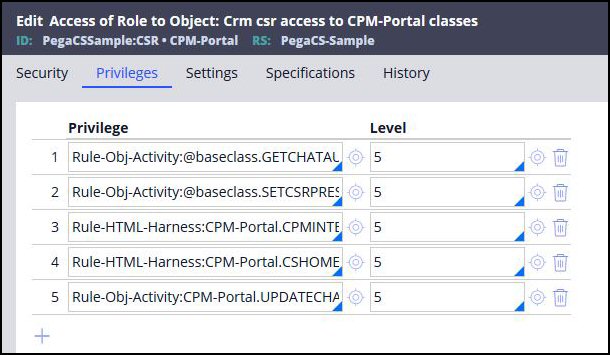
Each Access Class entry is a separate RARO. Here is the Access of Role to Object rule for the CPM-Portal class, showing the implicit privileges created.
Note that these implicit privileges will not display in the Privilege rules, as only Explicit privileges are stored there; they will also not appear on the executed rule.
11. Repeat steps 4-10 until no warnings show in the PegaRULES log.
In the testing environment, repeat the prior steps until no warnings are logged.
12. Set Rule Security Mode field to Deny in all relevant Access Groups.
After there are no longer any Warn statements in the PegaRULES log, change the Rule Security Mode to Denyfor all Access Groups in the testing environment.
13. Have testers run all the work flows in the application.
Have testers go through all their use cases again, using each of the various roles (WorkUser, Manager), to verify they have access to all the rules they need. If errors occur, and users cannot complete their tasks, this means that some privileges were missed and the procedure must be re-run.
14. If errors occur, check the AlertSecurity log for information, and re-run the utility.
If the tester gets the "blue screen" error, check the AlertSecurity Log to determine which rule was missed.
15. Reset the Access Groups back to WARN.
After all the testing for both Unauthenticated and Authenticated users is complete, and no further errors are found, changes will be migrated to production, including the changes to the Access Groups.
In each of the Access Groups, set the Rule Security Mode to WARN.
Production environment steps
Overview steps:
A. Apply the hotfix to the Production environment.
B. Migrate the changes to the Production environment. (These changes include Access Groups, Roles, and Rule-Access-Role-Obj (RAROs).)
C. Have users perform their usual work for a specified length of time.
D. Review the PegaRULES log for WARN messages.
E. Run identified procedures in lower environment to create implicit privileges.
F. Repeat steps B-E above until no WARN statements appear in the production log.
G. Set Rule Security Mode field to Deny in all relevant Access Groups in production.
Detailed steps
After testing is completed in the lower environment(s) for both unauthenticated and authenticated users, and no further errors are displayed in the Alert Security log, the changes must be migrated to the Production environment, to do verification of the security hardening over time.
A. Verify that the appropriate hotfix has been applied to the Production environment.
B. Migrate the changed rules to the Production environment.
Using a Rule Application Product (RAP), migrate the changes from the lower environment to Production. These changes should include:
- The Rule-Access-Role-Obj (RARO) class, which contains all the implicit privileges
- All the Access Groups, set to WARN
- All the new RSM roles
- All the new RSM RAROs
C. Have users perform their usual work for a specified length of time.
As no staging environment is a perfect copy of production, there will probably be case situations which were not fully covered in the testing steps. Some verification in the production environment will be necessary to make sure that users are not locked out of their legitimate work tasks.
Your system administrators should watch the size of the PegaRULES.log file carefully. Depending upon the size of the application, the number of users in the system, and whether the application receives light or heavy use, the log file could get large.
Your System Administrator should judge whether to move to the next step in the procedure after one day, or after several days.
D. Review the PegaRULES log for WARN messages
The WARN entries in the log file for the production system will indicate whether any rules were missed when running the pyRuleExecutionMessagesLogged activity in the lower environment. Identify all WARN statements in the log, and determine which rules/features did not get privileges assigned.
E. Run identified procedures in lower environment to create implicit privileges.
Since it is not possible to make and save changes in a production system (all RuleSets are locked), and it is also not possible to “move” a log file from one system to another, any WARN issues found in production must be recreated in the lower environments.
In the lower environment, run the procedures for the rules identified in the WARN statements in production, so the WARN statements will be created in the dev/test or staging log.
(Make sure that the Access Groups in that system all are set to WARN.)
Follow steps 3 – 16 provided above for the Lower Environment.
F. Repeat steps B - E above until no WARN statements appear in the production log.
G. Set Rule Security Mode to Deny in all relevant Access Groups in production.
Future application changes
This procedure must be repeated whenever there are any application changes, whether through feature development, upgrades, patches, or hotfix installation.
For example, you might have the Customer Service application, and have executed this procedure to harden your application security; six months later, you implement the Chat feature. If the Rule Security Mode Utility is not run on the Chat rules, then when the users attempt to use Chat, they will experience errors like the ones shown above.
Therefore, when any changes are made in the application, follow the procedure described above for the lower environments, and then migrate the changes to production.
Previous topic Security advisory Next topic Pega Security Advisory – C20 Hotfix