Upgrading harnesses that contain custom CSS and JavaScript to render in HTML5 Document Type
This article describes how to upgrade harnesses containing custom CSS and JavaScript.
In order to effectively render your application user interface in HTML5 Document Type, avoid custom CSS and JavaScript. Rendering your application in HTML5 Document Type ensures cross-browser and cross-platform compatibility, use of the latest HTML markup and improved performance, among other benefits. For more information, see Upgrading an application to render in HTML5 Document Type.
Upgrade harnesses containing custom JavaScript
You can use the HTML5 Application Readiness landing page to determine which harnesses in your application contain custom JavaScript:
- Select Designer Studio > User Interface> HTML5 Application Readiness.
- On the Applications tab, verify that the application displays and that the HTML5 Document Type is enabled. If the application does not display, click the Application link, select the desired application, and then click Apply.
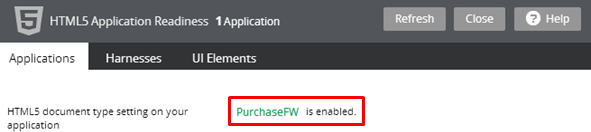
- Select the Harnesses tab.
- In the Harnesses referencing custom CSS or JavaScript area, click the Harness Name to open the harness.

- To view the custom JavaScript, select the Scripts and Styles tab. Click
 next to a text file name to open it in the Work Area.
- Evaluate the JavaScript to determine which elements can be replaced with auto-generated PRPC features. For example, instead of using JavaScript to handle “onclick” events, use a button control configured with a “click” event and the desired set of actions. To see an example of a control that performs multiple actions, refer to How to use the AutoComplete control to build a list (6.2 SP2).
Update the text file rule by editing the form directly, downloading the file to edit offline or using an external text file editor: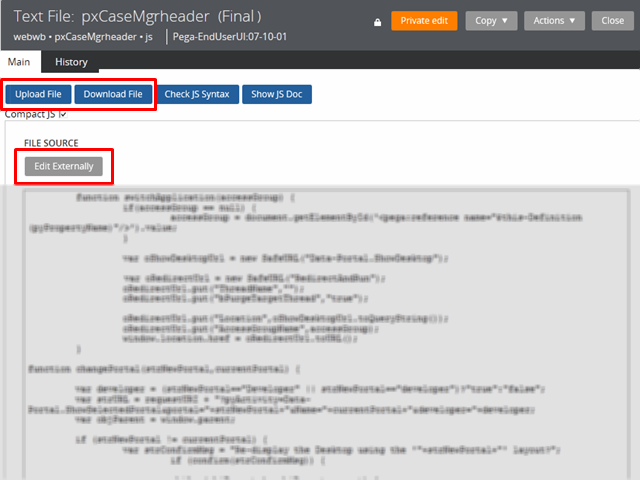
If all JavaScript can be replaced with equivalent PRPC features, update the harness form to remove the reference to the text file rule on the Scripts and Styles tab.
Upgrade harnesses with custom CSS
As a best practice, do not include hand-coded CSS in the harness. Instead, define multiple formats and custom styles in the application skin and reference them in the harness. This enables reuse and cascading change throughout your skin. It also ensures that your application will render as expected in standards mode.
Identifying harnesses with custom CSS
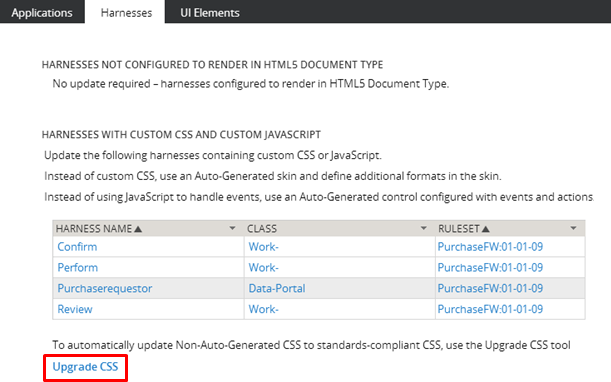
You can use the HTML5 Application Readiness landing page to determine which harnesses in your application contain custom CSS:
- Select Designer Studio > User Interface> HTML5 Application Readiness.
- Select the Harness tab.
- In the Harnesses with custom CSS and custom JavaScript area, click the Harness Name to open the harness.
- In the harness, select the Scripts and Styles tab and then click to open the custom stylesheet.

Review the contents of each CSS file to determine which styles can be replaced using one of the methods below.
Defining multiple formats in the skin
You can create multiple custom formats for grids, tabs, labels, headers, text input, text areas, accordions, modal dialogs, smart layouts, and repeating row/columns.
In this example, a harness uses custom CSS to define different button styles:
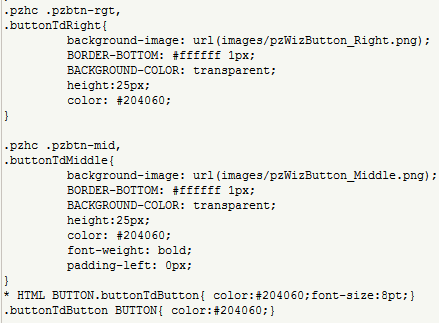
Replace this CSS by creating additional button formats in the skin:
- Start by determining what skin the application uses at run time. For instructions, seeAssociating a skin to the user interface.
- Open the skin rule, select the Components tab, click Change component, and then select Buttons.
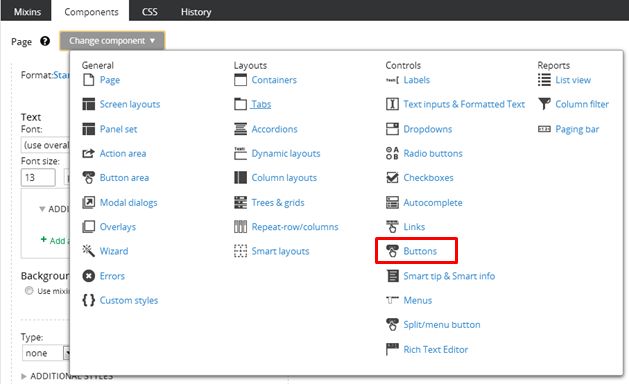
- Click + Add a format.
Type the name of the new button format, for example, TdRight, and then define a format that correlates to the custom CSS in the harness. Remember to take advantage of mixins when extending your application skin. See Using mixins in the skin to drive consistency and efficiency.
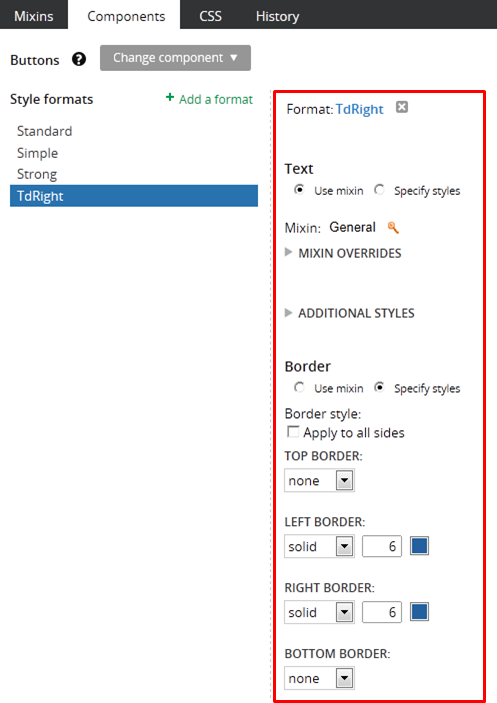
- Save the skin.
- In the harness form, update the button to reference the newly created custom format. Open the Cell Properties panel and select a Format value of “Other”. In the prompt that appears, enter the desired custom format; in this example TdRight.

- Save the updated harness. The newly defined button format is also accessible to other UI containers in your application such as sections.
Defining custom styles in the skin
In some cases, you may need to define a custom style, rather than an additional format, in the Skin rule. It is recommended to first view the source of your CSS and search in your application for the specific class names. This will aid in understanding the use cases for a particular style; you can then recreate the style quickly and ensure it is applied correctly.
To create a custom style:
- Start by determining what skin the application uses at run time. For instructions, see Associating a skin with the user interface.
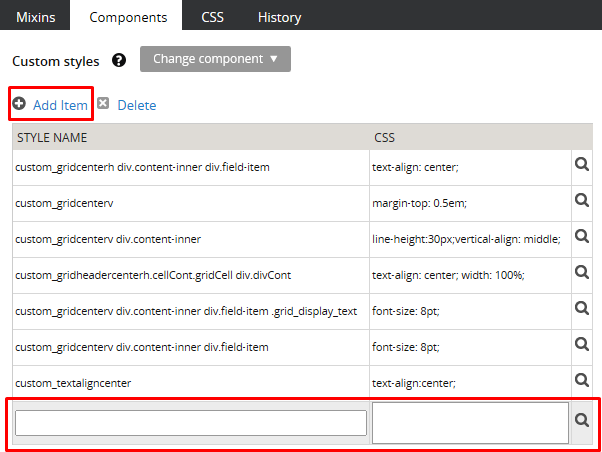
- In the skin rule, select the Components tab, click Change component and then select Custom styles.

- Click + Add Item.
- Type a Style Name and define the custom style in the CSS field. Note that custom_ is prepended to the value that you specify in the Style Name field.
- To apply the custom style as the Read-Write or Read-Only format, open the Cell Properties panel of a control. On the Presentation tab, enable the Display advanced presentation options checkbox. Then enter the desired custom style name in the Advanced Options area. See the PRPC Help for details.

Upgrade non-auto-generated CSS
If your harness contains non-auto-generated CSS, this may be problematic when rendering in standards mode. For example, non-standards compliant HTML, such as “width:50”, may have rendered correctly in quirks mode. This will not render as expected, however, in standards mode. Running the Upgrade CSS tool converts this code from “width:50” to “width:50px”, enabling it to render properly in standards mode.
To run the Upgrade CSS tool:
- As a best practice, create a new RuleSet version to contain the upgraded the CSS files.
Open the Designer Studio > User Interface> HTML5 Application Readiness landing page
Select the Harnesses tab.
Click Upgrade CSS to open the tool.
- Define how the Upgrade CSS tool should execute:

- Select a RuleSet Namethat contains CSS you want to upgrade. All RuleSets in the current application display.
- If you want to further scope the list of CSS files to upgrade, enable the RuleSet Version? checkbox and select a specific version.
- Enable the During Update Move To checkbox if you want the results of the Upgrade CSS tool to be saved as a new version of the rule. Only versions higher than the RuleSet Version specified in the RuleSet Version? display. If a higher RuleSet Version does not exist, an empty box displays.
- In the Memo field, type a note (this is required). This note displays in the History tab of the updated css rule-file-text.
- Make file selections and run the tool:

- Click List to view the File Name, RuleSet, and Version of files containing non-standards compliant CSS. This list is scoped based on the selections you made in the previous step.
- Click Check All, Uncheck All or Inverse to make selections wholesale in the Update? column. Alternatively, enable or disable individual checkboxes by hand.
- Click Run to automatically update the CSS for each of the selected files.
- Review the upgrade results:
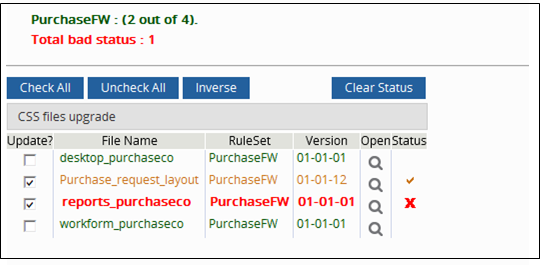
- View the Status column to determine upgrade results. A check displays when the CSS is upgraded successfully. An X appears when the CSS cannot be upgraded using the tool; hover over the icon to see a tooltip with error details.
- Click Clear Status to reset values in the Status column if you plan to run the Upgrade CSS tool multiple times.
- Click to open harnesses that were upgraded successfully. Verify the source was updated with a comment from the tool and that your memo was added in the history.
Setting the Document Type for a harness
Once you have removed custom CSS and JavaScript from a harness, ensure it will render as expected in standards mode by updating its document type. As a best practice, set the harness document type to Inherit from the Application rule. Alternatively, set an explicit document type on the harness form itself using one of the options below.
To set a harness document type:
- Open the Designer Studio > User Interface> HTML5 Application Readiness landing page
- Select the Harnesses tab.
- In the Harnesses not configured to render in HTML5 Document Type area, click the Harness Name.
- Select the Advanced tab.
- Change the Document Type from None (quirks mode) to one of the following:
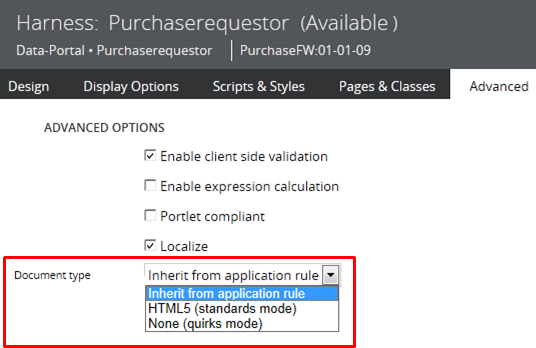
- Inherit from application rule: the harness renders using the document type set on the Definition tab of the Application rule.
- HTML 5 (standards mode): the harness renders in standards mode, regardless of the document type set in the Application rule.
- Save the harness.
Additional Information
Displaying a modal dialog in a custom format created in the application skin
Upgrading an application to render in HTML5 Document Type
Upgrading deprecated and outdated controls
Upgrading properties that reference deprecated controls
What you need to know about upgrading your application to HTML5 Document Type (standards mode)