

         This documentation site is for previous versions. Visit our new documentation site for current releases.      
 

Editing with Live UI

Updated on November 15, 2021
Applicable to Theme UI-Kit applications

Make instant adjustments to your user interface in the Live UI tool. The Live UI tool gives you detailed insight into the structure of your application's UI, and helps you add, move, and delete components, such as layouts and controls, directly at run time.

Note: Depending on the component that you select, the available actions might change. For example, you can place controls inside layouts, but not above or below them.
Before you begin: Ensure that you can use Live UI to edit the interface. For more information, see Enabling run-time branching and editing.
  1. Launch the application that you want to edit, and then navigate to the target page.
  2. In the footer of your application, click the Live UI icon.
    Result: A collapsible Live UI pane opens on the right side of the screen. Every item on the screen corresponds with a record on the list.
  3. Hover over and click the UI element that you want to adjust.
    Result: The Live UI pane on the right side of the screen highlights the record for the element that you select. You can now inspect how the component fits into the structure of the UI.
  4. Next to the highlighted record, click the See available actions icon, and then, in the dialog box, edit the selected area:
    See available actions menu
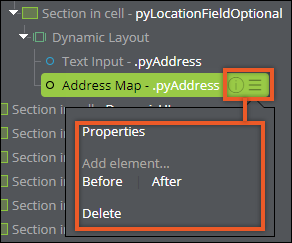
    The menu contains actions that you can use to edit the interface.
    ChoicesActions
    Change the configuration of a controlClick Properties, and then configure the control.
    Insert an element next to a control
    1. Depending on where you want to place the UI element, click Before or After.
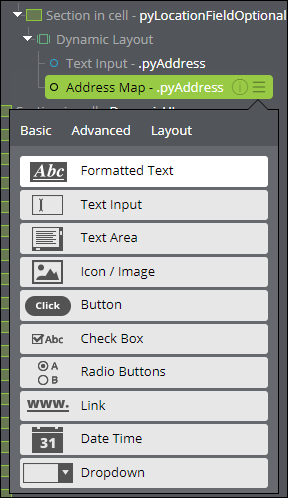
    2. On the tabs of the selection menu, click the control or layout that you want to add.
    3. Configure the UI element.
    Insert an element inside a layout
    1. Click Inside.
    2. On the tabs of the selection menu, find the control or layout that you want to use, and then click it.
    3. Configure the UI element.
    Delete a componentClick Delete.

    For more information on UI element configuration, see Controls and Layouts.

    Selection menu for UI components in the Live UI pane
    The tabs contain UI components that you can add to your interface.
  5. Optional: To move a component, on the Live UI pane, drag the highlighted component into place on the UI tree.
  6. On the Live UI pane, save changes by clicking Publish all.
  7. Close the Live UI tool by clicking the Live UI icon.
    Tip: You can toggle the Live UI view by pressing Control + Shift.

Have a question? Get answers now.

Visit the Support Center to ask questions, engage in discussions, share ideas, and help others.

Did you find this content helpful?

Want to help us improve this content?

We'd prefer it if you saw us at our best.

Pega.com is not optimized for Internet Explorer. For the optimal experience, please use:

Close Deprecation Notice
Contact us