Validating field input
Ensure that the user input on a form meets the required conditions before the case moves to the next step in the life cycle. By validating field input, you check whether the data values that users enter are valid and whether the system can process the information correctly. For example, you can ensure that the customer provides their name and address before placing an order.
In the navigation pane of App Studio, click Case types, and then click the case type that you want to open.
In the Case life cycle section, select the step to which you want to apply the validation condition.
In the Step pane on the right, on the General tab, click Configure view.
- Optional:
To ensure that the user enters a value in a field before submitting the form, set the field as Required.
In the view configuration window, on the Fields tab, locate the field that you want to set as Required.
In the Options list for that field, select Required.
When the user tries to submit the form without a value in a required field, an error message appears.
In the view configuration window, on the Validations tab, click Add condition.
- Optional:
To display an error message when the validation fails, in the Message field, enter the text of the message.
Define the validation conditions for a field on the form:
In the list of fields, select the name of the field that you want to validate.
In the comparator list, select the test that you want to perform on the field.
In the value field, enter or select a value to compare against the user input.
The Select values option lists the fields and values from your form that you can use in the condition.
- Optional:
To create a condition with multiple validation parameters, add a logical operator to the condition:
Choices Actions Ensure that the condition passes when all properties meet the criteria On the right side of the row, click the Add a row icon.
In the operator list, select and.
In the list of fields, select the name of the field that you want to validate.
In the comparator list, select the test that you want to perform on the field.
In the value field, enter or select a value to compare against the user input.
The Select values option lists the fields and values from your form that you can use in the condition.
Ensure that the condition passes when either property meets the criteria On the right side of the row, click the Add a row icon.
In the operator list, select or.
In the list of fields, select the name of the field that you want to validate.
In the comparator list, select the test that you want to perform on the field.
In the value field, enter or select a value to compare against the user input.
The Select values option lists the fields and values from your form that you can use in the condition.
For example: In a recruitment form, the user must indicate the time of employment at a specific company by entering dates in the From and To date type fields. To ensure that the start date is before the end date, and that the end date is after the start date, you can configure a validation condition with the AND logical operator, as in the following figure:Validation of the employment date range 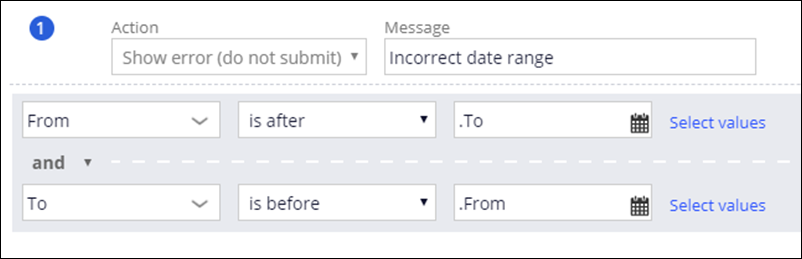
- Optional:
To define more validation conditions, repeat steps 6 through 9.
Click Submit.
- Validating field input in complex scenarios
Create validation rules to check whether the data values that users enter meet specific criteria, and whether the system can process the information correctly.
- Adding a validation rule to a flow action
Ensure that the data that your users provide meets the conditions that a case requires in order to go forward. By assigning validation rules to flow actions, you can prevent users from entering information that your application cannot process, and reduce the number of processing errors.
- Forms and fields
A form is a view of your data. The fields on a form store user input that can include single-value fields, a group of values, or a list of values. After you create a form, you can associate it with an assignment or approval step in the life cycle of a case.
- Restricting user input in a field
Configure fields in your data model to change the way that they store or display information to create a robust data model that is tailored to your business requirements.
Previous topic Prioritizing information in tables Next topic Validating field input in complex scenarios