How to conditionally show or hide portions of a work object form
Summary
This article describes the development steps for V6.1. The process for V5.X is similar; for details see How to conditionally show or hide portions of a work object form.
Some work object forms are large and complex. To make this aspect of your BPM application more user-friendly, you can use the conditional display feature to hide or display parts of these forms, based on actions that your users perform.
For example, these two images show an application where a form's Address fields are hidden until the user selects the Add Shipping Details checkbox:
Purchase Order Form with Add Shipping Details checkbox unchecked:

Purchase Order Form with the Add Shipping Details checkbox checked

Suggested Approach
Complete these two steps to implementing conditional displays:
In the above example, the checkbox is the controlling field. The Shipping Address lines (Address Line 1, ... ) are the controlled elements.
1: Set the Controlling Field
Complete the following steps to set a controlling field:
- Open the harness or section rule that you want to include a conditional display.
- Click the
 icon to turn on wireframes.
 - Select the field that you want to be the controlling field.
- Click the (
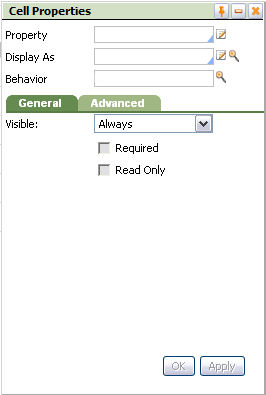
 ) magnifying glass to open Cell Properties.
- Click the () magnifying glass at the Behaviorfield.
- The Client Event Editor appears.
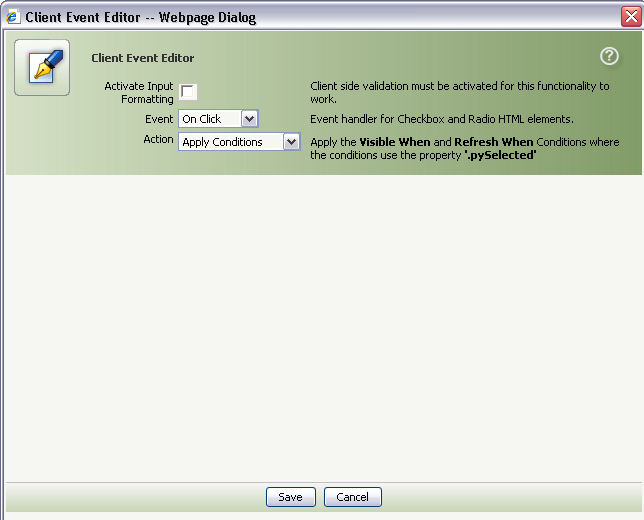
- Select one of the following values for the Eventfield:
- OnChange — Associates an event with properties presented as a text box, text area, or selection. The event occurs whenever the contents of the input field changes. This is most useful for selection lists; by using OnChange instead of OnBlur the action can occur immediately.
- OnBlur — Associates an event with properties presented as a text box, text area, or selection list. This event occurs when the input field on the form loses focus; for example, when the user presses the Tab key or clicks in another input field.
- OnClick — Associates an event with properties presented as a check box or set of radio buttons. The event occurs when the user clicks the the check box or radio button.
- Use the Actiondropdown to select one of the following actions:
- Hide/Show Elements — Causes properties, sections, or layouts (the controlled elements) to become visible or hidden dynamically, based on the value of this controlling property.
- Refresh This Section — Causes the section to be refreshed, based on the value of this controlling property. The updated form may contain different values supplied by an activity.
If you selected Refresh This Section for the Action field, you can use the Activity field to call an activity that changes the content of the section. To find the activity at runtime, the system uses the Applies To class of this rule with rule resolution. Use the Params button to specify the activity's input parameters, if any.

- Click Save to save your changes. Save the rule.
2: Set Conditions for the Controlled Element
At runtime, a controlled element is visible or hidden dynamically. You can control the following elements:
- Fields in a cell
- A layout
- An included section
- A container in a harness rule
Complete the following steps to set the conditions for the controlled element:
- Open the rule that contains the element that you want to control.
- Click the icon to turn on wireframes.
- Select the field, layout, section, or container that you want to be the controlled element.
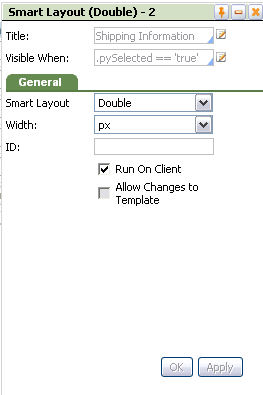
- Go to the Field, Layout, Section Include, or Container panel and fill out the Visible When field. Enter a test condition for the property value in the controlling field. Provide a comparison of the property with a constant value using one of the following operators:
- ==
- !=
- >
- >=
- <
- =<
- Unless the Type of the property is Integer, TrueorFalse, or Decimal, place a pair of single quotes around the string constant. For example, the test condition shown in the Visible When field of the Purchase Order form with Add Shipping Details checkbox unchecked. section rule is what controls the display of the address fields in Purchase Order Form with Add Shipping Details checkbox checked .
- Select the Run on Client check box to enable the controlled element.