How to configure a Dynamic Select Control using a Report Definition rule
Summary
Dynamic Select control presents the user with a drop-down list of choices at runtime. The list of choices can come from a list view rule, an activity, or, effective with V6.2, the results of a report definition rule. To configure a Dynamic Select usinga report definition rule, you can populate the report definition rule using a table that you create with the Data Table wizard, then identify the rule as a parameter on the Control field in the Cell Property panel.
For information on using activities or list view rules to create the Dynamic Select, refer to How to configure a Dynamic Select Control.
In the following example, a data table derived from the Data- base class is used as the source for the report definition rule. However, you can create the report definition rule based on instances of any concrete class, depending on what you need to show for the user to select from.
Suggested Approach
Step 1: Create a data table using the Data Table Wizard. You reference this data table in Step 3 when you create your report definition rule.
- Click
 > Data Model > Data Tables > Data Tables.
 - Click Add a new Data Table and complete the fields in the wizard.
- Click

- In the Class Name field, enter a unique concrete class name. You create the class when you generate the table.
- Enter a Description.
- In the Derives From field, choose a class that derives from Data-.
- Check the Create Dedicated Database Table box to create a new database table to hold your data.
- Complete the Properties section. You create the properties under the class you specified in the Class Name field when you generate the table. You must check Key on at least one property.
- Click Generate to create the data table and the new class, properties and rules.
- View the summary. You can click List Editor or use Excel to add data instances (rows) to the table.

Step 2: Expose the new properties as database columns with the Property Optimization tool. This step makes the properties available for reporting, and is necessary when a data table is the source for a report definition rule. If you use instances of another class, the properties may already be exposed, so this step could be skipped.
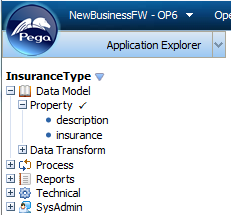
- Refresh your Application Explorer to display the new class.
- In the Application Explorer, use the down arrow to adjust the root class to match the newly created data table class.
- Right-click a property and select Optimize for Reporting from the drop-down menu. Complete the three steps shown on the left side of the screen. See How to expose a property as a database column with the Property Optimization tool for more information. (Screen details for this tool differ slightly between V6.1 and V6.2.)

Step 3: Create a report definition rule that contains the contents of the data table you created in the first step.
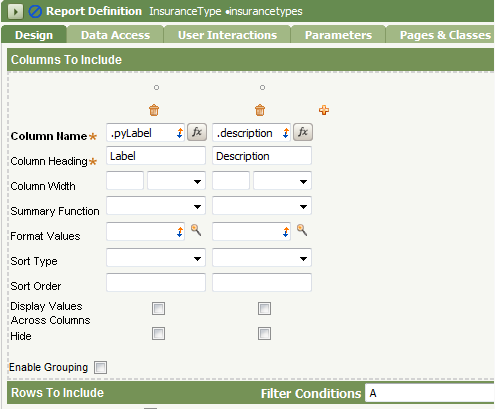
- Enter the class you created in the Applies To field, and enter a name for this report definition rule.

- On the Design tab, enter the Columns to Include from your data table. No other fields are needed to produce a report. However, depending on your needs, you may want to complete the Rows to Include fields, or change the sort order of rows. In this example, the .insurance property is not used in the report definition rule.
To display the Dynamic Select list in alphabetical order, enter a 1 in the Sort Order field under .description.
3. Save and unit test your report definition rule.

Step 4: Create a Dynamic Select using the report definition rule. Configure the parameters of the Dynamic Select to use the report definition you created from your data table. The data instances (rows) you created will be presented to the user at runtime.
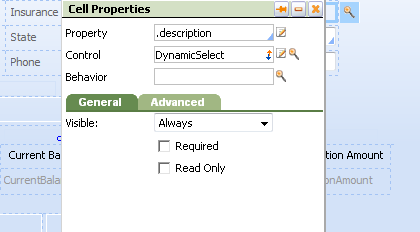
- Open a section rule for editing. On the Layout tab, locate the cell that requires a Dynamic Select control.
- Click the Advanced controls, and drag the Dynamic Select control to the appropriate cell.

- Open the Cell Properties panel. The Control field is populated with DynamicSelect. In the Property field, enter the name of the property that corresponds to the column you wish to display from the data table.
- Click the magnifying glass beside the Control field to display the parameters. For further information, refer to How to configure a Dynamic Select Control.
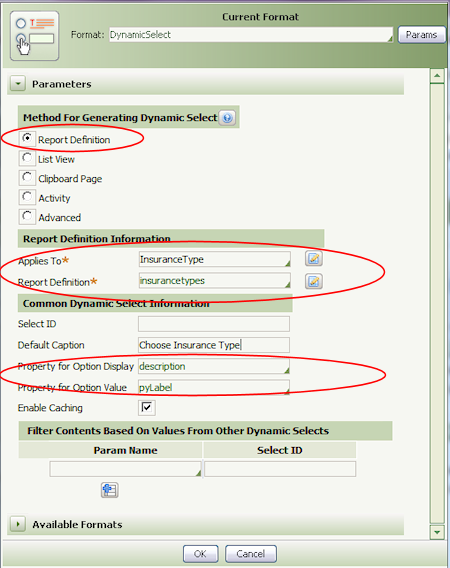
-Click the Report Definition radio button.
-In the Applies To field, enter the name of the class you created.
-In the Report Definition field, enter the name of your report definition rule.
-In the Property for Option Display field, enter the name of the property that corresponds to the data table column of information that you would like to display.
-In the Property for Option Value field, enter the name of the property that corresponds to the data table column of information that writes to the clipboard. In this case, for example, Health Maintenance Organization (.description) will be selectable from the drop-down menu at runtime, but HMO (.pyLabel) will be written to the clipboard.
- Click the magnifying glass beside the Control field to display the parameters. For further information, refer to How to configure a Dynamic Select Control.
- Click OK. Save the section rule and test it.

- Run your application. Select a value from the list presented by the Dynamic Select control. Verify that the clipboard shows the correct option value.