Using SmartLayout features - How to customize, use Merging Cells, and change Field Width
Summary
In general, SmartLayouts are a best practice for the majority of layouts. To read more about SmartLayouts, see How to create attractive flow actions using SmartLayouts. However, in several instances you may want to create more customized options where SmartLayouts may limit the appearance of your layouts. Below, several options that allow for customization.
Various topics in Advanced SmartLayouts:
- How to Use Restrictive Mode and Free-Form Mode
- How to Avoid Merging Cells
- How to Give Fields Control over its Own Width
- How to Show the Full Length in Select Boxes
Suggested Approach
How to Customize Layouts
When using SmartLayouts, you are limited to using standard templates of single/double/triple. While generally applicable, there are instances where you may need to customize the layout of your columns as the standard templates do not allow you to:
- Resize a column or row
- Add columns (you can, however, add rows)
- Drop anything into a cell that is a spacer column
- Change the text wrapping
- Modify ReadOnly and ReadWrite styles
- Merge any fields except Label and Field
In the Application Skin Wizard, templates are configured as below:
For example, a standard SmartLayout (using a double template) would be: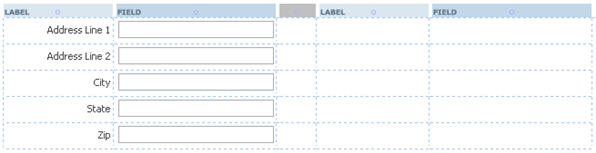
But if you wish to have a Label followed by three fields, for example, you cannot do this using SmartLayouts. 
However, you can create layouts that are more custom (like the example above) by using the following methods:
How to create Custom layouts
If you chose not to use the standard Single/Double/Triple SmartLayout templates, you can mimic these styles to allow more freedom when using columns by restricting columns and changing the Column Type, while not being limited to any specific order for columns.
To customize layouts from the standard options:
- Click the
 next to Layout.
- Go to the Advanced tab, and check Allow changes to Template. Once checked, you cannot switch back to SmartLayouts.

- In SmartLayouts, the Template field in Cell Properties allows you to pick a template. After clicking Allow changes to Template, you are using custom mode, the field is called Template Styles and allows you to chose a label, field or style that matches a single, double, or triple layout. The entire layout must use one style. You can also use a "Custom" layout in addition to single, double, or triple.

How to Avoid Merging Cells
Instead of merging cells, use different SmartLayout templates to accommodate layout requirements.
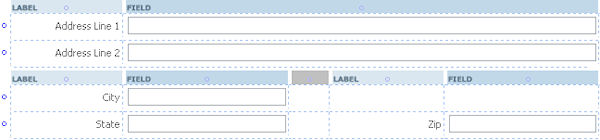
In reference to the original layout below, instead of merging the top two cells to increase the length of the field, a better method is to create two separate layouts.

The first layout uses a Single Template and the second uses a Double Template – both are SmartLayouts.
Sometimes, when using multiple SmartLayout templates on a screen, they require a common header. To do this, create a new section to include these layouts and set the header on this section.

How to Give a Field Control
SmartLayouts force fields to have a certain width.
To change the width for a field, do the following:
- Click on the field whose width you want to change.

- At the Cell Properties dialogue, click the magnifying glass next to Display As.

- At the Parameters window, set the width to 'auto.' Auto enables the field to have control over its own width.

- The Birth Date field now controls its own width.

- Note that the HTML Properties which support the 'auto' width setting are:
- Default
- Text
- Password
- DynamicSelect
- PromptSelect
- Date
How to Show the Full Length in Select Boxes
SmartLayouts force fields to have a certain width, however, sometimes option values in a dropdown can't be displayed in their full length.
To work around this, you can use one of two options that involve modifying the Width parameter of the Select Box.
By Entering Pixel Value
- At the Cell Properties dialog, click the
 magnifying glass.
 - At the Param Window, enter the pixel value next to the Width field.
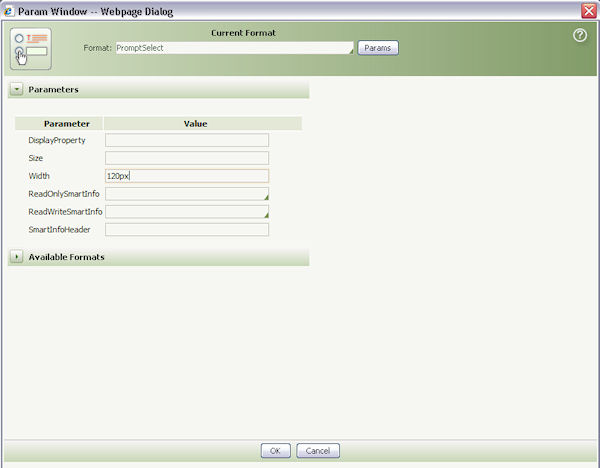
- The field now has the fixed value entered in the Width field, or in this instance, 120px.
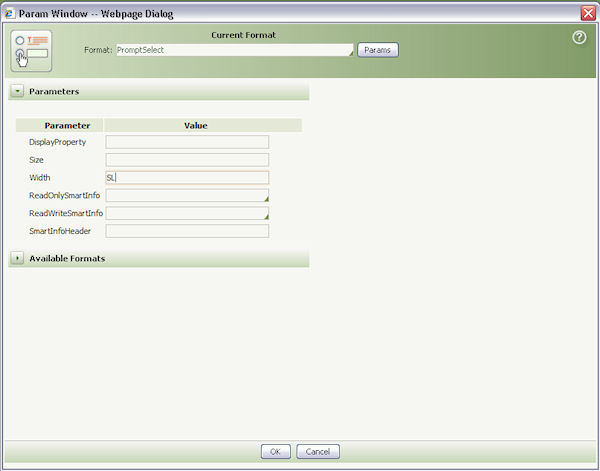
By Entering an SL Value
- At the Cell Properties dialogue, click the magnifying glass.
- At the Param Window, enter the special value SL next to the Width field. Entering SL (which stands for SmartLayout) forces the width of the field.