Using the administration functions to manage testing operations

Test managers use the Test Management Framework's administration functions to manage day-to-day testing operations in the areas of:
- Operators and workbaskets
- Test types
- Custom work types
- Test environments
- Test resources
The administration functions are launched from the Maintain gadget located at the top of the portal used by operators having the appropriate role and portal, such as those used by the PegaTestMgmt:Manager access group.
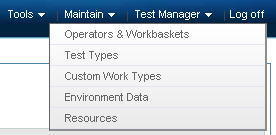
When you make a selection, a tab for performing the activity is displayed within your workspace.
Maintain operators and workbaskets
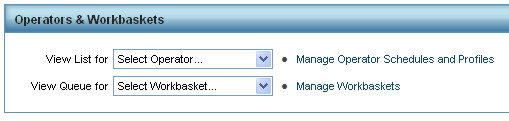
Select Maintain > Operators & Workbaskets to monitor worklists, manage operator schedules and profiles, and manage workbaskets.
Viewing work assigned to operators and workbaskets
To see a specific operator's assignments, select the operator's name from the View List for drop-down box. A window opens with the list of that operator's assignments. Select a row in the list to display a specific assignment. The assignment opens in your workspace where you can process it or perform an alternative action (for example, add an attachment).
To see a particular workbasket's assignments, select the workbasket name from the View Queue for drop-down box. A window opens with the list of assignments in that workbasket. Select a row in the list to display a specific assignment. The assignment opens in your workspace where you can process it or transfer the assignment to an operator or another workbasket.
Managing operator schedules and profiles
To work with operator schedules and profiles:
- Select Manage Operator Schedules and Profiles. The list of operators displays in a new window.
- Select the operator that you want to manage. A summary displays at the bottom of the window.
- Select one of the following actions:
- Click Open to open the operator's profile and update it. A window opens and displays the operator's profile. After updating the profile, click the Save icon to save your changes.
- Click Availability to update the operator's schedule and optionally choose a substitute for the operator's assignments.
- Click Skills to update the operator's skill level.
Managing workbaskets
To work with workbaskets:
- Select Manage Workbaskets. The list of workbaskets displays in a new window.
- Select the workbasket that you want to work with. A summary displays at the bottom of the window.
- Click Open to open the workbasket rule and modify it. After updating the rule, click the Save icon to save your changes.
Maintain test types
Select Maintain > Test Types to work with the names of test types that are used to categorize scenario definitions.
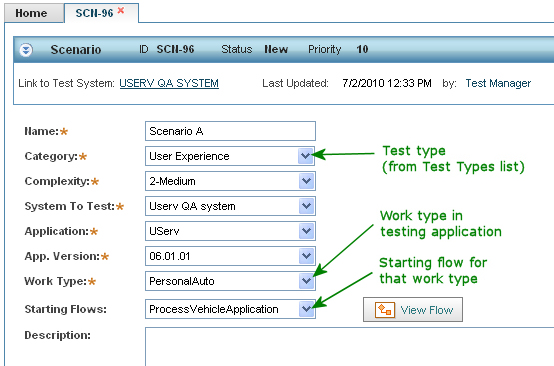
When you create a scenario, you specify a test type for that scenario. For example, if a scenario is intended for regression testing, you might specify Regression as the test type for that scenario:

Test Management Framework provides a set of standard test types. According to your organization's needs, you can delete test types that you do not use, add your own to the list, and update the displayed names.
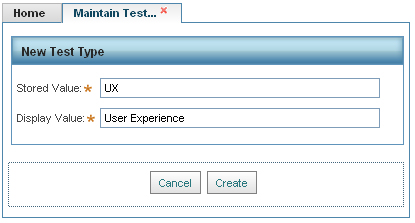
When you select Maintain > Test Types, a tab is added to your workspace, and you can add new test types, update existing ones, or delete test types:
- To add a new test type, click Add. Enter a value to use as the field value stored in the PegaTestMgmtConfig RuleSet and enter the text that you want displayed in the drop-down list when users specify a test type. Click Create to save the new test type.
- To update the displayed name for an existing test type, select it from the drop-down list and click Update. Enter the text that you want to have displayed in the drop-down list when users specify a test type. Click Save to save your changes.
- To delete a test type, select it from the drop-down list and click Delete. In the Delete Test Type Record section, click Delete to remove the stored field value for that test type from the system.
Maintain custom work types
Select Maintain > Custom Work Types to work with the names of work types that are used to categorize scenario definitions.
When you create a scenario, you specify a work type for that scenario. Usually the work type is obtained from the work types that exist in the testing application's application rule, and are associated with the application's starting flows:
In some situations, you might want to define scenarios to test areas of the application that are not associated with the specific application work types. For example, scenarios for manually testing the behavior of different skins used in applications might be appropriately categorized using a Skins work type. By defining custom work type values for such test areas, you can categorize your test scenarios using these values even though they are not truly work types in the testing application.
When you select Maintain > Custom Work Types, a tab is added to your workspace, and you can add new custom work types, update existing ones, or delete existing ones:
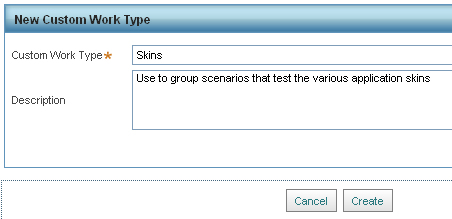
- To add a custom work type, click Add. Enter the text that you want displayed when users create a scenario using this work type, and optionally enter a description. Click Create to save the new custom work type.
- To update the displayed value for an existing custom work type, select it from the drop-down list and click Update. Enter a value that you want to have displayed in the drop-down list when users create a scenario using this work type. Click Save to save the updated value.
- To delete a custom work type, select it from the drop-down list and click Delete. In the Delete Custom Work Type section, click Delete to remove the stored value from the system.
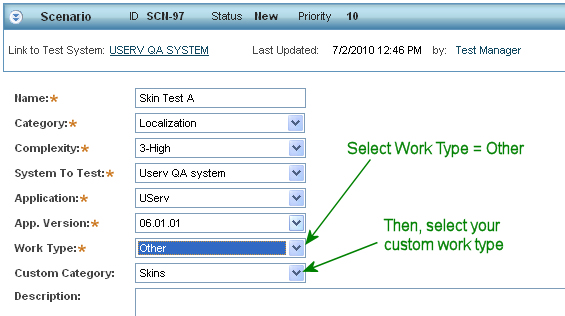
To use a custom work type when defining a scenario, select Other in the Work Type drop-down list, and then select a custom work type from the Custom Category list:
Manage testing environments
Managing testing environments involves:
- Creating and maintaining the various environment records that describe the target test systems. TMF uses these records to connect to the target systems and the applications in those systems.
- Specifying which applications on the target systems are to be tested with TMF.
- Optionally specifying bug tracking systems that testers are to use to open bug reports when tests fail.
In TMF, the environments define the URL connections and login credentials that link the framework to external target systems: development, QA, or bug tracking systems that host the applications you want to test or use to track bugs. The environment record for a target system includes the information about the applications and versions in that target system that you want to test using TMF.
In the test portal, select Maintain > Environment Data to work with the testing environment records. A new tab is added to your workspace and displays the Maintain Environment Data section. This section lists any environments already defined in TMF. On this tab, you can add new environment records, and view, update, or delete existing environment records.
Define a new target test system
- On the Maintain Environment Data tab, click Add. The New Environment section displays.
- In the New Environment section, enter a name and select the type of system. Optionally enter a description for the environment.
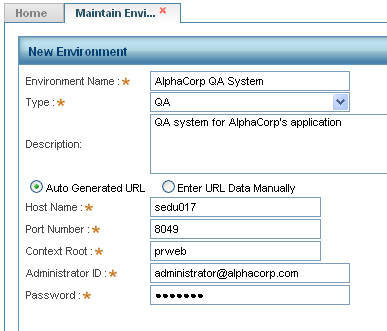
- Enter the URL information for the target system. If the system is using the standard URL for a Process Commander system of the form
hostname:port/prweb, then select Auto Generated URL and enter the information.If the target system has a system URL and SOAP URL that are different from the standard form, or if the system does not have a port or a context root, select Enter URL Data Manually and enter the URL information.
- Enter an operator ID and password.
TMF uses this operator ID's credentials to access the target system. Identify an operator ID that has the appropriate credentials to see the testing applications in the system and see the automated unit test cases and use case rules in those testing applications.
Optionally, after the environment is added, you can update the application information to use different operator IDs for different applications in the same target test environment. This allows you to test multiple applications in the same test environment without having to give a single operator ID access to all of the applications. If the information for a particular application in the environment record specifies an operator ID, TMF uses that operator ID's credentials instead of the one specified at the environment level.
- Click Create.
The tab refreshes and displays the Add Applications to the Environment section. At this point, specify at least one application in the target environment.
- Click
 . The Add Applications window opens.
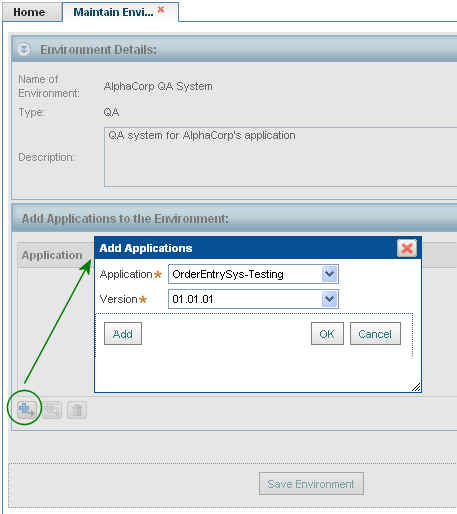
- Select an application and version. Click OK to add the application and close the window, or click Add to continue adding more applications.
- When you are finished adding the applications to be tested from the target system, click Save Environment. Then click Save to save the completed environment record.
The newly added environment appears in the list of environments in the Maintain Environment Data section.
Typically after adding an environment, you specify which applications in that system are to be tested using TMF, and customize the information about those applications (for example, what bug tracking system to use for tests in that application).
Add testing applications for a target environment
After the environment record is initially created for a test system, you add testing applications to the environment record and customize the information about those applications by updating the environment:
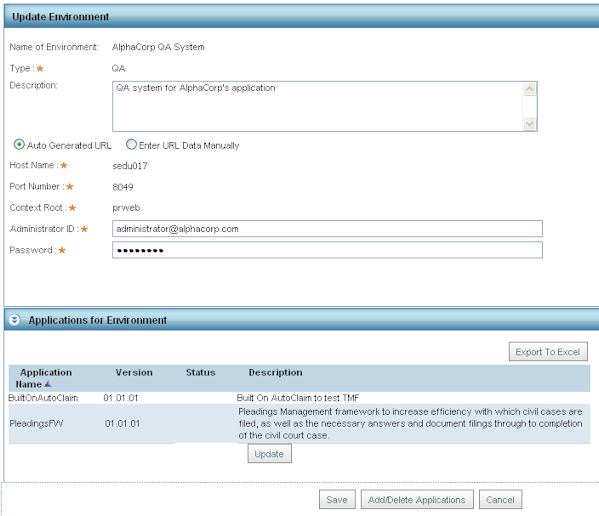
- In the Maintain Environment section, select the environment and click Update. The Update Environment section displays.
- Click Add/Delete Applications.
- In the Add Applications to the Environment section, click , select an application and version, and click OK.
- Click Save to save that application to that environment record.
Customize testing applications in a target environment
After an application is added to the environment record, you can view and customize information about the application. For example, you can select the bug tracking system to use for tests in that application and see a list of its open test definitions and runs.
- In the Maintain Environment section, select the environment and click Update. The Update Environment section displays.
- Select the application in the Applications for Environment list and click Update.
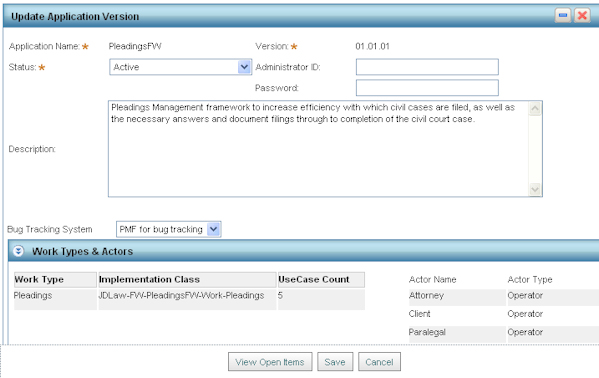
- In the Update Application Versionsection, you can see the application's work types, use cases, and actor information. This information comes from the application's rule in the test system and is used when defining scenarios.
You can optionally specify an operator ID and password that TMF should use to access this testing application and its automated unit test cases and use case rules. This operator ID must be able to access all automated unit test cases and use case rules in the application.
If any bug tracking systems are configured for your TMF system to use, you can select the one that testers should report bugs to when tests in this application fail.
Optionally, click View Open Items to review a list of the application's open test definitions and runs.
- Click Save to save any selections you make to customize the application.
- Click Save to save the updated environment record.
Configure a bug tracking system
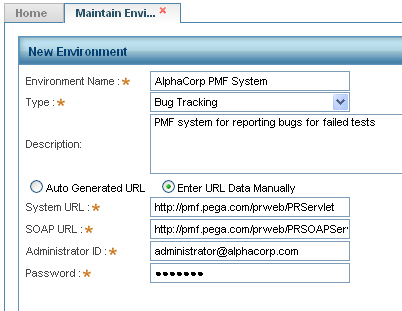
If you want your TMF users to log bugs directly to a bug tracking system from the TMF user interface when tests fail, you must create an environment record for the bug tracking system. In the New Environment section, select Bug Tracking from the Type list to specify the environment is a bug tracking system.
If you have the Project Management Framework (PMF), it is straightforward to connect TMF to your PMF installation so testers can log bugs directly to PMF from the TMF user interface. If you want to have testers log bugs directly to another bug tracking system from within the TMF user interface, you must create an implementation layer in your TMF system, and then customize the necessary SOAP connections, activities, and other rules to call that bug tracking system.
Maintain Resources
Select Maintain > Resources to associate target test systems with the operator IDs for those resources.
In TMF, your resources are the operators in TMF that participate in testing activities. You must associate environment records with these operators so that they can perform test work with the target test systems. Each operator must be associated with at least one environment-application-version combination and have a default one selected.
Specify test environment information for an operator
- In the Maintain Resources section, optionally enter filter criteria, and click Find. A list of operators in the system displays.
For example, to filter on operators associated with TMF, enter
PegaTestMgmtin the Access Group field.
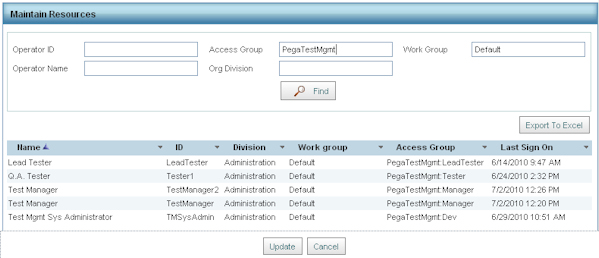
- Select an operator and click Update.
- In the My Environments List section, click .
- In the Framework User Update window, select an environment, application, and version. Select the level of access you want this operator to have to test definitions and test executions for the selected application and version.
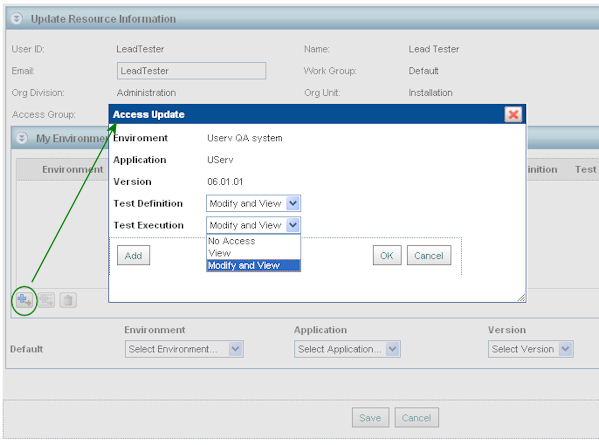
- Click OK.
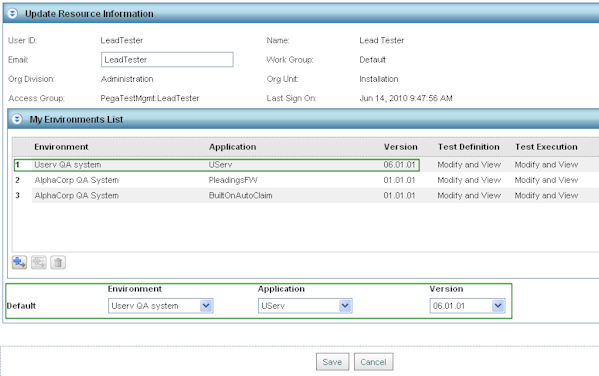
- In the Default section, specify the default environment-application-version combination for this operator.
The default must be one of the environment-application-version combinations listed in the My Environments List for this operator. When the operator logs into TMF, this application and version is the initial in-context application in the test portal for that operator.
- Click OK to save your updates.