Using a robotic desktop automation as a source for a data page
A robotic desktop automation (RDA) runs on client desktops and automates tasks and workflows. You can use an RDA as a source for a data page when the data page is requested from a browser on a Microsoft Windows client that is running Pega Robotics™ Runtime. The RDA robot can read data from a system or write data to a system, even if the system does not have an API. For example, you can use an RDA to obtain a credit score from a legacy system, and then you can display that credit score on a Pega Customer Service™ application account overview dashboard and update a client's address on the system of record.
At run time, the browser requests the data page to be loaded. The data page notifies the client to run the requested RDA automation, and then the browser notifies the desktop robot to run the automation. The data that is returned from the desktop robot is pushed back to the server, the server runs the response data transform, finalizing the data page, and the browser is notified to continue loading the user interface. The run-time architecture is shown in the following diagram.
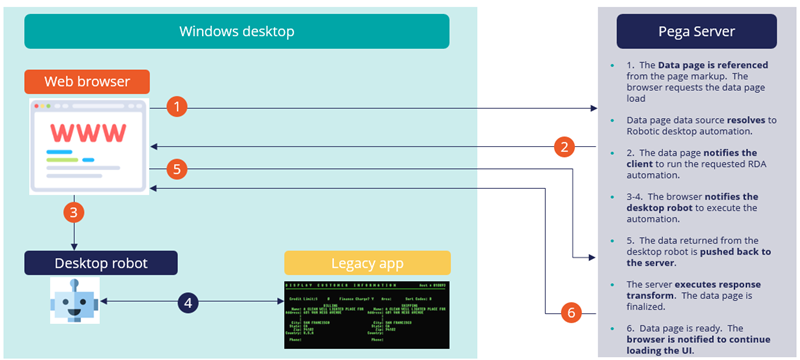
Robotic desktop automation run-time architecture
Configuring an RDA as a data page source
The high-level tasks for using an RDA as a data page source are as follows:
- In either App Studio or Dev Studio, create a data type . For more information, see Creating a new data type.
- Ingest the fields into Pega Robotic Automation Studio and build the automation logic for the robot to execute. Make note of the robotic automation ID because you need it to configure the data page. For more information, see Configuration of Robotic Desktop Automation (RDA) with your Pega 7.2.1 application.
- Configure the data page.
Configuring the data page
After you configure your data type and your automation has been built, you can configure the data page.
- In Dev Studio, from the Data Type Explorer, expand the data type that you created in step 1 above, and click the data page that you want to source with an RDA.
- In the Source field, click Robotic desktop automation.
- In the Robotic Automation ID field, enter the Robotic Automation ID of the automation that was created in Pega Robotic Automation Studio.
- In the Timeout(s) field, enter the length of time that the data page should wait for automation to complete before timing out.
- In the Request Data Transform field, enter the request data transform to use to provide input data to the robot.
- In the Response Data Transform field, enter the response data transform to use to convert the results returned from the robot to the logical model used by the data page.
- Optional. To write data back to the application with which the robot is interacting, configure a save plan:
- In the Data page definition section, in the Edit mode field, select Savable.
- In the Data save options section, in the Save type field, select Robotic desktop automation.
- In the Robotic Automation ID field, enter the ID of the automation that will write the data back to the application.
- In the Timeout field, enter the length of time to wait before timing out.
- In the Data Transform field, select the request data transform to use to provide input data to the robot.
- Click Save.
After the data page is configured, you can use it in your user interface. The most common way to do this is by using section include on a Section rule. You invoke the automation by selecting Use data page in the Page Context field and selecting data page. Select Defer load contents to allow extra time for the robot to fetch the data before rendering the user interface. For more information, see Harness and section forms - adding a section.
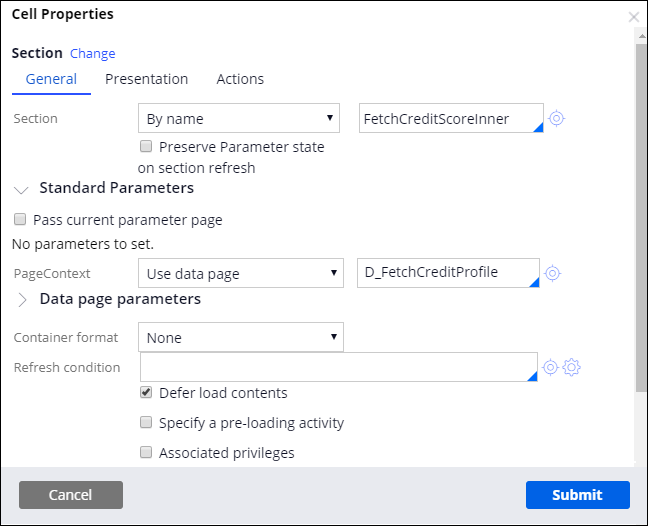
Section rule cell properties
If you configure a save plan, configure the flow action that triggers the post processing that writes data back to the application. For more information, see Saving data in a data page as part of a flow action.