
 Harness, Section, and Flow Action forms
Placing a text label in a layout cell or header

|
|
A cell on the layout can present formatted text, which may include the results of JSP tags or directives. Follow these instructions to control the presentation of the label. Labels can also appear in headers. GRP-229
![]() 1. Drag and
drop the Label control
1. Drag and
drop the Label control
Labels may appear in any cell. Labels are not associated with fields (properties) except by visual placement.
Click the down arrow (![]() ) in
the Basic control group (
) in
the Basic control group (![]() ) and select the
Label control (
) and select the
Label control (![]() ). Drag the Label control to the cell that is to
contain the text. When the pointer changes shape to indicate that a
single cell is selected, release the mouse button to drop the
control.
). Drag the Label control to the cell that is to
contain the text. When the pointer changes shape to indicate that a
single cell is selected, release the mouse button to drop the
control.
If the destination cell is not empty, the dropped label replaces the current contents of the cell.
 To speed development, you
can drag and drop a
To speed development, you
can drag and drop a Single Value property from the
Application Explorer into the right cell of a pair of adjacent cells.
The system drops a label control into the left cell (if it is
empty).
![]() In a SmartLayout, some columns are
labeled
In a SmartLayout, some columns are
labeled Label or Field. This designation
only determines the (default) styles applied to values in the column;
it does not restrict which controls can be placed in cells of the
column. For example, you can drop a Label control into a
Field column.
![]() 2. Complete the
Cell Properties panel — Top fields
2. Complete the
Cell Properties panel — Top fields
 Click the magnifying glass icon (
![]() ) to open the Cell
Properties panel. Complete the panel to define the label appearance
and behavior. GRP-229
) to open the Cell
Properties panel. Complete the panel to define the label appearance
and behavior. GRP-229
Your updates to this panel can update the rule form immediately or
upon clicking Apply, depending on the
Property Panel settings in your Edit
preferences. See Setting your preferences.
If the panel is pinned(![]() ), the wireframe on the rule
form changes immediately to reflect your inputs. If the panel is not
pinned(
), the wireframe on the rule
form changes immediately to reflect your inputs. If the panel is not
pinned(![]() ), click Apply to apply your inputs.GRP-229
), click Apply to apply your inputs.GRP-229
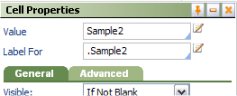
Field |
Description |
| Value |
Type the text that forms the label. If the text is wider
than the panel, click the magnifying glass icon (
Localization? checkbox (on the HTML tab of the rule form) is selected, you
can click the pencil icon ( ) to review or create a field
value rule supporting localization. Proj-212. See
About the
Localization wizard. ) to review or create a field
value rule supporting localization. Proj-212. See
About the
Localization wizard.
|
| Label for |
If you leave this blank, the generated HTML from this form assumes that this label identifies the cell (if any) immediately to the right of the current cell. If this field is not blank, the generated HTML from this form at runtime allows:
|
Field |
Description |
| Visible |
Select to determine when the label appears. (If this setting is not applicable, the cell contents are blank.) Select
|
| Condition |
|
| Run on Client? |
This field appears only if you select Select to indicate that the Condition field contains a simple property comparison test that will be evaluated on the user workstation in response to a client event. See Implementing dynamic form actions and the Client Event Editor. C-1990 Clear to indicate that the Condition field contains a when condition rule name or an expression to be evaluated once upon initial display of the form. |
| Required |
This box is meaningful only for flow action rules or sections that are included in flow action rules. REALLY? Select to cause a yellow asterisk (
|
| Wrap Text |
Select if the text in the cell is to be presented as multiple lines when the text is longer than the cell width. If not selected, the text in the cell may appear truncated at runtime. |
| Read Only |
|
| Condition |
This field appears only when you select the Read Only? checkbox. |
Field | Description |
| Width |
Optional. Enter a positive number for the width in pixels of this cell. (At runtime, normal browser processing for rendering tables determines the actual displayed width.) This field appears only when the Width
field in the Layout panel or Repeat panel (for the layout
containing this cell) is set to
|
| Height |
Optional. Enter a positive number for the height in pixels of this cell. (At runtime, normal browser processing for rendering tables determines the actual displayed height.) This field appears only when all columns in the Layout are
not controlled by SmartLayout column restrictions (that is,
all columns have the
|
| Read-Write Style |
The SmartPrompt list shows all styles that start with the
word Click the pencil icon ( |
| Read-Only Style |
The SmartPrompt list shows all styles that start with the
word Click the pencil icon ( |
| Inline Style | To apply inline styling to this cell only, type a CSS style definition in this field, or click the magnifying glass to access a Style Editor window. Styles you enter in this field supplement and override style elements defined in style sheets, according to normal CSS rules. Inline styles are recorded in the generated HTML for the form; they do not alter the CSS definitions. Using the Style EditorYou can select the font, color, font size, text align, vertical align PROJ 242 – TASK 16156, borders, margins, and other attributes of this cell using selection lists. The Style Editor maintains a preview of the resulting presentation. If you alter the style definition directly, click Apply to update the preview. Click OK to record the style defined with the Style Editor in the panel. |
| Use Heading Styles | Select to change the cell HTML element from <TD> to <TH>, with a resulting style change. |
Use these Windows operations to speed
development:
SHIFT key, select the cell, drag and drop it in
another cell, in the same one layout or another layout.
PROJ-198 RULE-298Ctrl key. Release the
Ctrl key to drop a duplicate row or column. Optionally, if
this label is within a cell of a section that includes
parameter declarations on the
Optionally, if
this label is within a cell of a section that includes
parameter declarations on the  If you need a text label that is longer than 64
characters and do not plan to localize this application,
consider a paragraph rule rather than a label. See
If you need a text label that is longer than 64
characters and do not plan to localize this application,
consider a paragraph rule rather than a label. See