 Flow form
Editing the Split/Join shape properties

|

|
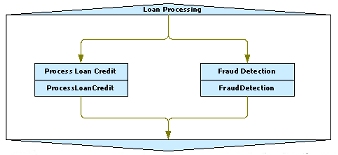
Use the Split-Join shape to require that multiple subflows of your flow be completed before the current flow continues execution. This allows subflows to execute asynchronously, in parallel. For an example, see the standard flow Work-.ParallelWork.
For example, a mortgage application workflow may require that facts about the home buyers be validated, and that a title search be completed. These two tasks are unrelated and can be performed in subflows that proceed independently and in parallel. Other processing later in the primary flow can require that both these two subflows complete.
Drag the Split/Join shape (![]() ) onto the flow and drop it. When the
Split/Join Properties panel appears, complete these fields:
) onto the flow and drop it. When the
Split/Join Properties panel appears, complete these fields:
Field |
Description |
| Split Join Rule | |
| Name |
Enter a text name for this Split/Join shape of 32 characters or less. Choose a name meaningful to application users who see this on the work object history display, the breadcrumbs control (for entry points), and the Where-Am-I? diagram. BUG-2983 The task name is only descriptive; it does not affect runtime execution of the flow. This name also appears inside the Split/Join shape on the Diagram tab. |
| Join When.. Flows are Finished |
Choose
|
| Cost |
Optional. You can associate a cost value (in any units) with this branch. For each work object, the system computes the sum of these cost values for the specific path it takes through the flow rule. MARIK 1/15/04REMOVED? |
| Audit Note |
|
| Audit Note |
Optional. Click the plus sign to access a text box. Text entered here appears as a history instance for the work object recording that this Split/Join task was started.
|
| Entry Point? |
Select to indicate that this Split-Join task is an entry point, which a user can return to using the breadcrumbs control or the standard flow action Previous. The default is cleared. 5.2 This checkbox works with Perform harness rules that include a breadcrumbs display and with assignments that offer the Work-.Previous flow action. In other cases, the checkbox has no effect. |
| Only going back? |
This checkbox appears only when you select the Entry Point? checkbox. Select to restrict users at runtime from jumping ahead to this step without having completed the preceding steps. After having completed this step, users may jump back to it from steps that follow it.
|
Then click Apply . (To edit these shape properties after you save the Flow form, open the Diagram tab, right-click the shape, and select the Edit tab on the pop-up window.) GRP-202
1. Connect at least one incoming connector to the top of the Split/Join shape. Add at least one outgoing connector to the bottom of the shape. VAGUE
2. Expand the Split/Join shape so that the rectangle becomes large enough to enclose the Flow shapes.
3. Select and drag a Flow shape (![]() ) for one of the subflow to be started. Complete
the SubFlow Process panel; then click Apply .
) for one of the subflow to be started. Complete
the SubFlow Process panel; then click Apply .
4. Repeat for each additional flow to be started. The Split/Join shape must contain at least two called subflows.
5.  Add a
connector from the top triangle to the top of each called flow. Add at
least one connector from the bottom of each called flow to the bottom
triangle.
6. Complete the Connector Properties panels. If you choose Status for the connectors that start the subflows, you can associate a Likelihood value with each. At runtime, Process Commander starts the called flows in order of greatest likelihood. MARIK 8/14/06