Customizing the login screen
You can replace the splash screen image and other aspects of the sign-on form with images and layout of your choosing.
The goal
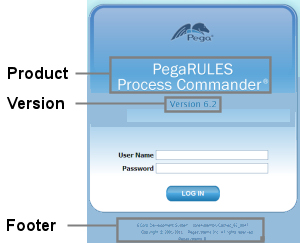
The standard log-in form includes:
- The Pega Platform product name
- Version level of the product
-
A footer containing:
- System node description
- Build identifier for the code build on which the installed version is based
- Pegasystems copyright and trademark information
In your setting, an image or text that identifies your organization or the application may be more appropriate.
In addition, you can change the text or layout of the log-in form, or change the authentication processing performed upon log-in.
Customize the displayed system node text
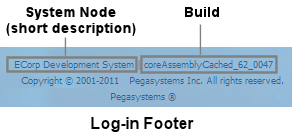
In the footer of the log-in form, the text for the system node is the short description of the System Node form.
To customize the displayed System Node text:
- Click Designer Studio > System > General > Systems, Nodes, Requestors .
- Scroll down to the Nodes section.
- In the Node Name column, click the name of the node that has the arrow next to it. This is the current node. The System Node form opens.
- In the Short Description field of the System Node form, enter the text that you want displayed for the System Node portion of the log-in form's footer.
- Save the form.
To see the changes, log out, and then return to the log-in form in your browser.
In a multinode cluster, repeat steps 3 through 5 for each node listed in the Nodes section of the Systems, Nodes, Requestors gadget.
Create an access group and application ruleset for guests
The Pega Platform presents this sign-on form to guest requestors — users who have started the Pega Platform but are not yet authenticated. The ruleset lists of guest users are limited to those rulesets and versions listed in an access group listed in the BROWSER requestor type.
- Create a new access group for unauthenticated users, for example, Unauthenticated.
- Create an application ruleset to hold the additional rules to be available to guest users. (For security reasons, don't use an existing ruleset that contains other parts of your application to hold these.) For example, you can call the new ruleset version MyCorpSplash:01-01-01.
- Open the new access group instance. Insert MyCorpSplash:01-01-01 into the Production RuleSets array.
- Save the Access Group form.
- Add the new access group to the BROWSER requestor type. Ensure that the radio button next to this access group.
Promptly after you complete and test any log-in changes for your application, update the ruleset version to secure it with a password. This prevents accidental additions of more rules to the ruleset — additions that might inappropriately become available to unauthenticated guest users.
Save the custom splash page as a series of binary file rules
The standard splash page is comprised of the following images:
| Image | Dimensions | Description |
|---|---|---|
| webwb.pxloginbackground.jpg | 1738x1104 px |
The background of the splash page, as defined in the
body
CSS element of the
@baseclass.Web-Login
HTML rule.
|
| webwb.pxloginbutton.png | 125x36 px |
The background of the "Login" button on the splash page, as defined in the
.loginbutton
class of the
@baseclass.Web-Login
HTML rule.
|
| webwb.pxlogindivbackground.png | 524x524 px | The background of the div element that contains the standard User Name and Password text boxes, as defined in the #logo div element in the @baseclass.Web-Login HTML rule. |
To edit the component images:
- Using Paint, Adobe Photoshop, or any similar workstation software of your choice, prepare an image of the appropriate dimensions with colors and content of your choosing. Save each image on your workstation with a matching file name and extension.
- Sign on to the Pega Platform. Open the standard binary file rule you wish to replace.
- Use the Save As toolbar button to make a copy of this standard rule in your new ruleset, version 01-01-01. Do not change the name.
- Click Upload File and navigate to upload the custom image.
- Save the Binary File form.
- The rule containing the new image is now available to guest users. However, your workstation browser cache and the Pega Platform 's static content cache may contain the older, standard image19.gif. To clear your workstation cache (when using Internet Explorer), sign off from the Pega Platform, close any windows that display the image, and choose Tools > Internet Options > General > Temporary Internet Files > Delete.
- To clear the static content cache, click Designer Studio > System > Operations > System Management App to start the System Management application. You may be prompted for authentication credentials.
- In the System Management application window, choose the current node. Then select Advanced > ETier Static Content Management.
- Click Delete Rule-File and ServiceExport to delete image19.gif and other binary files from the static content cache. The Pega Platform re-extracts them from the binary file rules as needed.
- Sign off and sign on again to see the updated image.
Change log-in form text and layout
The standard HTML rule named @baseclass.Web-Login defines the HTML code that presents the log-in form. You can override this to change the layout, wording, fonts, and colors used in the form. This procedure requires two workstations.
- Open the standard HTML rule named @baseclass.Web-Login.
- Use the Save As toolbar button to make a copy of this standard rule in your new ruleset, version 01-01-01. Do not change the rule name.
- Alter the content of the HTML tab as desired to present the desired text, colors, and layout. Don't alter the directives, the <FORM> element, or the <INPUT> elements. Don't change the activity name referenced in the Submit button.
- Save the HTML form.
- Perform Steps 6 and 7 from a different workstation, in case the new log-in form is incorrect and prevents anyone from signing-on. Remain logged in on the first workstation.
- At the second workstation, clear the browser cache (for Internet Explorer, use Tools > Internet Options > General > Temporary Internet Files > Delete ).
- At the second workstation, enter the sign on URL to see and test the new form.
- At the first workstation, revise the HTML rule again until you are satisfied with the new layout and appearance, always testing on the second workstation.
Change authentication processing
The standard activity Code-Security.Login defines authentication for browser-based users. Rather than overriding this sophisticated standard activity, you can alter the Submit button of the HTML form to call your activity that in turn calls the standard activity.
- The new authentication processing might prevent everyone from logging in, even to restore standard behavior.
- The new processing is defective such that guest users can perform processing not intended for them.
- Users with invalid credentials can sign on.
Log out form
The standard HTML rule @baseclass.Web-Session-Return defines the appearance of the log out form. You can override this rule to suit local needs. The ruleset containing your log out form must be available to guest requestors.
Related PDN articles
- How to customize the log-out screen
- How to customize the login screen
- How to temporarily disallow new interactive logins with a Dynamic System Setting
User Interface category Requestor Type data instances