Create effective navigation experience in your mobile app by adding pages and actions
to the menu bar. For example, you can add a custom profile page to the menu bar of your
Expenses app so that users can conveniently access the screen with their basic contact
information.
Before you begin: Create a mobile channel for your mobile app. For more
information, see Setting up mobile apps.
Open your mobile channel:
In the navigation pane of
App Studio, click Channels.
In the Current channel interfaces section, click
the tile that represents a mobile channel for your app.
On the mobile channel page, on the Content tab, click
the Navigation category.
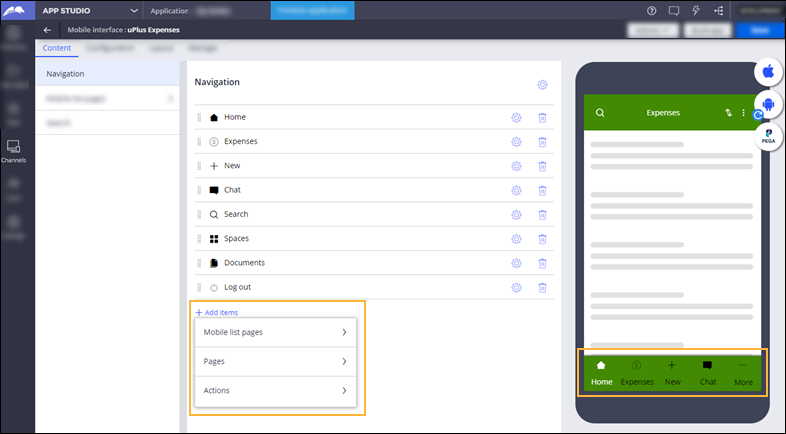
In the Navigation section, manage the items that appear on
the menu bar of your mobile app:
Note: The menu bar in your mobile app displays icons and labels for up to five
items. When you add a sixth item, the fifth icon and label change to the
More button that groups all subsequent
items.
To add a mobile list page, click Add items > Mobile list pages, and then select the list page that you want to display on
the menu bar.
To add a user interface page, click Add items > Pages, and then select the page that you want to display on the
menu bar.
To add an action, click Add items > Actions, and then select the action that you want to display on the
menu bar.
To remove an item, click the Remove icon on the
rightmost side of the row.
To reorder items on the menu bar, drag the items up or down the
list.
For example: To give your users an overview of their work items, you can enhance the
menu bar with the Expense reports mobile list page that
lists the submitted expense reports and their statuses. Additionally, you can
improve the way users log out of the mobile app by adding the Log out action to
the menu bar.
Click Save.
Result: You can see the updated menu bar on the preview in your
mobile channel. At run time, your mobile app displays the items that you added on the
menu bar. When users tap the icon of an item, the app displays the content of the page
on the screen or triggers an action.
Example:
Figure: Navigation of the menu bar for an expense reporting app
What to do next: Verify the changes to your mobile app with the Pega Mobile Preview app. For more information, see Previewing mobile apps.