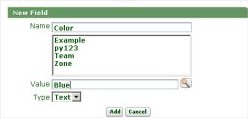
|
Rule forms include a History tab with a uniform layout.
Complete two fields:
Field |
Description |
| Full Description |
Optional. Enter text describing this rule instance. The data appears in a column in a list display.
|
| Usage |
Optional. Enter text for later reference describing any special considerations, usage, or other facts about this instance. |
The system maintains these fields automatically:
Field |
Description |
| Full History | |
| Add |
Read-only. System-maintained date, time, Operator ID and System ID of the user who created this rule. |
| Update |
Read-only. System-maintained date, time, and Operator ID of the user who most recently saved this rule. |
| Move |
Read-only. System-maintained date, time, and Operator ID of the user who most recently uploaded this rule into this Process Commander system's database, using the Import Archive facility. |
![]() The skim operation (
The skim operation (![]() > System > Tools > Refactor RuleSets> Skim a RuleSet ) BYRNB 2/26/10 records its use in the Add date and time field, not the
Update date and time. If this rule was created
through the Skim operation, the Update date and time
can be earlier than the Add date and time. This is
expected. B-21448 Rejected
> System > Tools > Refactor RuleSets> Skim a RuleSet ) BYRNB 2/26/10 records its use in the Add date and time field, not the
Update date and time. If this rule was created
through the Skim operation, the Update date and time
can be earlier than the Add date and time. This is
expected. B-21448 Rejected
![]() Using the
History Details button
Using the
History Details button
Click History Details to see the Save history of this rule in a new window. From the History window, you can
C-650Optionally, you can associate a set of names and values with a rule. These names and values can document development decisions or provide a means of locating the rules later. (Process architects and managers may alter the value of a previously entered name-value pair, but cannot add or delete Custom Field names.) B-13748 Rejected KHATV 04/20/05
Using this optional facility, you can associate an array of arbitrary Name and Value pairs with the rule. Later, using the Find by a Custom Field search (part of the Advanced Search tool), you can quickly locate all rules you or you colleagues have tagged with a specific field or value. B-16610 can't delete
You can also upload an entire file (for example, a Word document file, Visio VSD file, or a JPG image containing a diagram) as the value of a Custom Field. Process Commander links the uploaded file permanently with this rule.
![]() The Custom Fields array is
not visible the first time you open a rule. To access this array
immediately after you create a new rule with New or Save As, close the
rule form and then reopen the rule form.B-11017 Rejected
The Custom Fields array is
not visible the first time you open a rule. To access this array
immediately after you create a new rule with New or Save As, close the
rule form and then reopen the rule form.B-11017 Rejected
Click Update to add or change the Custom Fields associated with a rule. (This button appears only on rules you can update, and only on rules that are saved.)
A table in the top portion of the Custom Fields
dialog box contains one row for each existing field. Columns identify
the field name, field value, and type (Text or
File):
Click Apply to complete the changes and close the Custom Fields dialog box.
 Use the lower part of the
Custom Fields dialog box to add a new field to the
system.
File in the
Type selection box. Select a radio button to
indicate whether you want to upload a file from your workstation or
LAN, or to select from files previously uploaded for this field
name. In the upload case, use Windows facilities to navigate to the
file, which may be of any file type.
 You can modify the appearance of this
area. See Pega Developer Network article
You can modify the appearance of this
area. See Pega Developer Network article![]() PRKB-17693: How to allow developers to review or
update Custom Fields.
PRKB-17693: How to allow developers to review or
update Custom Fields.
By default, rule history instances (of the class
History-Rule) are stored in the PegaRULES database as
rows of the pr4_history_rule table.

|
History- base class |

 How to complete and use the History tab of a rule form
 Designer Studio basics