
 How to convert a section to use SmartLayouts
A SmartLayout-based form provides attractive, consistent spacing of horizontal elements such as field labels and Text Input controls, even when sections are embedded within sections. SmartLayouts contribute to a professional-looking application and may improve user productivity and quality.
For new development, use of SmartLayouts is recommended. If you have user forms or flow action forms created in releases before V5.5, consider "upgrading" them to achieve all or most of the Smart Layout benefits.
In many cases, you can convert some or non-SmartLayout form to use only SmartLayouts, realizing some of the benefits. In other cases, conversion is inadvisable or impractical.
Tactics
For the harnesses and sections, identify each included section, sections included within those sections, and so on.
Work in a new RuleSet version. Start by saving each rule to be converted into the higher RuleSet version.
Upgrade or rebuild the harness first. Then upgrade or rebuild the harness or flow action .
Approach 1: Upgrade in place
Follow these tips to "upgrade" an older layout into a quasi-SmartLayout layout.
- Decide whether the contents of the existing layout are most nearly matched by the
Single,Double, orTripleSmartLayout format. - Use the Insert Column (
 and
and  ), Merge Cells (
 ) and other operations as necessary so that columns correspond to alternating labels and fields, with an empty spacer column between label-field pairs.
 - Open the Layout Panel. If the Header value is
HiddenorHidden (Sub), change it toNo Format. - Change the Template from
CustomtoSingle,Double, orTriple. - Click Apply. Save the rule form.
- Open the Column panel for each column. Select a Column Type of
Labelfor the leftmost column and click Apply. Make the second column have a Column Type ofFieldand the third column have a Column Type of Spacer. Repeat to mimic theSingle,DoubleorTriplepattern of columns. Save the rule form. - Repeat for each section. After all sections are upgraded, make a Save As copy of harnesses and flow actions. Refresh to see the upgraded sections. Save.
- Test.
Approach 2: Replacement
The upgrade process in Approach 1 preserves your previous settings within individual cells (except for width, height, and styles), and preserves many previous settings for the layout itself. However, the result of this "upgrade" is not a true SmartLayout. To achieve a true SmartLayout, you must reproduce the cells in a SmartLayout.
- Decide whether the contents of the existing layout are most nearly matched by the
Single,Double, orTripleSmartLayout format. - Select the Layout control
 from the Layout control group (
 ). Drop a new layout below the original layout.
 - Open the Set the Template to
Single,DoubleorTripleas appropriate. The Smart Layout is empty. - Select a cell in the original layout. Right-click and choose Copy from the context menu. Find the correspondence cell in the SmartLayout, right-click, and choose Paste.
- Repeat for each cell in the layout, adding or deleting rows (not columns) as appropriate. Save.
- Open the Layout properties panel of the original layout, and note the property settings. Enter these values in the new SmartLayout panel. However, if the original layout has a Header value of
HiddenorHidden (Sub), selectNo Formatfor the Header of the SmartLayout panel. - After all cells and properties are copied to the SmartLayout, delete the original layout. (You can still examine the original layout in the original rule.)
- Test.
Example
Original user form. Labels and fields are not aligned on the left or the right, and have differing widths.

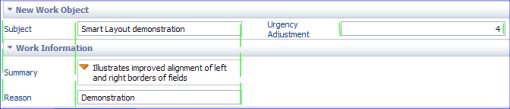
After upgrade. (Added green lines to emphasize uniform widths)
Related PDN articles
-
 25652 Tips and tactics for converting to SmartLayouts
 -
25901 When not to use SmartLayouts
-
25623 How to create attractive flow actions using SmartLayouts

|
SmartLayout, template |

|
Harness, Section, and Flow Action forms — Adding a Smart Layout |
 User Interface category