|
![]() When you complete the Save As form, you provide one or more key
parts that together determine the visible instance key. Optionally, you can provide additional fields to qualify and control the rule.
When you complete the Save As form, you provide one or more key
parts that together determine the visible instance key. Optionally, you can provide additional fields to qualify and control the rule.
Select a filter to restrict the SmartPrompt list of Applies To classes to a smaller, more relevant subset of classes. This avoids searching long lists of classes that are not part of your implementation or framework and eliminates validation errors caused by creating instances in the wrong RuleSets.
![]() The filter appears only when you create a rule that requires an Applies To class as part of its key structure, such as a property or activity rule.
The filter appears only when you create a rule that requires an Applies To class as part of its key structure, such as a property or activity rule.
Implementation— Displays classes that belong to the Application RuleSets list in your Operator profile Framework — Displays classes that belong to any RuleSet version in the RuleSet list in your Operator profile and not included in the Application RuleSet list (omitting the Pega- classes)All — Displays classes that belong to both the Application RuleSet and RuleSets lists in your Operator profile and Pega- classes ![]() Step 2: Enter names (key
parts)
Step 2: Enter names (key
parts)
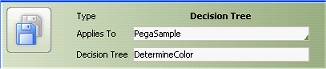 The form lists the name
or key part fields for the rule type, with values from the
original rules.
The form lists the name
or key part fields for the rule type, with values from the
original rules.
For many rule types, the new rule can retain the same key parts as the original rule, but belong to a different version, different RuleSet, or become circumstance-qualified or time-qualified.
Many standard rules have Work- as the Applies To key part, but you cannot create additional rules with Work- as the Applies To key part. When you're copying such a rule, the Save As form defaults the name of the container class for the current work pool as the Applies To class.
A green triangle (![]() ) at the right end of a field indicates
that SmartPrompt is available. Press the
) at the right end of a field indicates
that SmartPrompt is available. Press the Down
Arrow key to access a list of choices, as an
alternative to typing a value.
For help on choosing names, see Choosing rule and data instance names. Some key parts are restricted to be Java identifiers, which start with a letter and meet additional restrictions. See How to enter an identifier.
![]() If the original rule you
are copying has the Available field set to
If the original rule you
are copying has the Available field set to
Final, enter at least one key part that differs
from the keys of the original, or choose the same RuleSet and
a higher version number. By definition, you cannot override a
final rule with another rule in a different RuleSet.
![]() When creating a
circumstance-qualified or time-based rule by copying the
original rule, don't alter the name (final) key parts.
However, you can change the Applies To class
to another class that is derived from the Applies
To class of the original rule.
When creating a
circumstance-qualified or time-based rule by copying the
original rule, don't alter the name (final) key parts.
However, you can change the Applies To class
to another class that is derived from the Applies
To class of the original rule.
![]() Step 3: Enter RuleSet and
version
Step 3: Enter RuleSet and
version
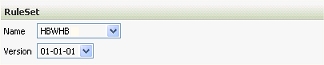 Select a RuleSet and
version. The lists identify unlocked RuleSets and versions
that you can access.
Select a RuleSet and
version. The lists identify unlocked RuleSets and versions
that you can access.
Field |
Description |
| RuleSet Name |
To override this default, select a RuleSet from the list.
|
| Version |
If the original rule belongs to a RuleSet that has a version that is not locked, the highest such version to which you have access appears here. If the RuleSet name field contains a Local Customization RuleSet from the Settings tab of your access group, the corresponding version from the access group typically appears here. You can select another version from the list. By definition, you can't save a new rule into a locked RuleSet version. |
The RuleSet and version you choose has prerequisites, identified in the Rule-RuleSet-Version instance. The RuleSet associated with the class instance (Rule-Obj-Class) must be among the prerequisites of the RuleSet and version you choose.
![]() Step 4: Set the rule availability and status
Step 4: Set the rule availability and status
Select an initial availability value for the new rule. You
can change this value anytime later using the Availability
toolbar button (![]() ). Select one of five
values:
). Select one of five
values:
Value |
Select ... |
Yes
|
To make this rule instance available, so that it can be found by rule resolution processing. |
No/Draft Mode
|
To make this rule unavailable to everyone — never selected by rule resolution — regardless of other rule settings. |
Blocked
|
To make this version and lower versions invisible and never found during rule resolution to all users seeking this version, regardless of other rule settings. (Users requesting a higher-numbered version or a specific lower number version may find those versions.) |
Final
|
To make this rule available and also prevent this rule from being overridden, in any RuleSet. |
Withdrawn
|
To make this rule never selected by rule resolution (like No/Draft) but also to hide other rules from rule resolution that share the same RuleSet, visible key, and qualifications (if any) but have a lower version. This allows you to effectively delete a rule in a locked RuleSet Version, by masking it from rule resolution. |
After you save this rule instance, you can change the
Availability value with the Availability (![]() ) or Save As
(
) or Save As
(![]() ) buttons (and only
for rules belonging to unlocked RuleSet versions).
) buttons (and only
for rules belonging to unlocked RuleSet versions).
![]() Leave the Status field blank except in special situations. Select:
Leave the Status field blank except in special situations. Select:
API — To associate this rule with one of Process Commander's interfaces. Select an interface. (Traditionally, this designation indicates an intent not to change the functionality of the rule in future releases.)Template— To mark this rule as a template, to appear in the Template field. Useful for harness and flow rules. (See step 4 above)Extension — To mark this rule as an extension point of a framework, to be overridden in each implementation of the framework. Extensions are specified by framework developers for rules that are intended to be overwritten or copied down to the implementation class. (If the current application was developed using the Enterprise Application Accelerator, select Application > Direct Capture of Objectives > List Extensions to list rules with this status.)
![]() The value you select for this property (Rule-.pyMethodStatus) does not affect validation, execution, rule resolution, or migration of the rule. The value does not appear on the rule form and cannot be changed later.
The value you select for this property (Rule-.pyMethodStatus) does not affect validation, execution, rule resolution, or migration of the rule. The value does not appear on the rule form and cannot be changed later.
![]() Step 5: Enter optional circumstance
qualifications
Step 5: Enter optional circumstance
qualifications
This area enables you to specify the following qualifications for a rule:
The Circumstance area appears only for rules of rule types with the Allow Selection based on Property Rules? box selected on the Class form defining the rule type. You can specify either a single-property circumstance or a multiple-property circumstance.
![]() Don't complete
circumstance fields for a rule unless another, base rule
exists with these fields blank. The base rule can have the
same Applies To key part as the
Applies To key part of the
circumstance-qualified rule, or a parent or ancestor class of
the Applies To key part of the
circumstance-qualified rule.
Don't complete
circumstance fields for a rule unless another, base rule
exists with these fields blank. The base rule can have the
same Applies To key part as the
Applies To key part of the
circumstance-qualified rule, or a parent or ancestor class of
the Applies To key part of the
circumstance-qualified rule.
 Select the
appropriate type of circumstance in
the Use drop-down list as follows:
Select the
appropriate type of circumstance in
the Use drop-down list as follows:
Property to specify a single-property
circumstancesTemplate to specify multiple-property
circumstancesIf you select Property, four additional
fields appear. The property fields in this section are
optional. If you enter a property name in the
Property field, also enter a property value.
If you enter a date property name, also enter a date (and
optionally, a time).
Field |
Description |
| Property |
|
| Value |
If you entered a property name, enter a literal value for that property to further restrict operation of rule resolution. You cannot use blank or the null value as the circumstance property value. |
| Date Property |
|
| Date Value |
Click the calendar button ( |
If you select Template, two additional fields
appear. The Template
field is optional. If you select a template, enter a value in
the Definition field.
Field |
Description |
| Template |
|
| Definition |
|
 Like
circumstance-qualified rules, time-qualified
rules require a preexisting sibling rule instance (of any
RuleSet and version) with unspecified (blank) Date
Range fields. These fields are optional. Don't
complete date range fields for a rule unless the system
contains another, existing rule with these fields blank. (The
base rule must have the same name but may have a parent or
ancestor Applies To class of the time-based
rule.)
Like
circumstance-qualified rules, time-qualified
rules require a preexisting sibling rule instance (of any
RuleSet and version) with unspecified (blank) Date
Range fields. These fields are optional. Don't
complete date range fields for a rule unless the system
contains another, existing rule with these fields blank. (The
base rule must have the same name but may have a parent or
ancestor Applies To class of the time-based
rule.)
After you save the rule, the rule is active during the specified time interval. At all other times, the base rule is active.
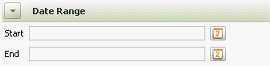
The Date Range area appears only for rule types that have the Allow rules that are valid only for a certain period of time? box selected on the Class form for the rule type.
Field |
Description |
| Start | Optional. Click the
calendar button ( |
| End | Optional. Click the calendar button to choose the end date, and time (optional) for this rule. |
![]() Two or more time-qualified
rules (for the same base rule) may have overlapping time
intervals. During rule resolution, if two or more
time-qualified rules are both candidates at the current time
and date, the system selects the ones with the nearest end
date. Of these, if multiple remaining candidate rules have
the same end date, the system picks the candidate with the
most recent start date.
Two or more time-qualified
rules (for the same base rule) may have overlapping time
intervals. During rule resolution, if two or more
time-qualified rules are both candidates at the current time
and date, the system selects the ones with the nearest end
date. Of these, if multiple remaining candidate rules have
the same end date, the system picks the candidate with the
most recent start date.
![]() Leave the Status field blank except in special situations. Select:
Leave the Status field blank except in special situations. Select:
API — To associate this rule with one of Process Commander's interfaces. Select an interface. (Traditionally, this designation indicates an intent not to change the functionality of the rule in future releases.)Template— To mark this rule as a template, to appear in the Template field. Useful for harness and flow rules. (See step 4 above)Extension — To mark this rule as an extension point of a framework, to be overridden in each implementation of the framework. Extensions are specified by framework developers for rules that are intended to be overwritten or copied down to the implementation class. (If the current application was developed using the Enterprise Application Accelerator, select Application > Direct Capture of Objectives > List Extensions to list rules with this status.)
![]() The value you select for this property (Rule-.pyMethodStatus) does not affect validation, execution, rule resolution, or migration of the rule. The value does not appear on the rule form and cannot be changed later.
The value you select for this property (Rule-.pyMethodStatus) does not affect validation, execution, rule resolution, or migration of the rule. The value does not appear on the rule form and cannot be changed later.
![]() Step 8: Select Project Management Task
ID
Step 8: Select Project Management Task
ID