|
 C-1099Use the Application Explorer to obtain quick access to
rules in a single application, organized by work type, category, and rule
type. This explorer is most useful in development settings where a
majority of rules have an Applies To key part that
matches a work type.
In contrast to the Class Explorer and Rules Explorer, the Application Explorer shows only rules that are associated with the RuleSets that correspond to your current application — the application name that appears in the header of the Designer Studio window. This smaller selection of rules is easier to explore and navigate.
The exact set of rules that appear depend on your preference settings and selected work pool (as defined more precisely below).
![]() Starting the
Application Explorer
Starting the
Application Explorer
The Application Explorer is available to all developer roles. To show the rules in your application:
Through preferences, you can control:
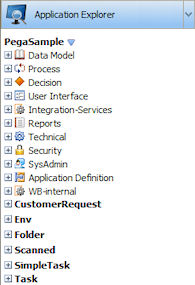
The tree contains nodes that correspond to the category of rules they contain. Each node contains several types of rules, and then individual instances of each rule type in the deepest level. Each node only appears if it is not empty.
Rule Categories:
|
|
|
|
|
|
|
|
|
|
|
|
|
|
|
|
|
|
Within each rule type node, the following icons represent individual rules.
For properties with a mode other than Single Value, an
icon indicates the mode. The following modes are most common:
Value
List.Value
Group.Page mode
property. C-2042Click the plus icon to expand the subtree
of embedded properties. Click the minus sign to collapse the
subtree.Page List property.
C-2042Click the plus icon to expand the subtree of
embedded properties, or the minus sign to collapse the
subtree.Page Group property.
C-2042Click the plus icon to expand the subtree of
embedded properties, or the minus sign to collapse the
subtree. ![]() Interacting with
the tree structure
Interacting with
the tree structure
 When you open or operate on a rule
presented in the Application Explorer, Process Commander uses rule
resolution to find the highest rule on your RuleSet list that you can
execute. However, the tree structure in the Application Explorer
presents all versions of rules in a RuleSet, not those you can
execute. In unusual situations, the Application Explorer display may
include a rule that you cannot execute.
![]() Interacting with
the Visio flow editor
Interacting with
the Visio flow editor
When working in Visio you can add new flow shapes by dragging rule instances from the Application Explorer and dropping them onto the diagram. Click the ![]() icon to select the rule.
icon to select the rule.
You can drag and drop rules of these types onto Visio diagrams. Proj-179, GRP-2259 v6.1 For an example, see Pega Developer Network article PRKB-26016 How to drag rules from the Application Explorer into shapes on a Visio flow diagram.
Rule |
Flow Shape |
||||||||||||||||||||||
|
Flow |
Flow
See: |
||||||||||||||||||||||
|
Flow action |
Connector (flow action)
|
||||||||||||||||||||||
|
Map value |
Decision |
||||||||||||||||||||||
|
Decision tree |
Decision |
||||||||||||||||||||||
|
Decision table |
Decision |
||||||||||||||||||||||
|
Service level |
No shape. Drop the instance on an Assignment shape to populate the Service Level field in the Assignment Properties panel.
|
||||||||||||||||||||||
|
Activity |
Shapes are determined by activity type as specified on the Security tab on the rule form. The types and their respective shapes are listed below.
|
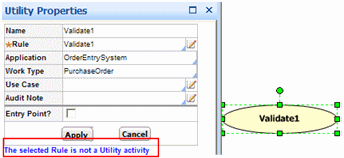
![]() You can (although not recommended) use an activity in a Utility shape that is not a
You can (although not recommended) use an activity in a Utility shape that is not a Utility type (see table above). Doing so displays a warning message in the Utility Properties panel. The shape does not affect flow processing. Here is an example of a Validate activity:

![]() You can drop some types of rule instances on a connector and automatically re-attach and create
new arrows connecting the new shape to existing shapes. See Flow form - Editing in Visio — Connectors and flow actions.
You can drop some types of rule instances on a connector and automatically re-attach and create
new arrows connecting the new shape to existing shapes. See Flow form - Editing in Visio — Connectors and flow actions.
Select a text value and right-click to access a context menu.
Depending on the type of the rule you select and other factors, a context menu can include the following menu options:
Menu item |
Result |
| Clone a Class Group | Starts a wizard to copy the classes in a class group. See How to clone a class group. 5.4 TASK-1391 PROJ-787 WHEN DOES THIS APPEAR? |
| Collapse | Collapses the subtree below the selected node. |
| Delegate | Delegates the rule; this action is equivalent to clicking
the Favorites toolbar button ( |
| Delete | Deletes the rule. Available only for rules in top-level classes that belong to unlocked RuleSet versions. C-1969 (If the rule is checked out to you, the checked-out rule opens; the system asks you to confirm the deletion.) |
| Define Expression | For properties where the expression icon ( |
| Define Properties | Starts the Define Properties wizard using the current work type or class as an input. See About the Define Properties wizard. C-2269 |
| Definition | Opens the class rule form. This menu item appears only when the selected item is a class. |
| Expand | Expands a Page, Page List, or
Page Group property to display the subtree of its
embedded properties.C-1969 |
| Favorites | Opens a form allowing you to add the selected rule to your set of favorites. See favorites. |
| Filter by RuleSet |
Opens a form allowing you to select RuleSets from those on your RuleSet list. After you click Submit, the tree substructure for the current class is refreshed to show only those rules that belong to the selected RuleSets. 5.5 GRP-458 This change remains in force until you use this menu
choice again for this class, or log off. A check mark by the
menu item indicates that filtering is in force for the
selected class. Filtering affects only the Application Explorer display of the selected class; it does not affect the display of subclasses that are derived from this class. Press the The Filter by RuleSet menu item appears only when the selected item is a class. |
| Inheritance | Starts the Class Inheritance display for the class in the Applies To key part of the selected rule. See About the Class Inheritance display. |
| Index Property | Starts a wizard to build a Declare Index rule for the
selected embedded property within a Page,
Page List, or Page Group property.
Requires special database privileges. See About the
Declarative Index wizard. Proj-840 5.4 |
| New > category > type | Create a new rule, using the selected class as the Applies To key part. This menu item appears only when the selected item is a class. |
| Open Expression | For properties where the expression icon ( |
| Preview | Presents a preview of the runtime appearance of the rule.
This action is equivalent to clicking the Preview toolbar button
( |
| Related Rules | Presents a second-level menu identifying other rules that related to this one — for example, circumstance-qualified, time-qualified, or checked out. Choose an item in the Related Rules submenu to open it. See Working with the Related Rules menu. C-2444 |
| Rename Class | Starts a wizard to rename the rules that apply to a class. See About the Rename a Class wizard. 5.4 TASK-1391 PROJ-787 (Appears only for class rules.) |
| Save As | Opens the Save As dialog box, so you can copy the rule. C-1969 |
| Show Calls | For activities, displays the interactive Show Calls tree, which identifies called activities. See Activity form — Completing the Steps tab — Show Calls button. C-1107 |
| Structure | Displays the Class Structure diagram that includes this class. See About the Class Structure viewer. |
| Switch Class | Appears for classes only. Makes the selected class the base class for the Application Explorer display. |
| Refactor | Starts the Refactor Rules tool, to allow you to copy rules
with a specific Applies To class (optionally
including descendent classes) from one RuleSet into another
RuleSet. See About the Refactor
Rules tool. GRP-212 5.5 This menu item appears only when the selected item is a class. |
| Refresh RuleSet | Updates the Application Explorer display to reflect rules recently created (or renamed or deleted) by other developers in the RuleSet that contains the selected rule. (Rules you create, rename, or delete are always visible.) |
| Refresh All | Updates the Application Explorer display to reflect rules recently created (or renamed or deleted) by other developers. (Rules you create, rename, or delete are always visible.) C-1969 |
| Run | Opens the rule and starts the unit test of the rule. This
action is equivalent to clicking the Run toolbar button
( |
| View > Applicable Rules |
Produce a report, in a separate window, of all rules that have the selected class as the Applies To key part, summarized by rule type. This menu item appears only when the selected item is a class. 5.5 GRP-458? |
| View > category > Type | List rules of a specific rule type that have the selected class as the Applies To key part. This menu item appears only when the selected item is a class. |
| View > INSTANCES > View | Lists instances of the class (and subclasses). This menu item appears only when the selected item is a class. |
| View > INSTANCES > Pop-Up | Lists instances of the class (and subclasses), in a separate window. This menu item appears only when the selected item is a class. |
![]()
 When you open or
operate on a rule presented in the Application Explorer, Process
Commander uses rule resolution to find the highest rule on your
RuleSet list that you can execute. However, the tree structure in the
Application Explorer presents all versions of rules in a
RuleSet, not those you can execute. In unusual situations, the
Application Explorer display can include a rule that you cannot
execute.
 Determine to which work type the new rule is to
belong. (That is, determine the Applies To key
part.) Locate that node in the tree structure.
Determine to which work type the new rule is to
belong. (That is, determine the Applies To key
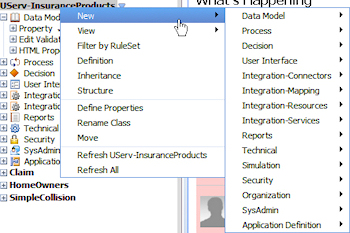
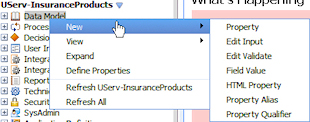
part.) Locate that node in the tree structure.You can also choose New from a right-click context menu at the category level:
 Determine to which work type the new rule belongs.
(That is, determine the Applies To key part.)
Locate that node in the tree structure.
 ![]() Understanding when
rules appear in the App Explorer tree
Understanding when
rules appear in the App Explorer tree
Which rules the Application Explorer presents depends on your current application, a work pool, and preferences. In some situations, the Application Explorer display may include rules that you do not consider part of the application, or may exclude others you expect. revised v5.1
![]() The Application Explorer display filters by
RuleSet but not by version. In some cases, the display can
include rules in versions higher than the highest version to which you
have access. It can also include blocked rules and rules with major
versions lower than the current major version. You may not be able to
open such rules or execute them. ZELEK 10/7/04, 7/7/05
The Application Explorer display filters by
RuleSet but not by version. In some cases, the display can
include rules in versions higher than the highest version to which you
have access. It can also include blocked rules and rules with major
versions lower than the current major version. You may not be able to
open such rules or execute them. ZELEK 10/7/04, 7/7/05
![]() Operation of the Application Explorer uses
information in a view of the PegaRULES database named
Operation of the Application Explorer uses
information in a view of the PegaRULES database named
pr4_rule_summary, corresponding to the class
Data-Rule-Summary. SR-437 SR-121
![]() In unusual cases, the developer can select a
work pool that does not match (belong to) the current application. In
this case, the Application Explorer includes all rules from the
RuleSets that use the work pool's RuleSet Version as a
pre-requisite. BUG-7502 ZELEK Rejected
In unusual cases, the developer can select a
work pool that does not match (belong to) the current application. In
this case, the Application Explorer includes all rules from the
RuleSets that use the work pool's RuleSet Version as a
pre-requisite. BUG-7502 ZELEK Rejected

 Using the Application Explorer

 Tools, accelerators, and wizards