|
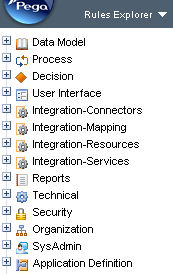
 Use the Rules Explorer tool to quickly access the rules and data objects available to you based on your RuleSet list.
- Select Rules Explorer from the Explorer Menu Items drop-down. (If the Rules Explorer option is not visible, select Preferences from the profile menu adjust your preferences to make it visible.)
- The top level nodes of this tree identify categories. Every rule type belongs to a category; many data classes also belong to a category.
- Click a category plus sign (
 ) to see the rule types and data object types in that category.
 - One type, marked with a check, at the top of the list is the most frequently accessed type. Other types appear in alphabetical order.
- Click a label to present in the workspace a list of all rules or data objects of that type. For example, expand the
Technicalcategory to see the rule types in that category. Then click theActivitynode to see a list of activities in the workspace.
Right-click to access instances, rules, or adjust tree
For quick access to rules, place your mouse pointer in the Rules Explorer area and right-click to access a context menu. The menu choices that appear depend on the location of the pointer. Select a menu item:
Menu |
Select to: |
| New > Category > Type | Create a new rule or data instance of the selected type. |
| View > Category > Type | List existing rules or data instances of the selected type. |
| Instances > View | Select a rule type name and choose this menu item to list instances of that rule type in the workspace. For example, if you select the Division text and then choose this menu item, the list includes all the Data-Admin-OrgDivision instances in your system. |
| Instances > Popup | List instances in a pop-up window. The contents are the same as produced by the Instances > View menu selection. |
| Collapse All | Redraw the entire Rules Explorer with all nodes below the category nodes collapsed. |
Notes
![]() For rule types, the list in the workspace includes rules belonging to any RuleSet in your PRPC system. Depending on your RuleSet list, the list may include rules that you cannot open or cannot execute.
For rule types, the list in the workspace includes rules belonging to any RuleSet in your PRPC system. Depending on your RuleSet list, the list may include rules that you cannot open or cannot execute.
![]() Through personal preference settings for the Designer Studio, you can show or hide the Rules Explorer.
Through personal preference settings for the Designer Studio, you can show or hide the Rules Explorer.
Additional categories
Your application can define additional categories — for example to provide quick access to the Data- classes in your application.
- Create an appropriate field value rule to define the category. Set the first key part to the value "Rule-Obj-Class", the second key part to "pyCategory", and the third key part to the category name.
- Open the Class form. Select the new category in the Category field on the Advanced tab of the Class form.
- Save the Class form.
Notes
The Rules Explorer is not available from the Business Analyst portal. | category, common name, rule type |
 | Common names for rules Common names for data instances Designer Studio — Setting preferences Explorer tools — Workspace results |

 About the Rules Explorer
 Tools — Basic