|
Use this window to:
- Provide specification information when creating a new specification or copying an existing one.
- View detailed information about a specification and any items that might be associated with it (such as associated requirements and implementations).
- Edit existing information about a specification (if it belongs to an unlocked RuleSet version).
- Associate existing items such as requirements and implementations with a specification (if it belongs to an unlocked RuleSet version).
To save your updates, click OK; to cancel, click Cancel.
When updates in this window are saved, the underlying specification is updated. When copying a specification, the system saves a new specification (does a Save As), according to the selections in the Edit Specification window. Note: Comments are not copied from the original specification to the copy.
 When using the Discovery Map view to view the properties of a process step, the fields, controls, and tabs used in this window correspond to those used in the Specification Properties for the process step.
Field |
Description |
|
Name |
Name of this specification. When defining a new specification or copying one, enter a name. When viewing an existing specification, you can click the displayed name to open the rule form for the underlying specification rule. When reviewing or editing a process-step-related specification using the Discovery Map view, this field is labeled Specification Name. |
|
Short Description |
Optional. Descriptive text label for the specification. (This text is used in the Short Description field of the corresponding specification rule form. See Creating good Descriptions and Short Descriptions.) |
|
Type |
Type of the specification. The standard specification types are:
For a process-step-related specification, the value for the Type reflects the nature of the process step. When creating, editing, or copying such a specification, you can select one of the following values: When you are creating, editing, or copying a specification not related to a process step (such as a report specification), Type defaults to the appropriate value related to your current context in the Designer Studio, and is read-only. For example, when adding a specification from the Correspondence landing page, the Type field is read-only and displays |
|
Status |
Select the implementation status of this specification. This field answers the question about what development state is this specification currently in (for example, whether it is deferred or pending information). The Profile Explorer's progress bar and the Business Analyst portal use this field to reflect the overall implementation progress of the application. The standard choices are |
|
Application |
Name of the application in which this specification is defined. This field is displayed only when reviewing or editing a process-step-related specification using the Discovery Map view. |
|
Case Type |
Name of the case type with which this specification is associated. |
|
RuleSet RuleSet Version |
RuleSet and RuleSet version for this specification. If the RuleSet is locked, You can save a new specification to any unlocked RuleSet in the current application stack (the current application and its built-on applications). |
Tabs
Use this tab to provide free-form details that describe the steps involved in completing this specification, such as what the system displays, applicable edits and choices, and expected behavior.
 You can enter the details directly in the rich-text area field on this tab, or use Microsoft Word to capture the content. A typical approach for the rich-text area is to use it as a scratch pad for quickly capturing the information. Then, to further refine the details, click the displayed link to use the Edit in Word feature and work on the description in Microsoft Word. Upon clicking the link, Word opens and loads the text from the rich-text area. When you save in Word, the description is saved as a document file attached to the specification, and you use the Edit in Word feature for subsequent updates to the information.
If you choose to edit the content in Word, you must continue to use Word to update the content. The rich-text area field is not available after you choose to edit the content using Word.
Field |
Description |
||||||||||||||||||||
|
Open/Edit in Microsoft Word |
Click to use the Edit in Word feature. When clicked, the system opens Microsoft Word and you can use it to enter and edit the description text. Note: Before clicking this link, close any other Word sessions that you might have opened from PRPC. The system can open only one Microsoft Word session for editing at the same time. If the Edit in Word feature was previously used, the Description tab displays information about when the description was last modified.
|
||||||||||||||||||||
|
Rich-text area |
Enter free-form details that describe the steps involved in completing the specification, the applicable edits, and expected behavior. Do not enter information about exception paths for the specification. Those are defined by other specifications in the application. Use the rich text controls to format the text in the rich-text area. The following controls are available when text in the rich-text area is highlighted.
|
This tab contains information related to the processing details of the specification such as the associated business objectives, actors, and other process-related details.
Field |
Description |
|
Trigger |
|
|
Complexity |
Select a complexity that describes the estimated level of effort required to create the specification. Standard values are: |
|
Protocol |
Displayed for a specification of Integration type. Select the system interface protocol for the integration defined in this specification. See Integration — Concepts and terms. |
|
Data Source Exists |
Displayed for a specification of Integration type. Select this checkbox to indicate the existence of the other system that the integration defined by this specification connects or responds to. |
|
# Interchanges |
Displayed for a specification of Integration type. Specify the number of interchanges expected for the integration defined by this specification. See interchange. |
|
Business Objective |
|
|
Actors |
|
|
Subject Matter Experts |
Specify the names of people or other resources who are the subject matter experts for this specification. Click |
|
Pre-Conditions |
Specify the circumstances that must exist before the steps in the specification can occur. For example 'Customer Service Representative must be logged into the system.' Click |
|
Post-Conditions |
Specify the successful end conditions of the specification where the actors' goals are satisfied. A post-condition is the result of the specification completing as anticipated. For example, 'Customer's account is updated to reflect their change of address.' Click |
This tab is not displayed when you open the Edit Specification window from the Specifications tab on the Case Management landing page or from the Specifications Add link in the Profile Explorer. Also, this tab is displayed only for specifications of type Correspondence, Report, and Integration.
Use this tab to work with implementations associated with this specification. You can view implementations currently associated with the specification and associate new ones. The rules for the implementations must already exist in the system to be associated with the specification.
Field |
Description |
| Name | Name of implementation associated with this specification. To open the rule form for the implementation, click its name. |
| Description | Read only. Description of the implementation (the short description of its rule). |
| Applies To | Read only. Class of the implementation (its rule's Applies To class). |
| RuleSet | Read only. RuleSet to which the implementation's rule belongs. If the specification is linked to multiple versions of an implementation, the most appropriate version is displayed. |

|
Click to associate another implementation with this specification. The rule for the implementation must already exist in the application. |

|
Click to disassociate the implementation from this specification. |
Use this tab to work with requirements associated with this specification. You can view requirements currently associated with the specification and associate new ones. The requirements must already exist in the system to be associated with the specification.
Field |
Description |

|
Click to associate a requirement with this specification. The requirement must already exist in the application. |

|
Click to disassociate the corresponding requirement from this specification. |
| Name | Name of requirement associated with this specification. To open the rule form for the requirement, click its name. |

|
Click to expand the display to view the requirement description. |
| Category | Category of the requirement. |
| Importance | Importance of the requirement. |
| Status | Status of the requirement. |
| External Req. ID | The ID of the requirement as identified in another (external) system. |
This tab displays only when reviewing or editing a process-step-related specification using the Discovery Map view for a Type of Human-Based Step, and only when the current application was created using Application Express. See About the Application Express tool.
Use this tab to define fields for the associated human-based process step.
![]() If the process step's associated flow action or related sections have been manually configured, you cannot define fields for the step using this tab. Instead, the tab displays a message and provides a link to the manually configured flow action or section rule, to make the updates there. Examples of when this message is displayed are: when the rule form of a section associated with this step (through its specified flow action) is directly edited, and when a flow action is associated with this step (in the step's Technical Properties) that is different from the default system-generated flow action.
If the process step's associated flow action or related sections have been manually configured, you cannot define fields for the step using this tab. Instead, the tab displays a message and provides a link to the manually configured flow action or section rule, to make the updates there. Examples of when this message is displayed are: when the rule form of a section associated with this step (through its specified flow action) is directly edited, and when a flow action is associated with this step (in the step's Technical Properties) that is different from the default system-generated flow action.
To add a new field to the array on this tab, click  to add a row for the field. To delete a field from the array, click
  in its row.
- Specify a name for the field (such as
FirstNameorCustomer). Enter a name, or use the auto-complete ( ) to select an existing field. If you enter a new name, the underlying rule for the field is generated when you click
  or
or  on the Processes tab (and not when you click OK to save the specification).
 - Select a type for the field from the Type list.

- Specify additional characteristics of the field – such as whether it is a required field – by clicking Configure >>.
When you select
PageorPage Listfor the field's type, you must click Configure >> to specify the individual single-value fields for that page or page list, and the corresponding Applies To class.When you click Configure >>, the system displays the characteristics that are available for selection, based on that field's type. After specifying characteristics for a field, click << Back to return to the previous screen.
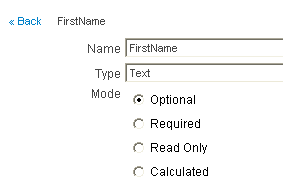
Example of configuring a field of Text type:
Example of configuring a field of Page type:
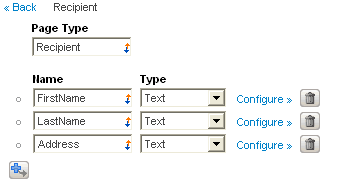
For a Page or Page List field, specify the characteristics of the individual fields in that page or page list using the Configure >> links.
Sequence of the fields
When the process runs, the fields are displayed on the user form in the same sequence as they appear on the Fields tab. To rearrange the position of a field in the sequence, drag and drop its row using the white dot to the left of the row's Name field. To drag and drop a row:
- Click and hold the white dot to the left of the row's Name field. The cursor changes to a four-headed arrow (
 ).
).
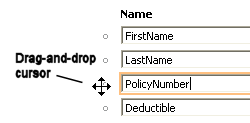
- Drag the white dot to the destination and release.
As you drag the dot, an indicator shape appears when the cursor is at a location in which you can insert the row.
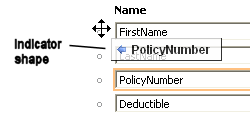
Here, the
PolicyNumberfield has been dragged to be the first field.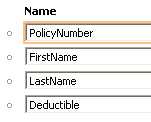
The displayed indicators have the following meanings:
-
 — Indicates the current location is invalid. You cannot drop the row at that location in the array.
 -
 — Indicates the row will be inserted into the array at the current location if you release the cursor.
Fields array
Each row in the array has the following items.
Field |
Description |
||||||||||||||
|
Name |
The field's name. When the process runs, this name is displayed in the user form. |
||||||||||||||
|
Type |
The field's type. Choices are Select Select
When the process runs, the user form displays multiple sets of those fields to collect the values for each field for each past employer, and the system stores the applicant's input values as ordered pages (one per employer) in the When you select |
||||||||||||||
| Configure >> |
Click to configure characteristics of the field. The system displays the characteristics that you can configure for the named field. The characteristics you can set vary according to the field's type (in the Type drop-down list). After making your selections, click << Back. For a non-page-type:
For Type set to Page or Page List:
|
Use this tab to attach files to the specification and manage the attachments. Typically, specification attachments contain reference materials related to the specification such as Word files, UML diagrams, PowerPoint presentations, informal sketches, or files from external systems.
To add or delete attached files to the specification:
- Click Edit Attachments. The Attachments window opens in which you manage the attached files.
To add a new attachment: in the window, enter a descriptive name for the new attachment, browse to the file on your local system or network, and click Add to add it to the list in the window. Note: The name must start with a letter and contain only letters, digits, and underscore characters. You can add multiple files in this window.
To delete an attachment, click
 in its row.
 - When you are done adding or deleting items in this window, click Apply to reflect the changes in the Attachments tab.
To modify an attachment listed on the Attachments tab:
- Save the file to your local system by clicking its name in the list on the Attachments tab and then clicking Save to save the file to a location on your local system or network.
- Modify the file using the appropriate program for its file type. Save the changed file in a location on your local system or network.
- In the Attachments tab, click Edit Attachments. In the Attachments window that opens, first delete the existing attachment in the list (click
 in its row), and then add the modified file as an attachment.
The Attachments tab displays the list of attached files and the following fields.
Field |
Description |
|
Name |
Name of the attachment. You specify a descriptive name when you add the attachment using the Edit Attachments button. The name must start with a letter and contain only letters, digits, and underscore characters. To save a copy to a location on your local system or network, or to open the attached file, click its name.
|
|
Include in Documentation? |
Select this checkbox to specify that the contents of the attachment should be included whenever the specification is included in a generated document (such as when using the Application Document wizard or the Actions > Document action in the Application Profiler).
File types that can contain executable file types (such as bat, jar, exe, pif, zip, and others) are not supported for this feature. The Include in Documentation? checkbox is not available to select for such attachments. |
|
Use as Description? |
Available if the specified file is of Microsoft Word format (doc or docx file types). Select this checkbox to specify to use the contents of the file as the description for the specification. Only Microsoft Word files are supported for using their contents as the description. If you select this checkbox for an attached Word file, that file replaces any description entered on the Description tab. Only one attachment can be used as the specification description at a time. |
Use this tab to work with comments made on this specification. You can view existing comments and post comments.
![]() When copying a specification, comments in the original specification are not copied.
When copying a specification, comments in the original specification are not copied.
Typically, the Comments tab is a location for collecting review comments from team members and stakeholders about the specification. The comments can provide a view into the evolution of the specification.
Field |
Description |
|
Text area |
To create a comment, enter text and click Post. The message can consist of up to a thousand (1000) characters. The system displays the date and time when the comment was posted. The operator image (as defined in the Operator ID instance) of the operator who posted the comment appears on the left side of the comment. When an image is updated in the Operator ID form, it replaces the existing image in that operator's previous comment. After posting the comment and saving the specification, the comments are read-only records and cannot be deleted from the system. |

 Edit Specification window
 is displayed.
 Description tab


 Specify the event method that triggers the specification. This value can also describe how the actor associated with the specification typically accesses the system to perform the work in this step of the flow. Standard values are
  When the Edit in Word feature is used on the
  About Flows