|
 Access
Category |
Page |
|
|
The Case Management landing page contains the Case Designer, which allows you to view and modify the case type relationships and processes comprising a case management application. You can also work with processes using the Discovery Map view, and work with the specifications for each case type. Your configuration dictates how cases are created and processes started at any point in the business process. Here is an example of the Case Designer:
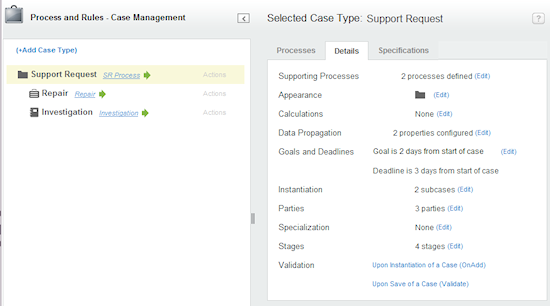
The Case Designer contains two panels:
Case Type tree — The left panel displays a hierarchy of case type nodes, which indicate parent /child (covering/covered) case type relationships and their starting processes. The tree includes all case types in the work pools defined in your access group.
The tree enables you to modify and extend the case type structure as follows:
- Change case type relationships. The system automatically updates the case type rules to reflect the updates.
- Create new case types. When you create a new case type, the system automatically creates required rules such as class, case type, work parties, and a starting flow.
- Remove a subcase type's relationship with its parent.
- Change case type names as they appear on the tree, user forms, and the Case Manager and Case Worker portals.
- View and run starting processes associated with the case types.
- Create remote case types for use in a Federated Case Management configuration.
Case type tabs — The right panel contains three tabs. When you select a node in the tree, the tabs are populated with information relevant to that case type.
- Processes tab — Presents the selected case type's process in the Discovery Map view. Use the Discovery Map view to design the starting process and subprocesses for the selected case type. See Basics of editing with the Discovery Map view.
After editing the process, click:
 , to save your changes.
 , to save your changes, and then run the process.
After you click
 or
or  , the system saves the flow with any additions or updates you made to the process. (When working in an application created using the Application Express tool, if the flow is in draft mode, the system updates rules in addition to the flow. See About the Application Express tool.)
If Discovery Map view is in read-only mode, the
 and
and  buttons are read only.
- Details tab — Selected by default. Use this tab to configure processing behavior for each of the case types. You can configure:
- Supporting processes for out-of-sequence assignments in the case process.
- Unique images that identify case types in the Case Worker and Case Manager portals and user forms.
- Summing calculations of parent case and subcase property values.
- Automatic data propagation from a parent case to its subcases.
- Work item service levels.
- Automatic and conditional settings that enable the system or user to create cases or start supporting processes when another case is created.
- Case type dependencies that automatically create subcases based on the work status values, the completion, or the creation of other related cases types within a top-level case.
- Stage views on user forms.
- Circumstanced versions of case type rules.
- Specifications tab — Lists the specifications captured for the case type selected in the tree. Sort the list by clicking a column heading. For example, to see specifications grouped by their types, click the Type column heading. Filter the list according to a column value by clicking the down arrow to the right of that column's heading and selecting the values you want displayed.
Use this tab to:
- Review and update a specification, by clicking its name. The edit form opens, and you can update the specification's information.
- Create a new specification, by clicking the Add Specification link. The edit form opens, and you can fill in the specification's information and requirements. See Edit Specification window for details on completing the form.
- Copy an existing specification, so that you can make a new specification based on an existing one. To copy an existing specification, in the right hand column of that specification's row, click Actions > Copy. The edit form opens, so that you can update the information for the copy and save it. See Edit Specification window for details on completing the form when copying a specification.
- Delete a specification, by clicking Actions > Delete in the right hand column of that specification's row. The specification is deleted from the system.
- Document or print out a specification, by clicking Actions > Document in the right hand column of that specification's row. The system generates a Microsoft Word document with the information from the specification, opens Microsoft Word on your local system, and loads the generated document. In the Microsoft Word window, you can save a copy of the generated document to your local system, or print it. Note: Before clicking Document, close any other Word sessions that you might have opened from PRPC. The system can open only one Microsoft Word session for editing at the same time.
Controlling the Case Designer presentation
- Select a case type in the tree to load its related tabs in the right panel. The case type name appears in the Selected Case Type: heading above the case type tab panel.
- Click the collapse icon (
 ) on the Case Designer header to open and close the case types tree.
 - Click and drag the grab handles (
 ) on the border between the panels to resize them.
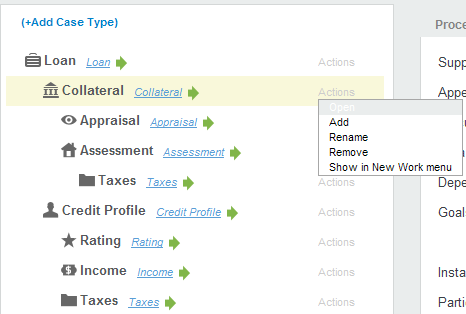
The tree describes the parent/child case type relationships among the case types in your application. Here is an example:
![]() Note the following:
Note the following:
- Only work classes (case types) descending from Work-Cover- and having a case type rule appear in the tree.
- By default, case management class groups do not have a case type rule and do not appear in the tree. You can display the work pool by adding a case type rule. The system appends (Work Pool) to the case type name.
At the top of the tree is a top-level case type (Loan, in this example), which is not covered by any case type at any level. Typically, users create top-level case instance using the New menu on the Case Manager or Case Worker portals. There can be any number of top-level case types in your application.
A covered (subcase) case type indents beneath its parent. A subcase type can itself be a parent, and have more than one parent. As seen in the example above, the top-level case type Loan is a parent of subcase types Collateral and Credit Profile. Appraisal and Assessment are subcase types of Collateral. Taxes has two parents: Assessment and Credit Profile.
Subcase type instances are called subcases (top-level and subcase instances are all informally referred to as cases). Usually, subcases must be created and resolved before the parent case can be resolved. Depending upon your configuration, subcases can be created:
- Manually — Users can create subcases in user forms or in the Case Manager or Case Worker portals.
- Automatically — The system creates subcases when a parent case is created or when a case type dependency is met.
You use the Instantiation and Dependency items in the Details tab to configure how subcases are created and resolved.
Each case type in the tree provides this information:
- Case type image (
 ) — Preceding each name is an image that visually identifies the case.
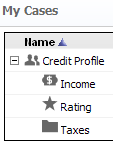
The image also appears on user forms, and on Case Worker and Case Manager portals. You can use the Appearance option in the Details tab to replace the default image with a unique one for each case type. Using the example above, here is how the images appear on the My Cases tab on the Case Manager portal. - Starting process (
 ) — Following the case type name is the name of the case type's starter flow (the process that instantiates a case). The process name is the value in the flow's Description label. If this case type has more than one starter flow, the count appears in parentheses next to the name; for example (1 of 2). If there are no starter flows, a name does not appear.
You can do the following in this field:- Click the flow name to open the Flow rule form.
- Click the Run icon (
 ) to start the process.
 - Click the flow count to open a pop-up dialog listing the starting flow names. Click a name to open the rule form, or click the Run icon to start the process. Click Done to close the dialog.
Using the Actions menu
An Actions menu appears on the right-side of the row. Select the menu to perform the following actions:
Option |
Description |
| Open | Open the Case Type rule form. |
| Add | Select this item to:
When you select this option, the Add dialog appears. Adding a subcase Do the following:
About standard rules used in case types When you add a new case type, the system creates the following standard rules:
Adding a supporting process to a case type This option enables you to add processes that can run concurrently with the main process. From the Add a Case or Process dialog do the following:
Adding a top-level case type
About Federated Case ManagementFederated Case Management (FCM) uses Internet Application Composer (IAC) connectivity to establish case management relationships between a PRPC system (control) where users create and work on cases in an application hosted on another V6.3+ system (remote). The FCM user interface allows users on the control system to:
Adding a remote case type and case type rule Before you begin, do the following:
On the control system, create a remote case type (an abstract class inheriting from Work-Cover-) and its case type rule. Each remote case type maps to one concrete case type in the remote application. Do the following:
The remote case type and its case type rule appear in the Application Explorer. The case type also appears in the Case Designer Case Types tree; the only available actions are Rename and Open. The Processes, Details , and Specifications tabs do not contain remote case type information, which resides on the remote system. After you create the remote case type rule, configure the Remote Case Configuration tab. See Case Type form — Completing the Remote Case Configuration tab.
|
| Rename | Edit the case type name as it appears in the Case Designer, work and case lists on the Case Manager and Case Worker portals, and on user forms. The system updates the Description label on the Class rule form. As a best practice, edit the name using this option rather than the class rule. |
| Remove | Remove this subcase type's covered relationship from its current parent. The system deletes this case type from the list of Coverable Work Types on the parent Case Type rule form's Processes tab. This removed case type remains covered by other parents or higher.
This option does not appear if this is a top-level case type. |
| Show in (Remove from) New Work menu | Available only if this case type has one or more starter flows.
Select Show in New Work menu so that all starter flows for this case type appear in the New work menu on the Case Manager and Case Worker portals. Typically, you designate top-level processes for this menu. When you create case types, the default settings are as follows:
Your selections automatically update the Show in New Work Menu checkbox on the Work Types array on the Application rule form's Details tab.
|
This tab displays items that control case management processing behavior. Select the (Edit) menu next to each item to update its settings.
![]() Most of the settings on this tab update the case type rule. Make sure that there is an unlocked RuleSet version that enables the system to update or copy the case type rule.
Most of the settings on this tab update the case type rule. Make sure that there is an unlocked RuleSet version that enables the system to update or copy the case type rule.
Item |
Description |
||||||||||
| Supporting Processes | The number of supporting processes for this case type. Like spinoff flows, supporting processes are used for out-of-sequence assignments that can run concurrently with the main process.
Select to add or remove supporting processes and to specify when they start (manually or automatically). In the Supporting Processes dialog, do the following:
Optionally, add supporting processes using the Add Process menu in the Case Type tree. Use this item to configure their start behavior. |
||||||||||
| Appearance | The image that represents the case type on the Case Designer tree, user forms, and the Case Manager and Case Worker portals.
Select to open the Appearance pop-up dialog. Click the radio button next to the image you want, and click OK to close the dialog and save your edits.
|
||||||||||
| Calculations | The number of target numeric properties for this subcase type that will be summed when specified subcase type property values are updated. Appears only if this case type is a parent to other subcase types.
Select to specify one or more target numeric property values and the input property values in one or more of its subcases. These settings also appear on the Case Type rule form's Calculations tab. See Completing the Calculations tab. |
||||||||||
| Dependencies | Number of case types this case type is dependent upon in order to automatically instantiate. Does not appear in top-level case types.
A dependency relationship exists when a dependent case type can automatically instantiate only when one or more other case type instances (under the same top-level case type) are created, completed, or reach a specified work status. You use this item to define that relationship. Using the parent case type's Instantiation setting, you select the Upon Dependency Fulfillment as the automatic instantiation option for the selected subcase. Select to create one or more dependency definitions for this case type. In the Define Dependencies dialog, complete the following fields.
Click (
Altering case type dependency relationshipsDependency data is stored on Example 1 If you promote a subcase type a top-level, all of its dependent relationships are deleted. Assume a subcase type named Ship Order has a dependent relationship with its peer Package Order under their parent case type Equipment Request. If Package Order is removed from its parent and made a top-level case type, the Ship Order relationship is also removed. The row in its Define Dependencies dialog, and the dependency data in Equipment Request, are deleted. Example 2 If you add a top-level case type to a subcase type under another top-level case type, the dependency data for all of the subcase types is copied to the new top level. The data in the original top-level is deleted. Using the above example, assume you add top-level Equipment Request as a subcase type beneath top-level New Hire. The dependency data for subcase types Package Order and Ship Order is copied from New Equipment to New Hire. The New Equipment data is deleted. |
||||||||||
| Propagation | The number of properties configured for data propagation among the subcases covered by this parent case. Appears only if this case type is a parent to other case types.
Select to define the propagation of properties (not property definitions), such as work parties and descriptions, from a case to its subcases. In the form, declare one or more property-set statements. They are invoked at runtime when performing an add-to-cover action such as adding a subcase to a case. The system checks the case type rule for its parent case type and searches for any defined propagation. For an example, see About data propagation below. Because the system does not create property definitions, the properties do not appear in the Application Explorer. You can also make this configuration using the Data Propagation button on the Case Type rule form's Processes tab. |
||||||||||
| Goals and Deadlines | Goal and deadline times from the start of this case, its parent, or the top-level case.
Select to create and edit a work item service level rule for this case type. The current goal and deadline intervals appear in the My Cases tab on the Case Manager and Case Worker portals, and on the work summary section on user forms. Do the following:
The first time you use this option, the system creates in this case type a service level rule named .pyCaseTypeDefault. The system also creates a data transform. pyDefault (if it does not already exist) so that .pySLAName is set to .pyCaseTypeDefault. This setting ensures that the .pyOverallSLA flow uses this service level rule. If a transform rule already exists in this class, the system adds the SLA setting. See How to set a service level for a work item. |
||||||||||
| Instantiation | For this parent case, the number of subcase types that it covers and can be instantiated. Appears only if this is a parent case type.
Select to determine how and when subcase instances are created for each subcase type. The Instantiation pop-up dialog contains the following columns. Covered Work Type The name (as it appears on the case types tree) of a case type included in the Coverable Work Types array on the Case Type rule form. Specialization The name of a specialized case type that is included in the array. Settings A subcase can be created (instantiated) automatically, manually, or both. Select the following:
Optional. Also specify:
Click OK to close the dialog, update the Coverable Work Types area on the Case Type rule form's Processes tab, and save the rule. See Case Type rules — Completing the Processes tab. |
||||||||||
| Parties | Number of work parties configured for this case type. This option appears if the Case Type rule form has a work parties rule specified in the Work Parties Rule field on the Details tab. See About Work Parties rules. Select to edit the fields in the work parties rule. Click OK to close the dialog, update the work parties rule, and save it.
|
||||||||||
| Specialization | For this base case type, the number of circumstance-qualified (by property) case type instances. Circumstanced case types can:
Select to create specialized case type rules. In the Specialization pop-up dialog, do the following:
If the base rule has a parent, the system does not automatically update the Coverable Work Types list on the parent Case Type rule form's Processes tab. You must manually add the specialized versions as described in Case Type rules — Completing the Processes tab. To configure a specialized version as a parent, open its Case Type rule form (use the Option action item on the tree) and add the child case types to the Coverable Work Types list. The Details tab for specialized case types that are not parents is limited to Supporting Processes and Stages . If it is a parent, the Data Propagation and Instantiation items also appear . The Action menu items in the tree are
|
||||||||||
| Stages |
The number of stages defined for this case type. Stages are work-status based "Where-am-I" graphical display on user forms. A horizontal array of read-only chevron images (
A stage is:
Stages are also defined on the Stages tab on the Case Type rule form. See Case Type rules — Completing the Stages tab. Select to create or update the stage display.
|
||||||||||
| Validation | Links to OnAdd and Validate validate rules used by this case type. By default, the system uses Work-Cover-.OnAdd and Work-Cover-.Validate rules whenever a case is created or updated.
You can customize these standard rules by copying them into the case type's Applies To class. Retain the names |
Below is an example of a configured data propagation form:
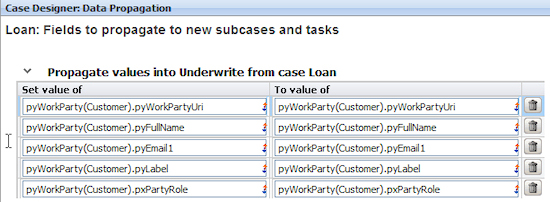
In this example, when when the Underwrite subcase is created, the system copies customer work party data values from the Loan parent case to the subcase's work page on the pyWorkParty(Customer) embedded page.
The property in the Set value of field is the subcase that you are adding to the parent case.
The property in the To value of field is the parent case to which you are adding a subcase
You can use property-set syntax to set a scalar property (for example, .Customer) on the child to the value of a embedded scalar property from the parent; for example, .pyWorkParty(Customer).pyWorkPartyUri.
As a best practice, use unique and meaningful case ID prefixes so that when displayed in work lists and user forms, users can quickly associate cases with their case types.
The system determines a case ID prefix in the following order:
- The value in the Work ID Prefix field for this case type on the Details tab on the Application rule form.
- The prefix setting for .pyWorkIDPrefix in the .pyDefault data transform of that work type. Note that when you create a new case type in Case Designer, you must manually add a data transform; the Application Accelerator generates the rule with the prefix already defined.
- If neither of the above is true, the Work-Cover-.GenerateID activity uses "C-" as the default prefix (also used for ad hoc work).
 Adding menu items to the landing page and tabs
You can add or modify menu items to the Case Management landing page and case types tree by copying the following Rule-Navigation rules in your application:
- pyExtendedCaseManagementLPMenu — The Case Management landing page menu
- pyCaseTreeExtendedRightClickAction — The Case Type tree Action menu.
Go to the Case Management Gallery (![]() > Process & Rules > Case Management > Gallery ) to see a working example of a case management application, and descriptions of important flows, flow actions, and sections.
> Process & Rules > Case Management > Gallery ) to see a working example of a case management application, and descriptions of important flows, flow actions, and sections.
 Tools — Process and Rules
 Designer Studio — About Landing Pages


 ) to expand the area. The following fields appear:
 ) or create this class by clicking (
 ). By default, new case types inherit from Work-Cover-.
 Select a flow that can be added to an open case created by a previous flow execution.
 ) to add a row and specify another dependency relationship. All enabled dependencies must be satisfied in order to instantiate a case.


 Help Home