|
|
Use the Diagram tab to:
The offer canvas toolbar provides a rich set of buttons to aid in Offer flow creation. See Toolbar buttons for details.
The Offer flow stencil consists of a set of shapes to aid you in designing flows for your Marketing offerings.
Each shape has a corresponding properties panel. After you add the shape to the canvas, you can open the property panel by double-clicking the shape, or by selecting the shape and clicking the View Properties icon ![]() on the toolbar.
on the toolbar.
Shape |
Purpose |
|
|
Send Email — Configure and send an Email. See Send Email shape. |
|
|
Send SMS — Configure and send an SMS message. See Send SMS shape. |
|
|
Send Generic — Configure and send a Generic treatment. See Send Generic shape. |
|
|
Send Multiple Treatments — Dynamically determine which channel (Email, SMS, or Passbook) to use for communication and send out the appropriate treatment on that channel. See Send Multiple Treatments shape. |
|
|
Send Passbook — Configure and send a Passbook treatment. See Send Passbook shape. |
|
|
Push Notification — Configure and send a notification to an app running on a device. See Push Notification shape. |
|
|
Inbound — Specify the Section to be returned for a request from an inbound application. See Inbound shape. |
|
|
Wait — Specify a wait time in the Offer flow execution. See Wait shape. |
|
|
Update Status — Update the Offer's status and record response information to History (Interaction Services). See Update Status shape. |
|
|
Hand Off — Spinoff a new work object/process (such as Offer Fulfillment). See Hand Off shape. |
|
|
Decision — Use various PRPC decision structures to determine branch conditions in the flow. |
|
|
Start — Denote the starting point of the Offer flow. |
|
|
End — Denote the ending point of the Offer flow. |
![]() Refer to the Process Modeler - Interacting with the Diagram tab Pega 7 Help section for more details on the Decision, Start, and End shapes.
Refer to the Process Modeler - Interacting with the Diagram tab Pega 7 Help section for more details on the Decision, Start, and End shapes.
Smart Shapes
The Smart Shapes menu in the flow shapes palette provides access to frequently-used, pre-configured utilities and sub-processes that you can easily add to your process flows. The Marketing application provides the following Smart Shape:
Shape |
Purpose |
|
|
Schedule Appointment — Schedule a follow-up appointment. See Schedule Appointment shape. |
The various Offer flow shapes can all be connected to each other. Each connector connects one shape to another. A shape can have multiple connectors emanating from it and/or terminating at it. The various connectors represent possible paths of Offer flow execution.
There are four types of connectors in Offer flows:
Result - This condition type represents the result of executing the Decision rule specified in the Decision shape. The system automatically analyzes the Decision rule and populates the Result drop-down with the possible set of outcomes from the decision.Always - This condition type represents a connector that is always taken.When - This condition type represents a connector that is taken when the expression or condition specified in the When input field evaluates to true.Percentage - This condition type represents a connector that is taken the specified Percentage of time.Else - This condition type serves as the catch-all connector and is taken when none of the other connectors originating from the Decision shape can be taken.There are two types of wait connectors: Continue and Wait Expired. Only one Wait connector can originate from a wait-based shape. If waiting is enabled for the shape, the system renders the Wait Expired connector; otherwise it renders the Continue connector. The system automatically generates the appropriate Wait connector (Continue or Wait Expired) when you connect a wait-based shape to another shape.
![]() Since the system manages the Wait connectors, you should not change them manually. If you wish to update the type of Wait connector originating from a shape, toggle the Wait field on the shape. If you delete the Wait connector by accident, simply draw a new connector coming out of the shape and the system will recreate the appropriate Wait connector for you.
Since the system manages the Wait connectors, you should not change them manually. If you wish to update the type of Wait connector originating from a shape, toggle the Wait field on the shape. If you delete the Wait connector by accident, simply draw a new connector coming out of the shape and the system will recreate the appropriate Wait connector for you.
![]() Typically, the Response Received connector should originate from the Send Email or Send SMS shape after an Offer email or SMS is sent to a customer. This connector should be used in tandem with the Wait Expired connector, as shown below:
Typically, the Response Received connector should originate from the Send Email or Send SMS shape after an Offer email or SMS is sent to a customer. This connector should be used in tandem with the Wait Expired connector, as shown below: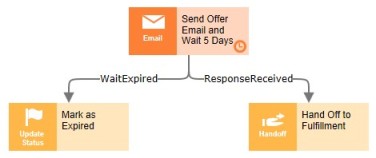
In the Offer flow depicted above, the System puts the Offer in a wait state for the duration specified (5 days). If no response is received within this wait duration, Offer flow execution will resume along the Wait Expired path. However, if the system receives a response before the wait duration has expired; the Offer will instantly get out of the wait state and go down the Response Received path.
![]() The ability of the System to go down the Response Received path depends on the built-in response mechanism for Email and SMS treatments. For Email treatments, you can configure this mechanism via embedding response links. See Embedding response links in Email treatments. For SMS treatments, you can configure this mechanism via the Response Behaviors on Inbound SMS accounts. See Creating/Editing an Inbound SMS account.
The ability of the System to go down the Response Received path depends on the built-in response mechanism for Email and SMS treatments. For Email treatments, you can configure this mechanism via embedding response links. See Embedding response links in Email treatments. For SMS treatments, you can configure this mechanism via the Response Behaviors on Inbound SMS accounts. See Creating/Editing an Inbound SMS account.
To add a Response Received connector to a Send Email or Send SMS shape:
ResponseReceived as the value for the Flow Action field and enter a suitable name in the Name field (e.g. Response Received).
The Wait Volumes overlay allows you to perform the following actions:
View waiting Offer counts
Applying the Wait Volumes overlay displays the number of waiting instances of the Offer for a selected Campaign.
Perform the following steps to view this overlay:
The overlay displays the waiting Offer count on each wait-enabled shape in the Offer.
Update expiration time for waiting Offers
After applying the Wait Volumes overlay, click the Update wait time link in the overlay on a particular shape. Choose one of the following options to set a wait expiration time:
Click Submit to update the expiration time of waiting Offers. The system performs this update in the background. During this time period, a busy message is shown at the top of the Offer rule and all further overlay actions are disabled.
Upon completion of the update, a confirmation message is displayed along with the number of waiting Offers that were updated.
Stop waiting Offers
After applying the Wait Volumes overlay, click the Stop offers link in the overlay on a particular shape. Click Submit to confirm the stop request. Upon submission, the system performs the update in the background. During this time period, a busy message is shown at the top of the Offer rule and all further overlay actions are disabled.
Upon completion, a confirmation message is displayed along with the number of waiting Offers that were stopped.
|
|
Toolbar buttons |