Use a list view to create work objects from Excel worksheet data
Summary
The Edit in Excel feature in list view rules is commonly used to add, review, or update data table rows in the Data Table wizard. Under certain conditions, you can also use this feature to add work objects to an application without the need to type the values into a work object form.
Because Microsoft Excel can generate values through formulas, this can be a useful way to load work objects to test a specific process or processes. You can enter up to hundreds of work objects with this approach.
You can use a similar approach to import data into instances of other classes, not just work objects.
Suggested Approach
The Edit In Excel feature of list view rules is familiar to most developers as one way to add, review or update rows of a data table that was created using the Data Table wizard.
If a work type in your application includes a New harness rule that requires only Single Value inputs, you can enter new work objects from an Excel spreadsheet rather than by typing the values into a work object form. For example, if your application includes processing that depends on a dollar amount (of a property entered for every work object), you can use Excel formulas to define data for work objects with amounts set to $10.00, $20.00, $30.00 up to. $10,000.00..
The approach described in this article requires manual steps, and is best suited for entering test cases rather than for frequent use
In a production setting where creating work objects from text values is to occur frequently, use a file listener and parse rules, rather than the Edit in Excel approach. The file listener approach eliminates the manual steps of the Excel approach described here.
Overview
The procedure has six major steps:
- Identify the work object properties
- Create a list view rule that contains the properties.
- Execute the list view rule to create an Excel spreadsheet
- Populate the Excel spreadsheet with work object data
- Upload the Excel spreadsheet to create work objects
- Review the new work objects
Step 1: Identify the work object properties
It is important that the Excel spreadsheet include a column for each Single Value property needed to create a complete work object.
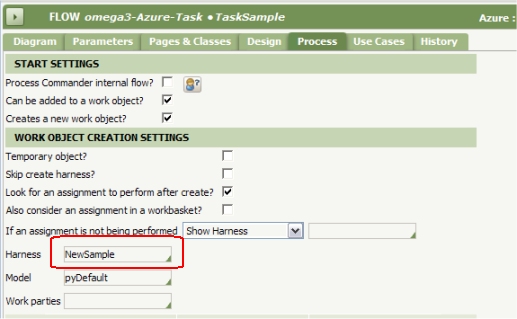
1. To help identify the list of these properties, open the starter flow rule for the work type. On the Process tab, identify the harness rule that supports work object creation. In this example, the harness rule is named NewSample.
2. Open and review the harness rule. If the work object form produced by this harness rule requires the user to enter values for an aggregate property — for example, as work parties — you can't directly use the Excel approach. (As a workaround, you could modify the model for the class to provide at least one constant value for any required Value List, Value Group or embedded page properties).
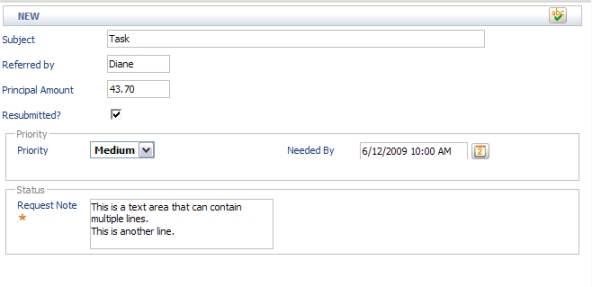
3. Create a work object using the work object form from the harness rule. Provide values for every field. The following example includes values for properties of various property types — Text, DateTime, TrueFalse, and Decimal.
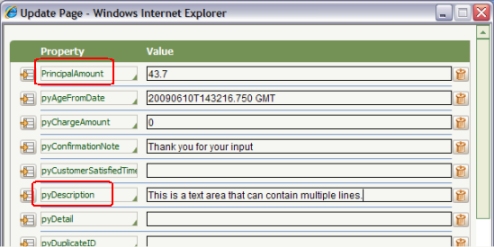
4. After you create the work object, select Tools > Clipboard to start the Clipboard tool. Select the pyWorkPage page and then choose Update Page from the Clipboard tool's Action menu. Review this page to identify the property name and type of each Single Value properties you entered. Some property values are provided by a model, others are provided by internal calculations. Print the page for later reference.
Step 2: Create a List View rule that contains the properties
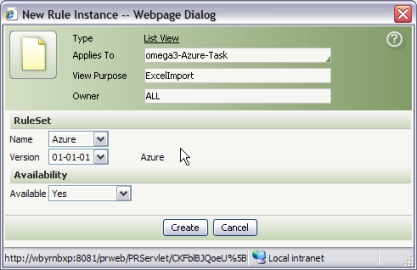
1. Create a list view rule. Right-click the work type class in the App Explorer and select New > Reports > List View. Set the Applies To key part to match the work type.
2. On the Display Fields tab, identify each Single Value property, and a label for the column. Include the pyID property and the pyLabel property.
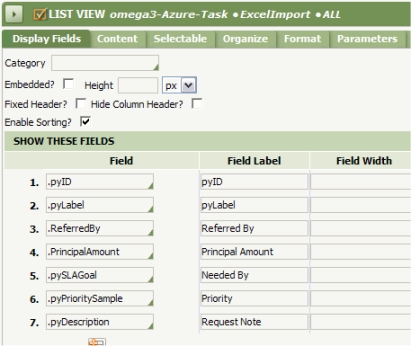
3. Save the list view rule. Click the Run toolbar button ( ) to confirm that each column has the data value you expect. Revise the list view rule if necessary. (When you run the list view later, all columns are blank.)

4. On the Organize tab, select the Export to Excel check box and the Edit check box.
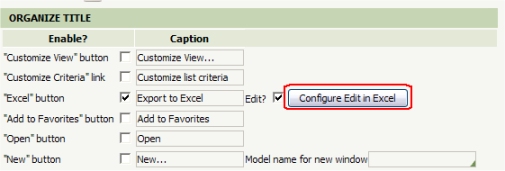
Click Configure Edit in Excel. Complete the pop-up window to allow Add but not allow Update or Delete. Identify the work type. Click Apply.
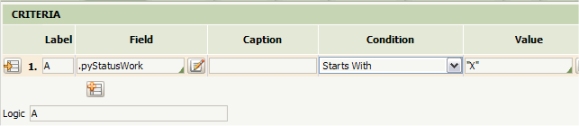
5. On the Contents tab, enter criteria that are always false, so the report output will never contain rows for existing work objects.
For example, you can restrict the report to include only work objects for which the work object status value (pyStatusWork property) starts with the letter X.
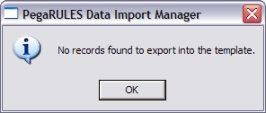
Step 3: Execute the list view rule
Click to execute the list view rule. The report is empty, but has columns for each property.

Step 4: Populate the Excel spreadsheet
Click Export to Excel. Excel starts with an alert that the report contains no rows. Click OK.
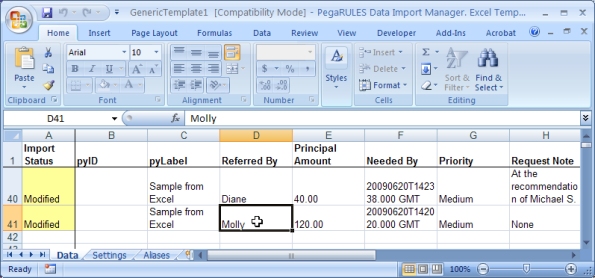
Enter data by typing or pasting, noting the formats and values that appeared in the initial report display.
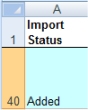
- Do not enter values in the Import Status, pyID or Instance Key columns.
- For a TrueFalse property, type true or false.
- For a DateTime property, use the format yyyyMMddtHHmmss.SS GMT, for example 20090527T141238.000 GMT. (When updating rather than adding, you can use the shorted format mm/dd/yy hh:mm xx, for example 6/20/2009 11:59 AM. )
- Do not attempt to change any values on the Settings or Aliases tabs.
The Data sheet is protected, with cell formats that allow you to enter only constant values, not formulas.
Sources of test values
To include values that Excel can compute with formulas, first use a separate (unprotected ) Excel spreadsheet to produce the values using formulas. Then copy the computed values from that sheet and paste them into the Data sheet.
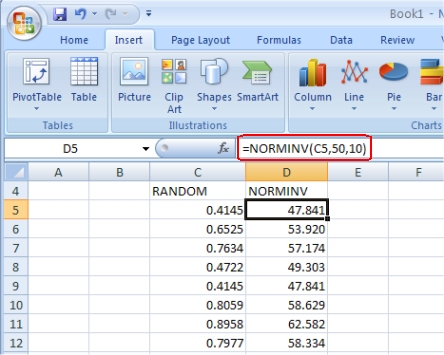
For example, you can use an Excel formula to produce dollar amounts that are randomly distributed to test the expected variations in prioritization, routing or other flow processing in your application. The Excel RAND() function returns a real value between 0.00 and 1.00 with a uniform distribution. In the following example, column B contains RAND() values, and column C contains amounts, computed by the Excel NORMINV( ) function that average 50 with a standard deviation of 10, according to the Normal (Gaussian) distribution. Consult Excel help to identify and use Excel's many statistical functions.
Similarly you could use an Excel formula to create due dates that are 1, 2, 3, ... hours (or days, or weeks) into the future, to test service level-related processing.
Excel can reformat dates and times, too. For example, if cell A1 contains an Excel date, and B1 contains an Excel time of date (London time), you can compute the Java Date format like 20090110 15:00:00.000 GMT using
= CONCATENATE(YEAR(A1),RIGHT(MONTH(A1)+100,2),RIGHT(DAY(A1)+100,2)," ",
RIGHT(HOUR(B1)+100,2),":",RIGHT(MINUTE(B1)+100),":00.000 GMT")
If you have test case data from a real-world business process, available in any format that Excel can import (such as as Comma-Separated-Values), you can similarly paste values similarly into a range of cells on the Data sheet.
Step 5: Import the Excel data
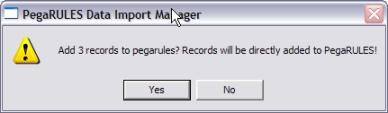
Click the Excel Add-Ins tab. Click the Add button to instruct Process Commander to process the spreadsheet data.
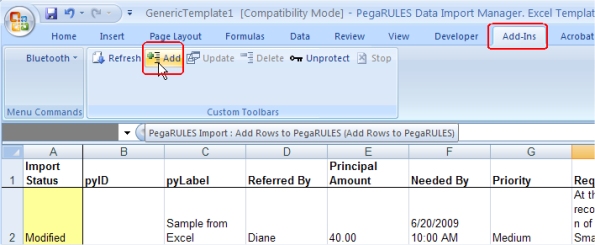
An alert appears. Click Yes to confirm the quantity. Processing may take up to several minutes.
As each row is processed, the Import Status cell in the row changes from yellow to blue to record successful processing, or to orange if a parsing or validation error occurs:
 | or |  |
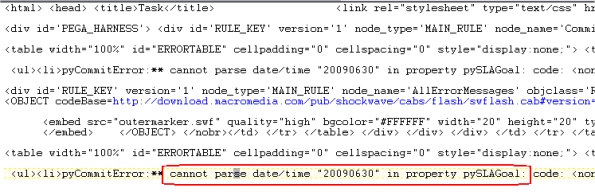
For each error, Excel records error details in a small TXT file or HTM file in C:/Documents and Settings/username/Local Settings/Temp/Import_zzzz, where username is the Windows account name. When an error alert occurs, you may cancel processing of further rows, or continue. This image shows a portion of an error file:
.After processing ends, you can research the errors, correct the data values and resubmit the corrected rows.
Step 6: Review the work objects
Return to the Process Commander portal. Select View > Work > Entered By Me to list the work objects created by your own Operator ID. The new work objects appear at the bottom of the display.
Open one of these work objects. Select Tools > Clipboard and review the property values on the pyWorkPage page. Compare them with the similar values on the pyWorkPage you printed in Step 1 above. Research and find an explanation for each property that has a value in the earlier work object but has no value in the new work object. If necessary, adjust the list view columns or the model rule to supply values.
Notes
- If your system contains meaningful open work objects, you can adjust the list view criteria to include some open work objects (for example, 25 to100). This resulting Excel spreadsheet then contains rows of values that you can copy from, to paste into new rows. Do not alter the initially displayed rows that corresponding to existing work objects.
- This feature depends on a few of Process Commander ActiveX controls. If your workstation has accessed multiple versions of Process Commander, the ActiveX controls saved in the C:\Windows\Downloaded Program Files directory may not exactly match the ActiveX controls of the current Process Commander system. As a precaution, you can log off, and delete the ActiveX controls from C:\Windows\Downloaded Program Files directory,. The name of each Process Commander ActiveX control starts with "pr". The appropriate controls are downloaded when you next log in.
- You can use a similar procedure to update the Single Value properties of existing open work objects. However, extra caution is necessary, as most work objects —after initial entry —have many aggregate property values that cannot be updated through Excel. Property values may be interdependent through declare expression rules or other calculations. Also, changing a value in the work object does not alter a values in assignment, history, attachment, or other instances associated with the work object, resulting in an inconsistent, corrupted database.