Conversation
Pegasystems Inc.
CA
Last activity: 12 Jan 2026 19:27 EST
Build Faster with Pega Web Embed: Seamlessly Embed Powerful Case Management in Your Website
With Constellation, Web Embed lets you bring Pega workflows directly into your existing website. Pick specific parts of the Pega Platform UI that fit your business needs, create a Web Embed channel, and insert the auto‑generated markup into any web page to make those experiences available to users.
Key capabilities
- Embed Constellation landing pages and case experiences in any site, regardless of your front‑end framework.
- Uses HTML5 Web Components to define robust custom elements. This differs from the traditional Pega Web Mashup, which relies on iframes.
Steps to create a Web Embed channel
- In App Studio, open the navigation pane and click Channels.
- In Create new Channel interface, select Web Embed.
- In the New web embed interface form, under Basic options, enter a Channel name.
- Optional: Add a Description to distinguish this interface from other embedded channels.
- Verify the autopopulated URL for your Pega Platform instance.
- Choose the Grant type (authentication style).
- Select the Authentication service (provider) for the embed.
- Choose an Action for the embedded code:
- Create a Case: lets users start a new case; select the target Case Type.
- Display a page: loads a specific Constellation page; select the target page. Note: the Administration page is not supported.
- Get next work: retrieves the next assignment for a user.
- Open an Assignment: opens a specific assignment; provide the Assignment ID.
- Generate the web embed code.
- In the Show web embed code snippet window, click Copy.
- Click Save.
- Paste the HTML snippet into a static web page or the webview of an external app to display the embedded case experience (HTML snippet below).
<script src='https://lab/PRRestService/c11nsvc/v1/pega-embed.js' ></script>

<pega-embed id='theEmbed' action='createCase' caseTypeID='ABC-Personal-Work-LoanApplication' casePage='fullSelfService' appAlias='personal-loan-application' pegaServerUrl='https://lab/prweb/' autoReauth='true' authService='pega' clientId='XXXXXXX' startingFields='{"IdentificationNumber":"I-123456l","FirstName":"John","LastName":"Doe","EmailAddress":"[email protected]","PhoneNumber":"123-123-4320"}' style='width:100%'>

</pega-embed>
Assignment display configurations You can choose from five presentation “flavors” that control which UI elements appear when showing assignments:
|
Case presentation |
Assignment |
Stages |
Optional Actions |
Details |
History |
Pulse |
Left Navigation |
Utility Panel |
|
fullSelfService |
Yes |
Yes |
Yes |
No |
No |
Yes |
No |
No |
|
simplifiedAssignment |
Yes |
No |
Yes |
No |
No |
No |
No |
No |
|
Full |
Yes |
Yes |
Yes |
Yes |
Yes |
Yes |
Yes |
Yes |
|
assignmentWithStages |
Yes |
Yes |
No |
No |
No |
No |
No |
No |
|
assignment |
Yes |
No |
No |
No |
No |
No |
No |
No |
Attributes Starting fields for case creation You can prefill starting fields for a new case in two ways:
- In markup:
-
<pega-embed id='theEmbed' action='createCase' caseTypeID='ABC-Personal-Work-LoanApplication' casePage='fullSelfService' appAlias='personal-loan-application' pegaServerUrl='https://lab' autoReauth='true' authService='pega' clientId='XXXXXXXXXX' startingFields='{"IdentificationNumber":"I-123456l","FirstName":"John","LastName":"Doe","EmailAddress":"[email protected]","PhoneNumber":"123-123-4320"}' style='width:100%'> </pega-embed> - Programmatically:
const options = { IdentificationNumber: "I-1234561", FirstName: "John", LastName: "Doe", EmailAddress: "[email protected]", PhoneNumber: "123-123-4320" };
     el.setAttribute("startingFields", JSON.stringify(options));
To pass dynamic values to Display Pages, Use additionalHeaders to pass values from the host page into Data Page parameters:
- Configure additionalHeaders in the Web Embed (below code Snippet).
-
const hdrs = { "x-addhdr1": "Review-LoanEligibility", "x-addhdr2": "value2" }; el.setAttribute("additionalHeaders", JSON.stringify(hdrs)); - Create a wrapper Data Page.
- Call an activity to read request headers (screenshot below).
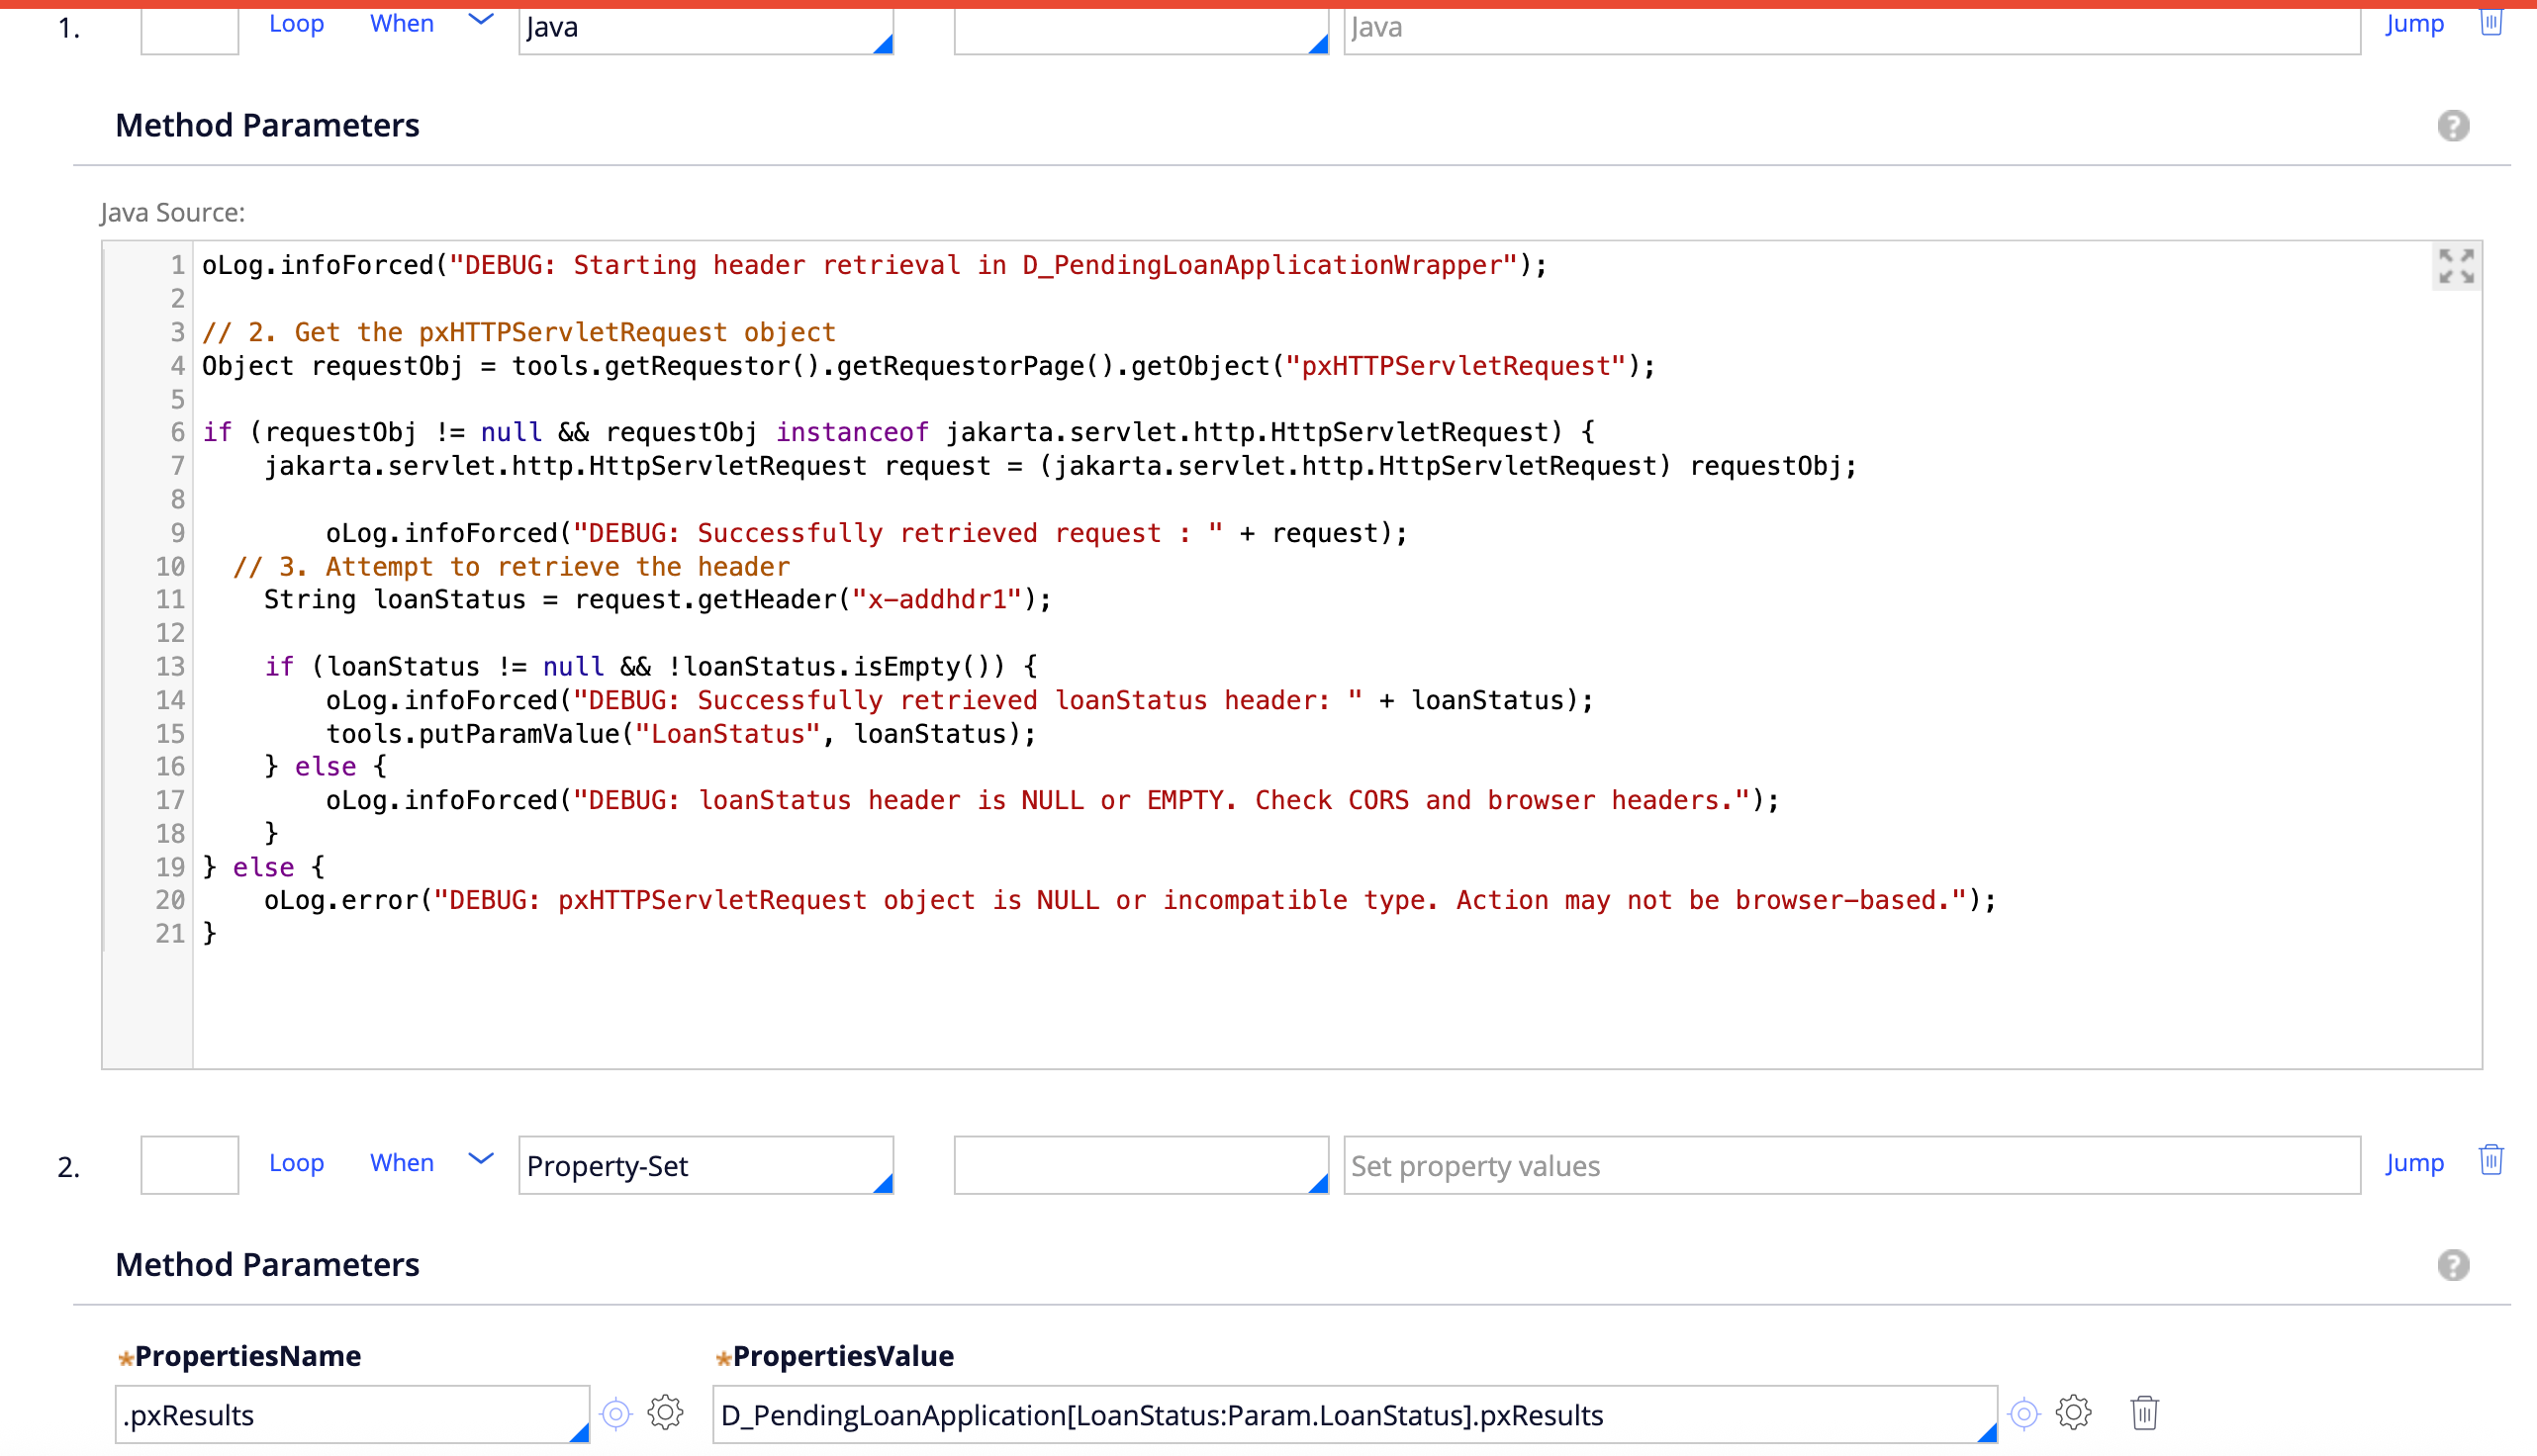
- Pass header values as parameters to the Data Page.
- Ensure these headers are allowed by your CORS configuration.
For more on attributes, see: https://docs.pega.com/bundle/platform/page/platform/user-experience/attributes-web-embed.html
Events The host page can listen for Web Embed events to integrate Pega UI with custom behavior:
- embedassignmentopened: Fired when an assignment opens. Internal: assignmentOpened.
- embedassignmentsubmission: Fired on Next or Previous assignment submission. Internal: assignmentSubmission.
- embedauthfail: Fired when authentication fails. details will be one of:
- popup_blocked: browser blocked the login popup.
- popup_disallowed: popup blocked due to noPopups attribute.
- login_cancelled: user closed the popup without completing login.
- server_error: other exception during authentication.
- timeout_exceeded: silent timeout expired before a response.
- embedcaseopened: Fired when a case opens. Internal: caseOpened.
- embedcaseclosed: Fired when a case closes. Internal: caseClosed.
- embedcloseconfirmview: Fired when the user clicks Done on a confirmation view. Internal: closeConfirmView.
- embedcustom: Allows listening for events sent by a custom DX component inside the embed.
- embedeventcancel: Fired when the user clicks Cancel. Internal: cancel.
- embedprocessingend: Fired when assignment processing completes. Internal: endOfAssignmentProcessing.
- embedready: Fired before the embed UI displays. Indicates PCore is ready. Use to call getEmbedData/setEmbedData, or with createCase to fetch current case/assignment IDs. Internal: renderApp.
- embedreauth: Fired when tokens expire and popupReauth is false, or the authorization header becomes invalid.
- Standard auth: obtain new access/refresh tokens and pass them via updateTokens.
- Custom auth with authorization header: obtain new credentials and set the header in the embed, for example: theEmbed.authHeader = "<new authorization header value>";
- Internal: customReAuth.
Event listener example Attach listeners before calling load():
Code snippet ofr Events:
 const el = document.getElementById("theEmbed");
    // 2) Attach event listeners BEFORE calling load()
    function handleEmbedReady(e) {
      console.log("Embed is ready", e.detail);

    }
    function handleAssignmentOpened(e) {
      console.log("Assignment opened", e.detail);

    }
    function handleAssignmentSubmission(e) {
       console.log("handleAssignmentSubmission ", e.detail);

    }
    function handleEmbedcaseclosed(e) {
      console.log("embedcaseclosed", e.detail);

    }
    function handleEmbedprocessingEnd(e) { c
      console.log("handleEmbedprocessingEnd opened", e.detail);
    }
    function handleEmbedcasepened(e) {
      console.log("embedcaseopened", e.detail);
    }
    function handleEventCancel(e) {
      console.log("embedcaseCancel", e.detail);
    }
    el.addEventListener("embedready", handleEmbedReady);
    el.addEventListener("embedassignmentopened", handleAssignmentOpened);
    el.addEventListener("embedprocessingend", handleEmbedprocessingEnd);
    el.addEventListener("embedcaseclosed", handleEmbedcaseclosed);
    el.addEventListener("embedcaseopened", handleEmbedcasepened);
    el.addEventListener("embedassignmentsubmission", handleAssignmentSubmission);
    el.addEventListener("embedeventcancel", handleEventCancel);
Notes
- Ensure CORS is configured to allow any custom headers you pass through additionalHeaders.
- The Administration page is not supported in Web Embed.
Demo:
Constellation 101 Series
Enjoyed this article? See more similar articles in Constellation 101 series.