Even knowing the ins and outs of Constellation architecture can leave one wondering how it works when put into practice. Well, you're in for a treat now, because we are about to find out by looking at the following example, which shows how UI Authoring affects the user's interface at runtime and how information is handled between the Infinity Server and Client Browser. Let's get on with the journey from authoring to rendering!
UI Authoring
When developing applications in Constellation, developers create Views, which bind together the Data Model and the User Experience for handling the Data Model objects through the user interface.
The Data Model is definitely in the spotlight in Constellation, as the UI and UX of rendered fields are directly tied to the configuration of their properties. This makes it even more important than ever to accurately define your model, because you are no longer able to plug properties into a different display component, like you can in Traditional UI.
Let’s look at the example now. We want to model a Car Service Request Case Type. We’ll focus on the first step of the process, which is the Service Request Initiation step. We start the modeling process by creating a property that enables us to capture the information about the Service Type that will be requested for the Car Service Request. We want the user to select information from a list of available options.
When selecting Picklist as the property type, you can choose a default UI component from a narrowed-down list corresponding to the property's type.
This limits your runtime rendering options to:
- Drop-down list
- Search box
- Radio buttons (which can be configured to source values from a Data Page or Local list)
Next, we must configure a view for the first step within our Car Service Request Case Type.
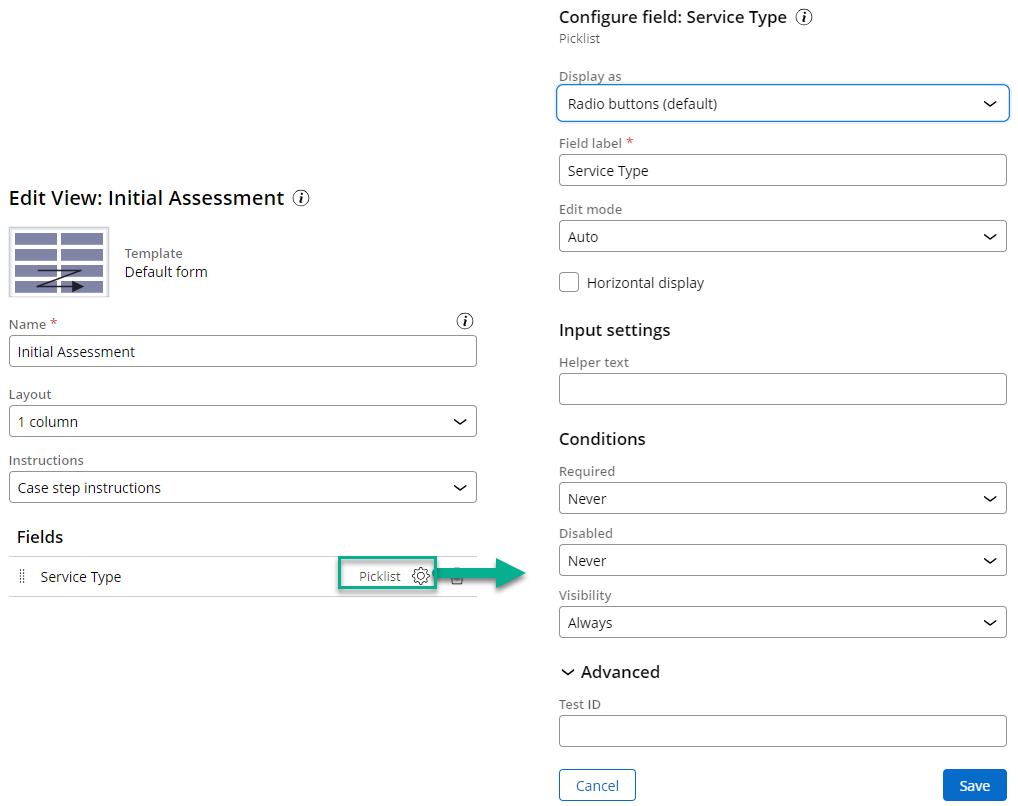
Then, inside our new View, we can search for the Service Type field, which we want to add to the View. At this point, you’ll notice that you don't need to know the technical names of the fields, but can instead conveniently search within the fields and Views that are relevant to this Case Type's context. Finally, we configure the field for that specific View.

This makes the planning and design part of our process a critical part of laying the proper foundations for the application we are building, as well as the data we will be handling throughout the app’s lifetime. This process comes with great advantages - creating the UI is as simple as choosing fields and choosing from a set of configuration options, which default to what we already have defined in the Data Model. With this prescriptive approach, there is little-to-no room for errors because the correct component will automatically be used to capture and display data, with the User Experience and Accessibility features baked into that component's definition.
The Data Model is definitely in the spotlight in Constellation, as the UI and UX of rendered fields are directly tied to the configuration of their properties.
Rendering
All of the configuration options that we've explored so far are stored within the View (Rule-UI-View) rule in JSON format. Now, let's explore the rendering process. How does it happen that by basing a representation of a View on JSON, our browser is able to display a UI that is a form of HTML markup?
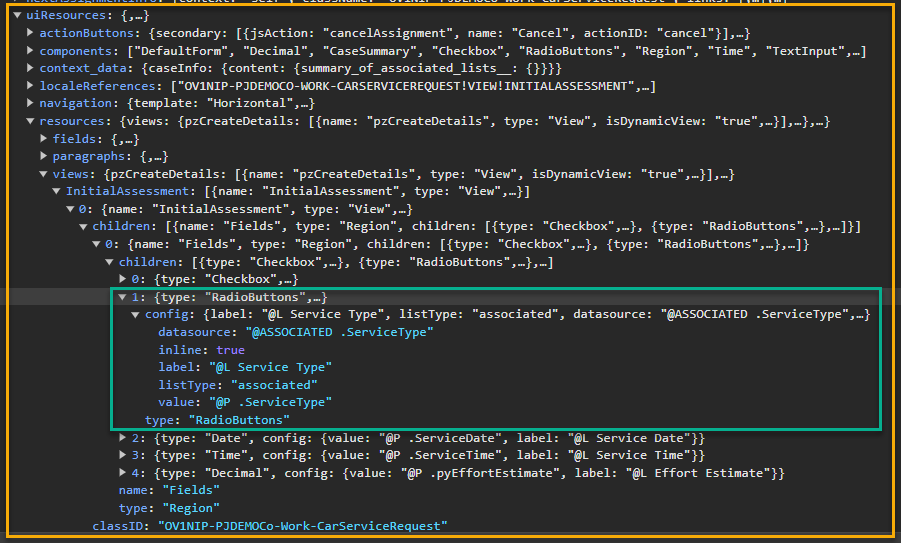
When creating Cases and displaying assignments in an application, users are sending requests from their browser to the Infinity Server through the DX API. The Infinity Server stores metadata about the UI configuration (what fields shall be dispalyed on screen and their configuration). The Infinity Server then returns a response to the Client Browser that contains both business data and metadata about the UI (the uiResources node in the JSON below):

The client’s browser fetches the definition of the components that is referenced in the response, either from the Constellation UI Service (by using the default components on a publicly available CDN, no authentication needed), or by using the Customer UI Service (custom components, requires authentication). According to the client orchestration paradigm, the rendering and hydrating of the UI happens on, and is orchestrated by, the end user’s device. Thanks to this strategy, the same View and Component can be rendered differently, depending on whether you use a portal or a channel. Because the rendering no longer happens on the server but on the client, it is up to the client how to interpret the JSON metadata, and so finally how to render the UI. This is actually a very powerful process because it opens the gates to creating fully custom UIs. However, it's important to remember that regardless of the approach or portal that you use, developers still need to perform the UI Authoring of the Views in Pega Platform™. Front-end portals (whether default or custom) use metadata coming from View definitions to render the UI in a way that depends on the front-end implementation. But the Views must still be created so that we can fetch their definition.
Depending on the Theming configuration that you set up in Pega Platform, or the custom component definitions and styling that you use in accordance with the client’s preferred design system for SDK-based solutions, the look and feel of the application can be tailored to the client’s needs. Staying true to its characteristics, Constellation architecture utilizes DX API independently of the chosen channel, and separates concerns following the Model-View-Controller (MVC) pattern. So whether you use a Constellation portal or custom SDK based solution, they both utilize the same underlying API. This gives you a lot of power and flexibility to extend the usage of the application across many channels, always offering similar capabilities as well as a channel-specific UX.
Related Resources
- Constellation on Support Center
- Pega Community Constellation Page
- Constellation Adoption on Pega Academy
- Constellation Documentation
Don't Forget
- JOIN THE CONVERSATION on Support Center
- FOLLOW @PegaDeveloper on Twitter

