Conversation
Pegasystems Inc.
PL
Last activity: 23 Jan 2026 6:49 EST
Implementation of custom pulse type in Constellation
Pulse and its capability for custom post types can be used in many scenarios across modern Pega applications.
One example is creating an Escalation post type. The documentation clearly describes the implementation steps: https://docs.pega.com/bundle/platform/page/platform/case-management/pul….
A typical use case is task management, where users can create tasks directly from Pulse and assign them to team members. Many more use cases can be implemented using custom post types.
When it comes to the main purpose of Pulse—collaboration—Pulse offers the ability to create both public and private posts (available in Pega 25).
This article outlines the implementation required to enable posting to a group of people (for example, a work group), which provides a powerful collaboration tool
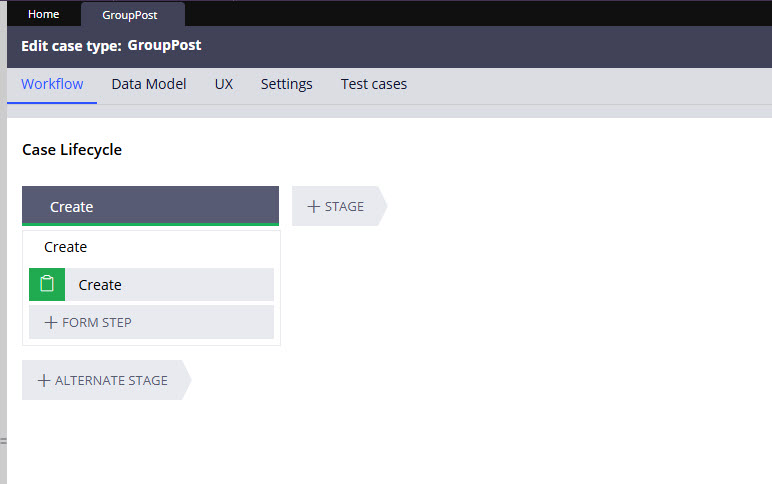
Create a case type
Create a case type or data type to serve as your custom pulse framework. In this example, only the default stage or step added during case type creation is needed—no additional steps are required. Here, the GroupPost case type is used.
The case type class is required to inherit directly from PegaSocial-Post. This inheritance may be established during the initial configuration of the case or adjusted later by modifying the class definition as necessary.
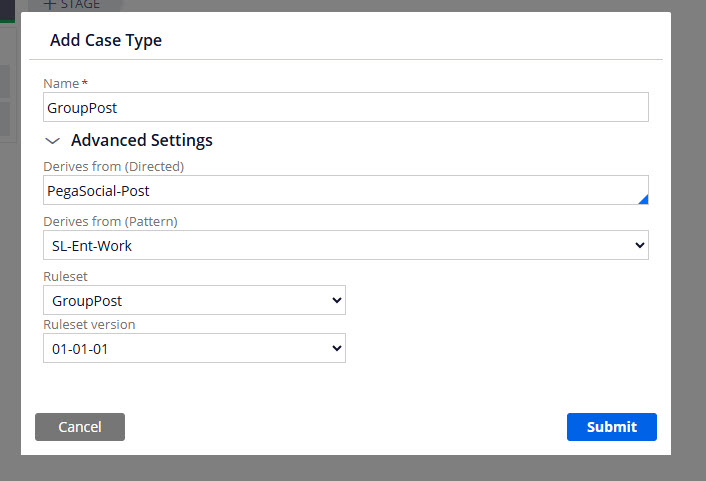
This inheritance requirement exists because certain out-of-the-box (OOTB) code utilises the `@isAncestorOf` function to verify whether PegaSocial-Post is present in the inheritance path.
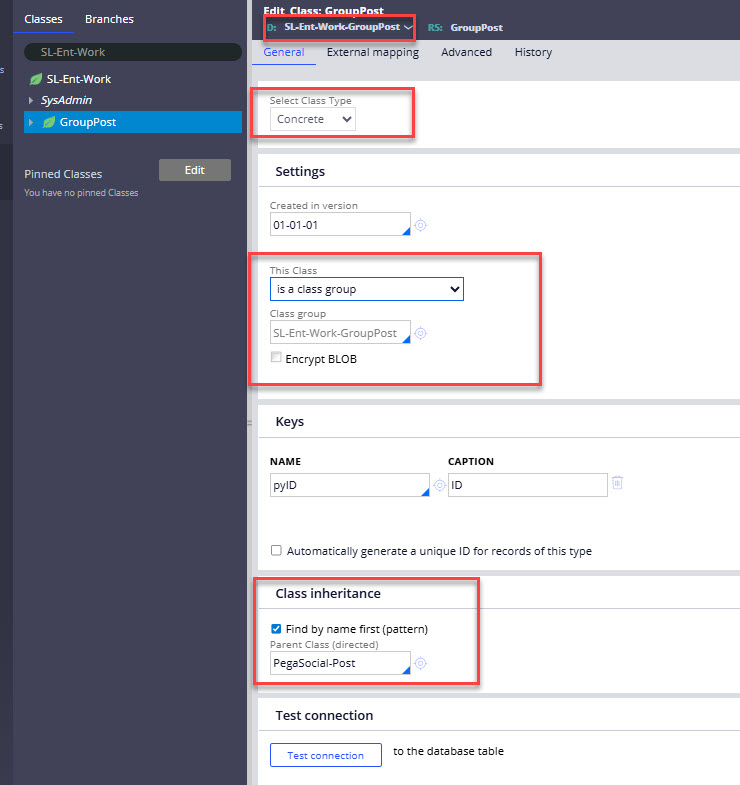
After creating the case type, navigate to the definition of the relevant case type class—in this example, SL-Ent-Work-GroupPost. Within the Settings section, select the option is a class group for This class. Next, go to the Keys area and set pyID as the Name. Finally, confirm that the class type is listed as Concrete.
Configure views
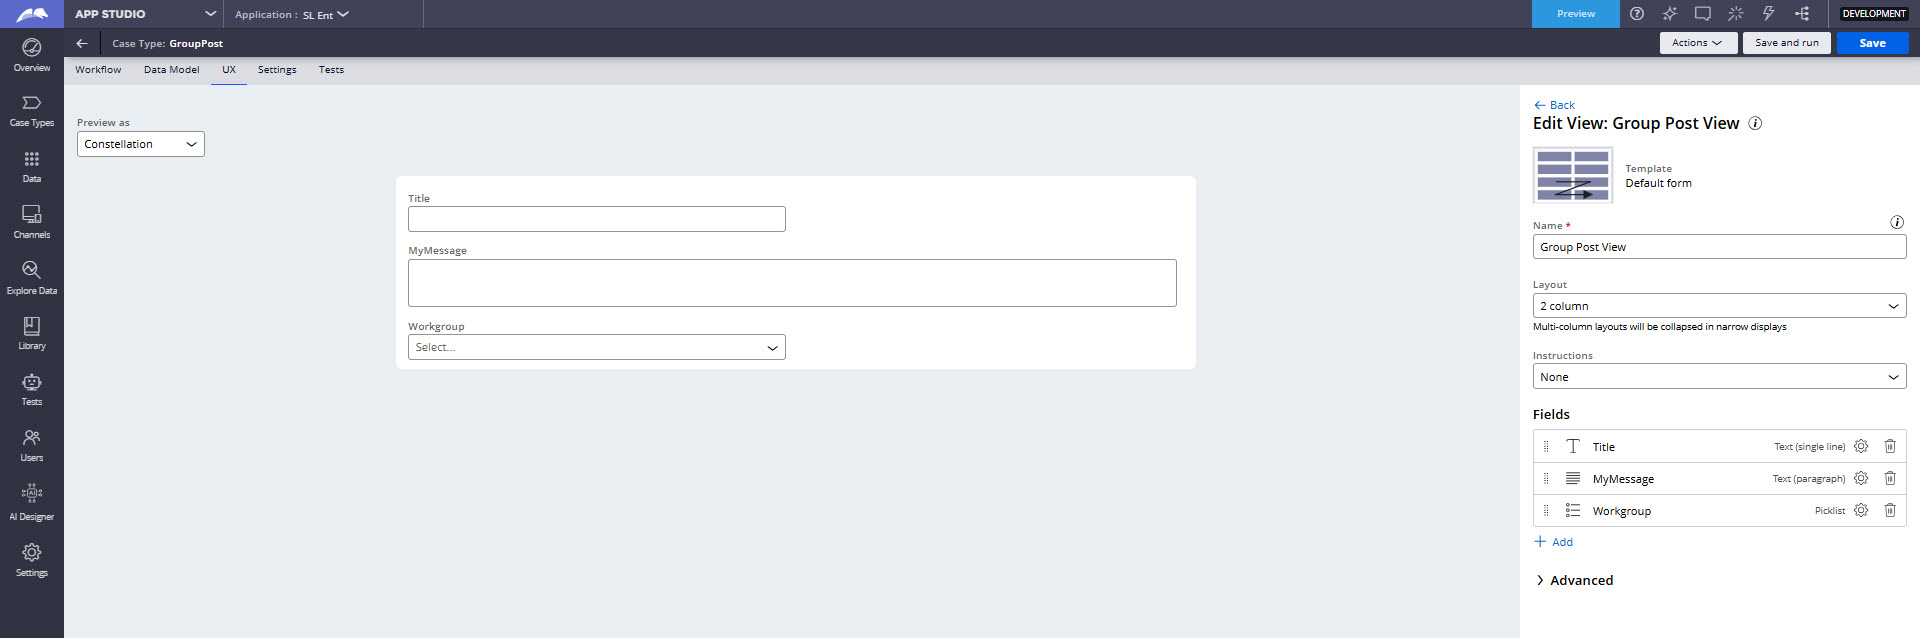
Configure two views in the case type UX: one for creating pulse items with required fields, and another for displaying read-only information after creation.
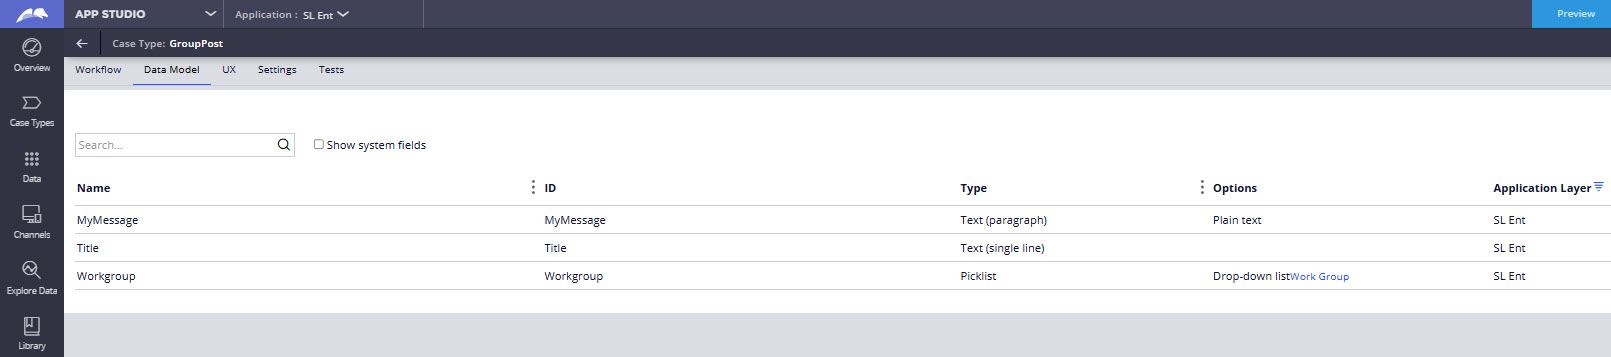
First, add the necessary properties to the case type data model. For illustration purposes, the following properties have been created for the GroupPost custom pulse example.
Go to the UX tab for case type, open Other Views, create a new Form view, name it, and use the default form.
Add necessary fields according to requirements.
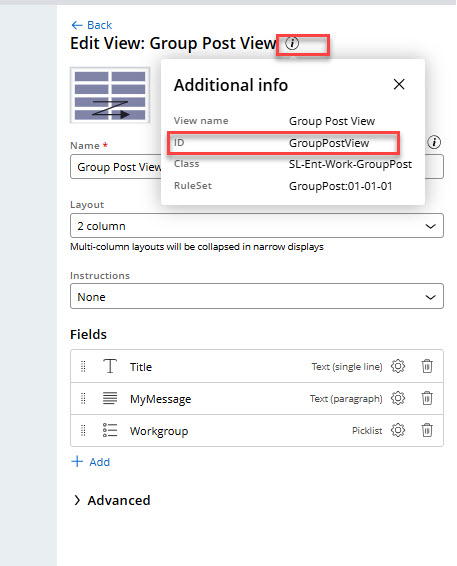
Please note the created view ID, as you will need it for the upcoming data transform configuration. You can find this ID by clicking the information icon next to the view name, which will open an Additional Info window where the view ID is listed among the properties.
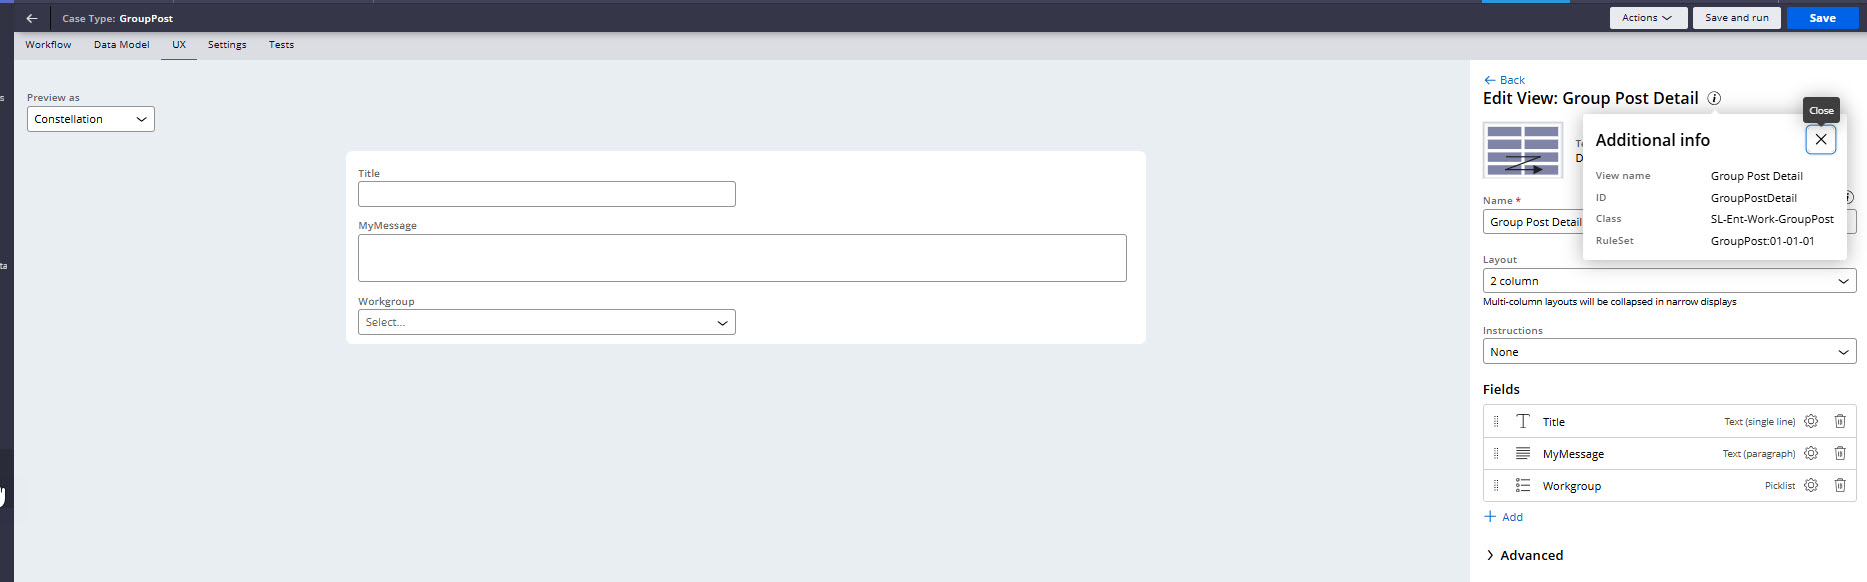
Create another Form View as before for use in Pulse Feed configuration to display details after a pulse item is created. This one will be read-only.
Specialize pyFeedSourceForPostType property
Specialize the property pyFeedSourceForPostType for your case type class. To do this, you can copy the property from @baseclass by using Save As for the specific class; in this example, it would be SL-Ent-Work-GroupPost.
Create Pulse Feed
Create a rule of type Pulse Feed and save it in @baseclass. This approach ensures visibility across all case types within the application. Saving the rule in a custom pulse case type class (SL-Ent-Work-GroupPost) may result in errors if a pulse item is triggered from another case type.
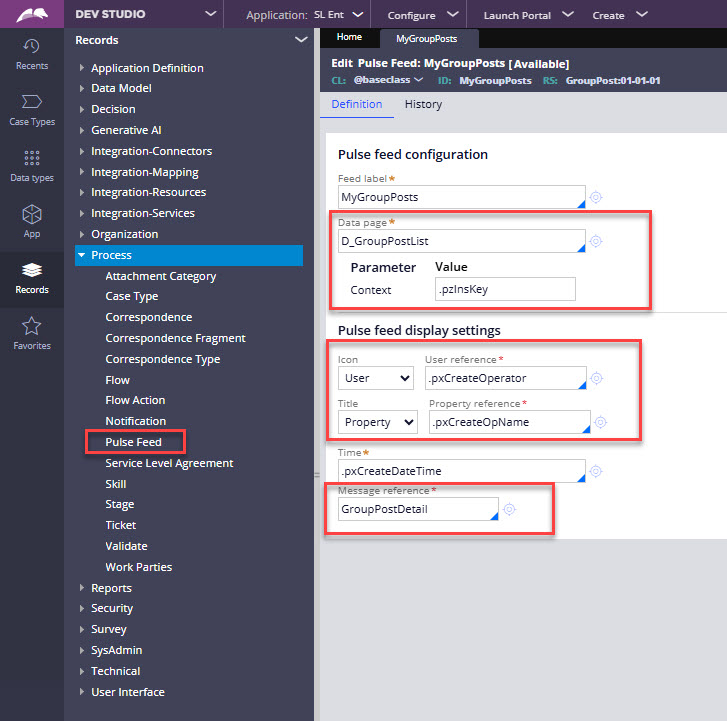
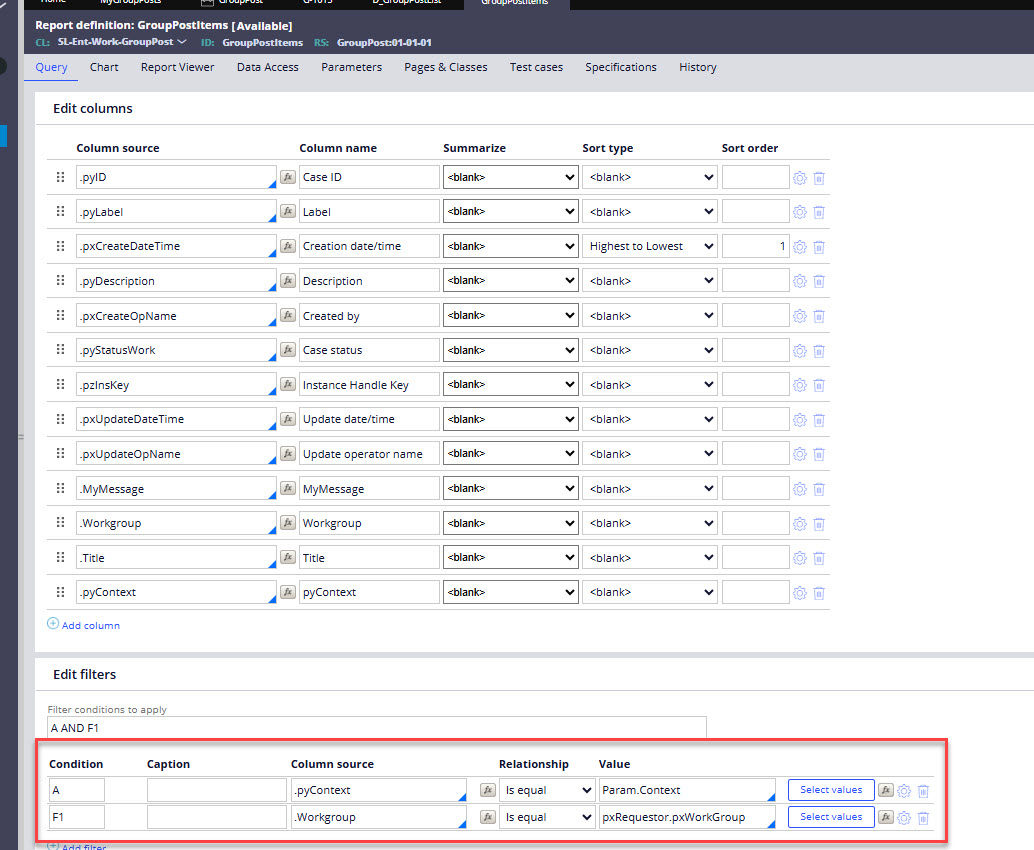
The Data page field requires you to enter the name of the data page that will display related pulse items. To support this, a Context parameter is included, and its value should be set to the pzInsKey of the current object (it’s pzInsKey of the case in which the context pulse item was created).
In this scenario, the data page is sourced from the report shown below. This setup ensures that pulse items are filtered correctly for each case and workgroup, so posts will be visible only to the intended workgroup.
Specialize pySetPostTypeInfo data transform
Specialize the pySetPostTypeInfo data transformation by selecting one from the PegaSocial-Message class and saving it to your pulse case type class.
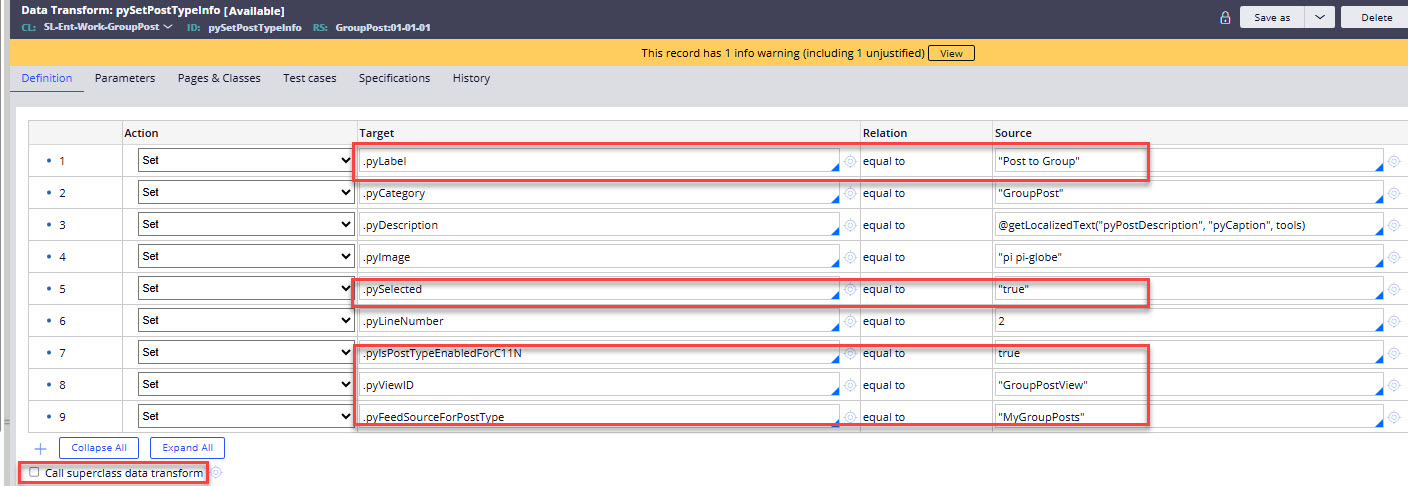
Set accordingly below mentioned properties:
- pyLabel – decides what label will be shown in menu for pulse items creation
- pySelected – set to true
- pyIsPostTypeEnabledForC11N – set to true
- pyViewID – id of the read only view (second view) created in one of the previous steps
- pyFeedSourceForPostType – id of the pulse feed rule created before
Clear the checkbox for calling the superclass data transform.
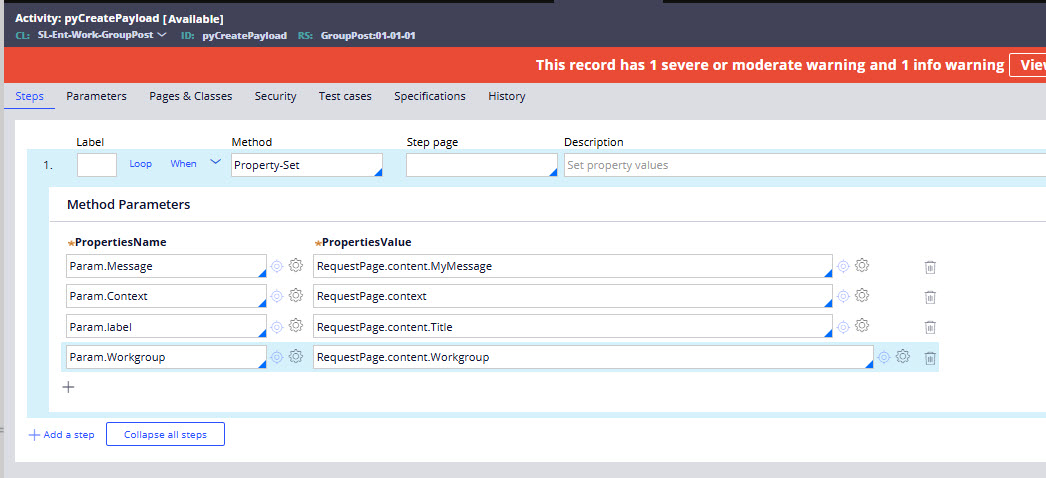
Specialize pyCreatePayload and pyValidateParams activities
Specialize pyCreatePayload activity from the PegaSocial class by saving it to your pulse case type class.
The RequestPage is the context page during the creation of a pulse item. Parameter values should be set based on the properties displayed in the creation view. When specifying the Context parameter, use the approach outlined below: if a case type is involved, the context value should be the pzInsKey of the case in which the pulse item was initiated.
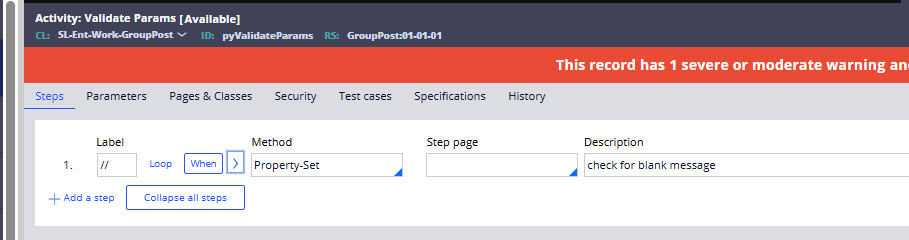
Specialize pyValidateParams activity by copying it from the PegaSocial-Message class and saving it to your pulse case type class. If no validation is required, simply copy activity and leave it steps empty to prevent the default activity from the PegaSocial-Message class from being applied.
Specialize pyAddPost activity
Customize the pyAddPost activity by taking it from the PegaSocial-Message class and saving it to your own pulse case type class. Keep in mind that the activity in the PegaSocial-Message class includes when conditions in step 1. You should check whether these conditions apply to your use case. For example, if your custom pulse type doesn't use any files, Param.FileName will be empty, causing that step to be skipped and preventing the message from being created.
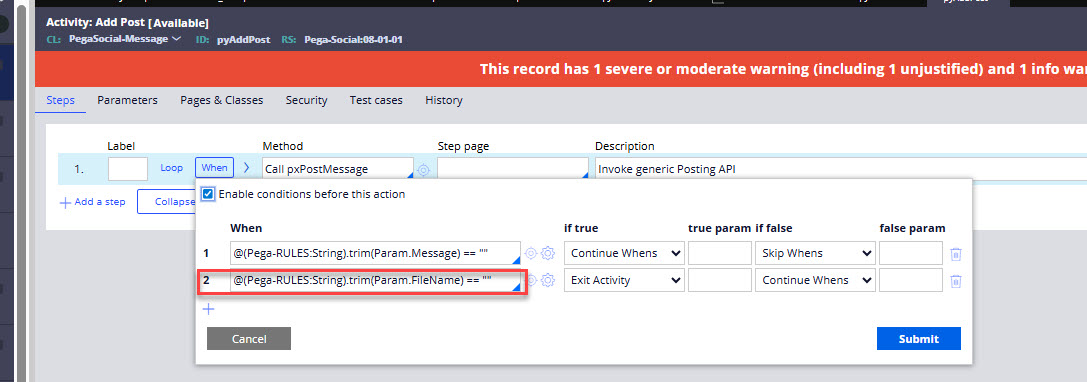
Therefore, in your customized version, remove any conditions that are not applicable. All other settings for the pxPostMessage activity can stay unchanged.
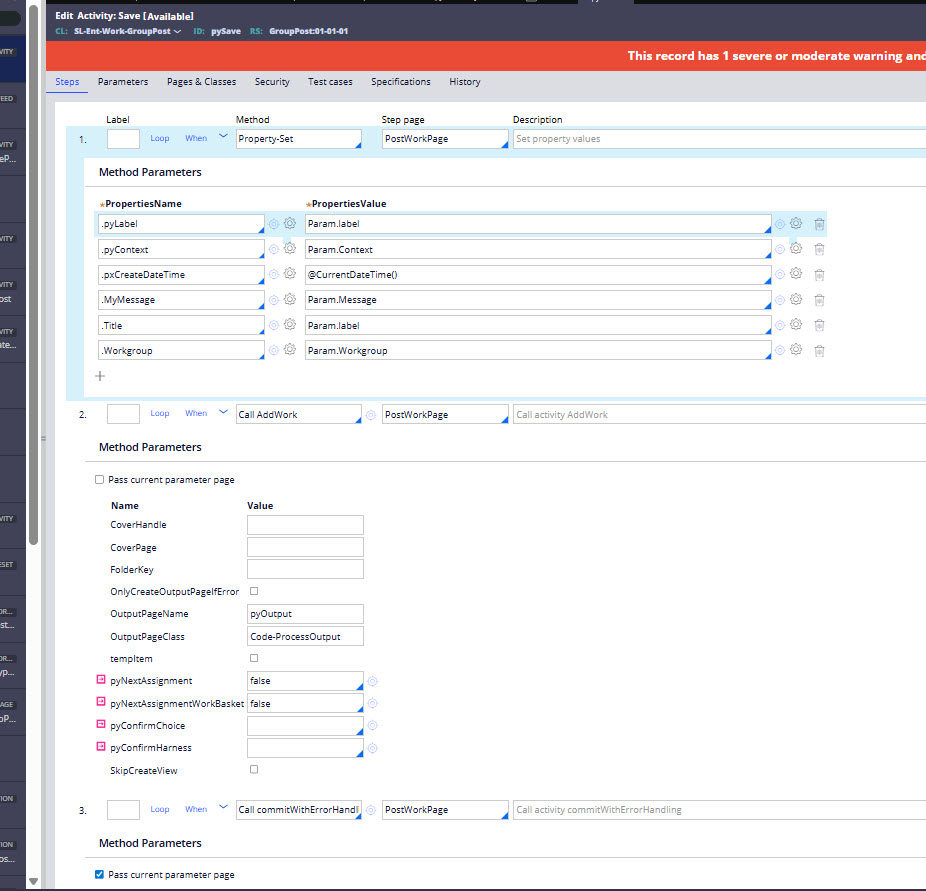
Specialize pySave activity
Specialize the pySave activity for your case type class. You may either copy it from the PegaSocial-Message class and save it to your Pulse case type class, or create a new activity named pySave within your own class. In this example, the second option was followed.
In first step set properties which should be populated to the custom pulse case type instance. Next, include steps to invoke the OOTB AddWork activity to create the case, followed by the commitWithErrorHandling OOTB activity to commit the changes.
Configure Pulse rule
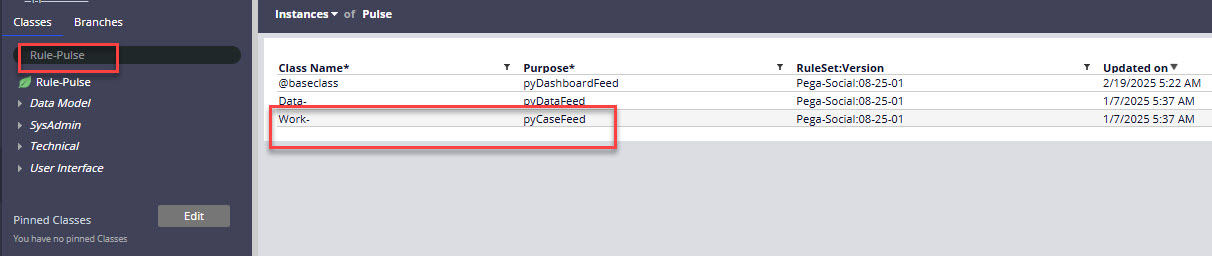
The Pulse rule named pyCaseFeed may be modified if required, although this step is not performed in the current scenario. To locate this rule, search for Rule-Pulse within the App Explorer under classes, then select and open the relevant instance.
If the case type acts as a foundation for a custom pulse type, then pyCaseFeed from the Work- class becomes applicable. Once all previously outlined steps are finished, the newly created pulse type will appear.
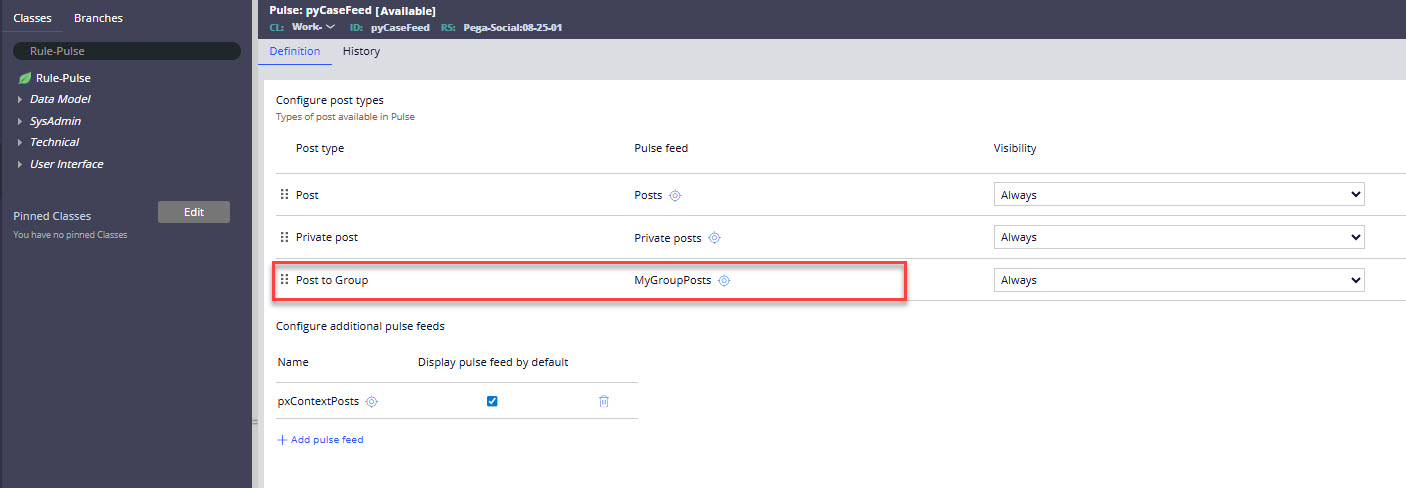
If a change is necessary, Pulse can be adjusted, such as by adding visibility conditions. When these modifications are made within this Work-class rule, they will automatically apply to all other case types across the system.
When customization is required for certain case types that use pulse functionality (these which utilize pulse functionality not these which implement new pulse type) then the Pulse rule can be specialized for those classes.
Verify implementation
After completing all required steps, the custom pulse becomes available for use. For instance, when working with the Loan case type, opening the pulse for a specific case will display the custom pulse in the menu.
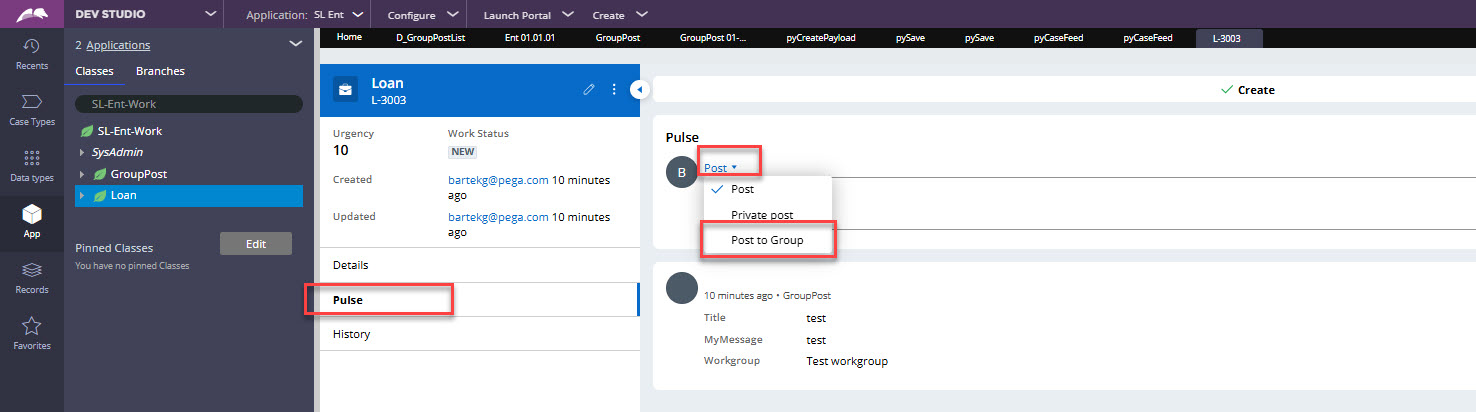
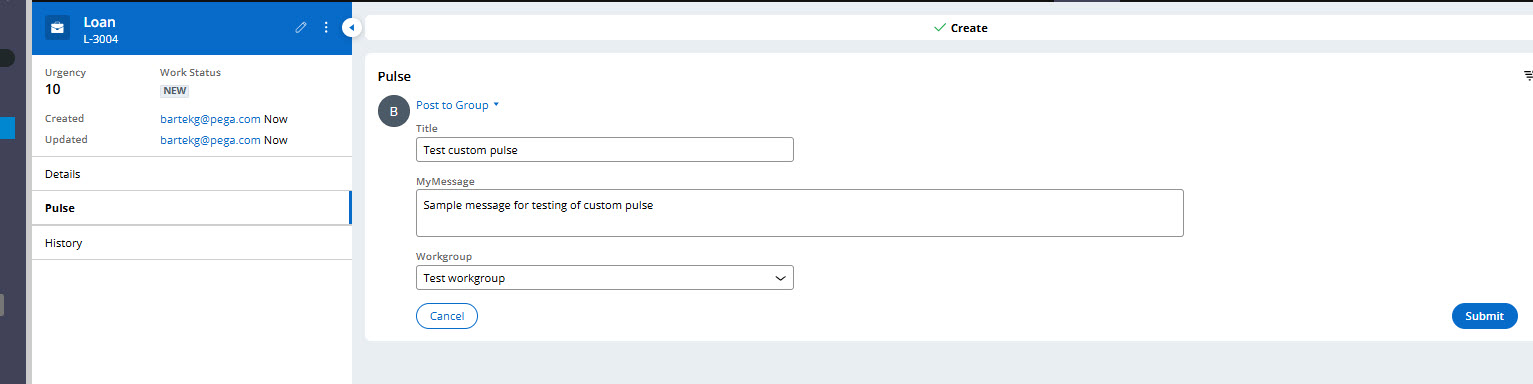
Once you select the newly implemented custom pulse option, the relevant fields will appear according to the configured view. Fill in these fields, and click Submit to post the item.
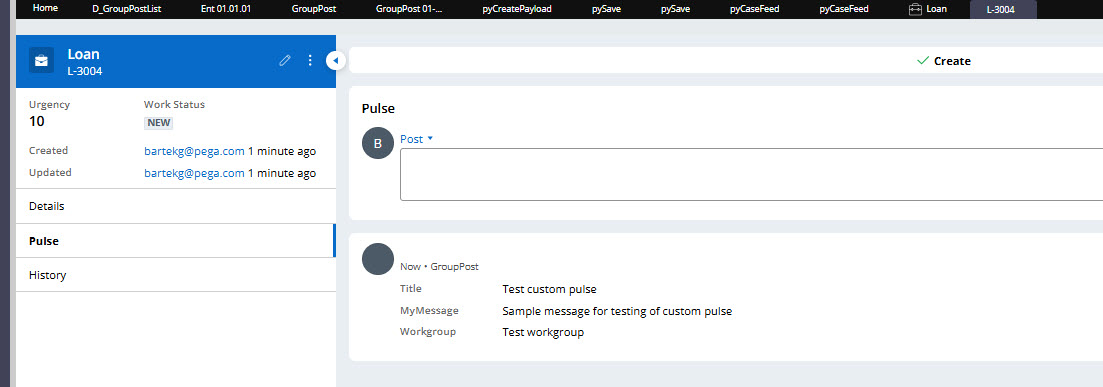
It can then be confirmed that the published pulse item is displayed, and it can also be checked that it is only visible to users who belong to the specified work group.
Resources
- Pega Documentation: https://docs.pega.com/bundle/platform/page/platform/case-management/pul…
Constellation 101 Series
Enjoyed this article? See more similar articles in Constellation 101 series.