Conversation
Pegasystems Inc.
PL
Last activity: 8 Jan 2026 8:58 EST
Implementing data updates in Constellation applications
Find out more similar tutorials in Constellation 101 series
This tutorial has been created by Dawid Stefanik @stefd1 Thank you for your contribution.
Constellation offers a powerful and streamlined approach to data management, providing robust capabilities for Create, Read, Update, and Delete (CRUD) operations, which usage was described in the following articles:
CRUD Operations for Operator Records via Landing Page | Pega Community
While these operations are fundamental for modern applications, many business processes require an additional layer of governance to ensure data integrity and compliance. For example, sensitive or critical data updates often need to be reviewed and approved by a designated person before they are committed to the system of record.
This guide provides a step-by-step walkthrough on how to implement data updates with approval step in a Constellation application by leveraging savable data pages and data reference fields.
Use Case: Product Portfolio Management
To illustrate this pattern, let's consider following business scenario: managing a company's product portfolio. A product manager needs to be able to update details for various products, such as pricing, stock levels, or supplier information. However, to prevent accidental or unauthorized changes from impacting the live product catalog, any updates must be reviewed and approved by a senior portfolio manager before being saved to the master product database.
In this use case, a user will:
- Select product from the existing portfolio.
- Modify the product's attributes in a dedicated form.
- Submit changes, which will initiate an approval request to the portfolio manager.
- The portfolio manager will review the proposed changes and either approve or reject them.
- Only upon approval will the system update the product's record in the database.
This process ensures that all changes are vetted and approved, maintaining the accuracy and reliability of the product data.
Implementation Guide
This guide will walk you through the technical steps to build the product update approval workflow.
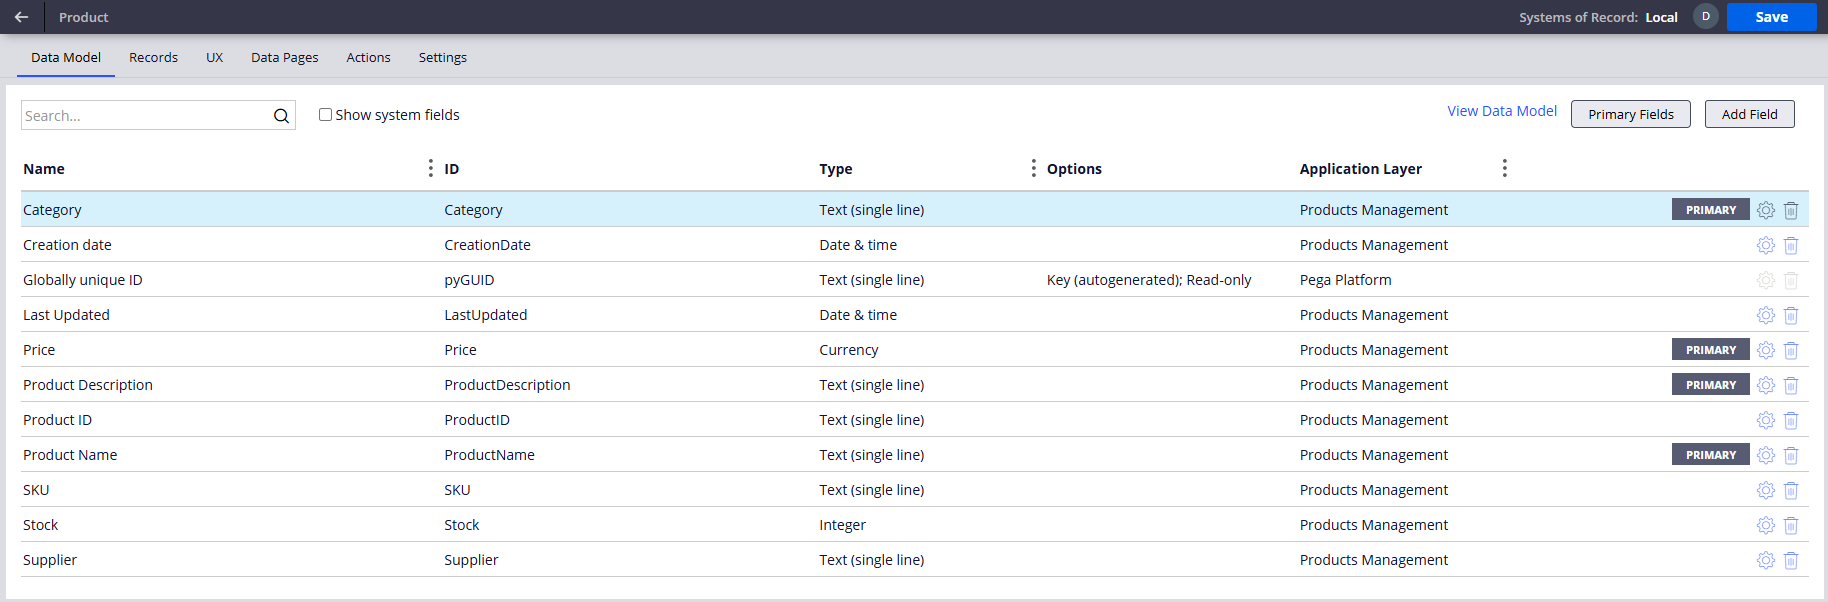
1. Define the Product Data Object
The first step is to define the Product data object. In App Studio, create a new data object named Product with required fields, such as its Name, Price, and Stock.
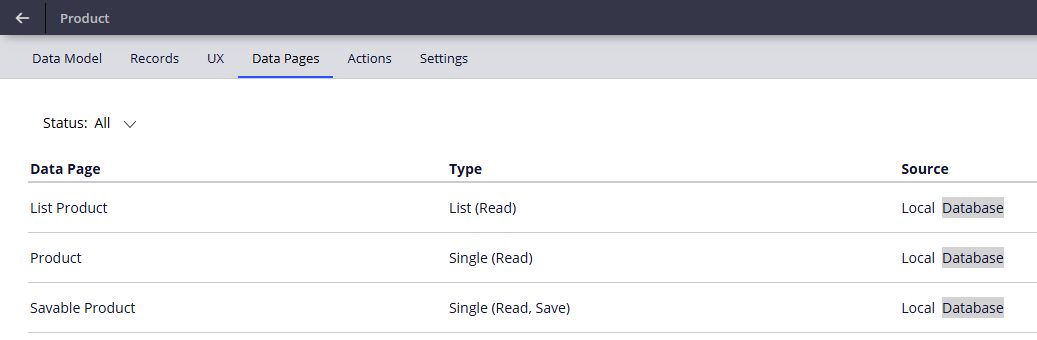
2. Configure Product Data Pages
- D_Product: A page-scoped data page to read a single product's details. Refresh strategy: Set to Reload once per interaction to ensure the data is up to date when user creates a new case.
- D_ProductList: A list-scoped data page to fetch a list of all products. This data page will be used to populate product selection control. It should be configured to source a list of Product records.
- D_ProductSavable: A savable data page that will handle the update of the product data in the system of record.
3. Create the Product Update Case Type
Create a Product Update case type. The case lifecycle can consist of the following stages:
- Selection: in the Select Product step user choose the product they wish to update.
- Product Update: in the Product Update Step user modifies details of the selected product.
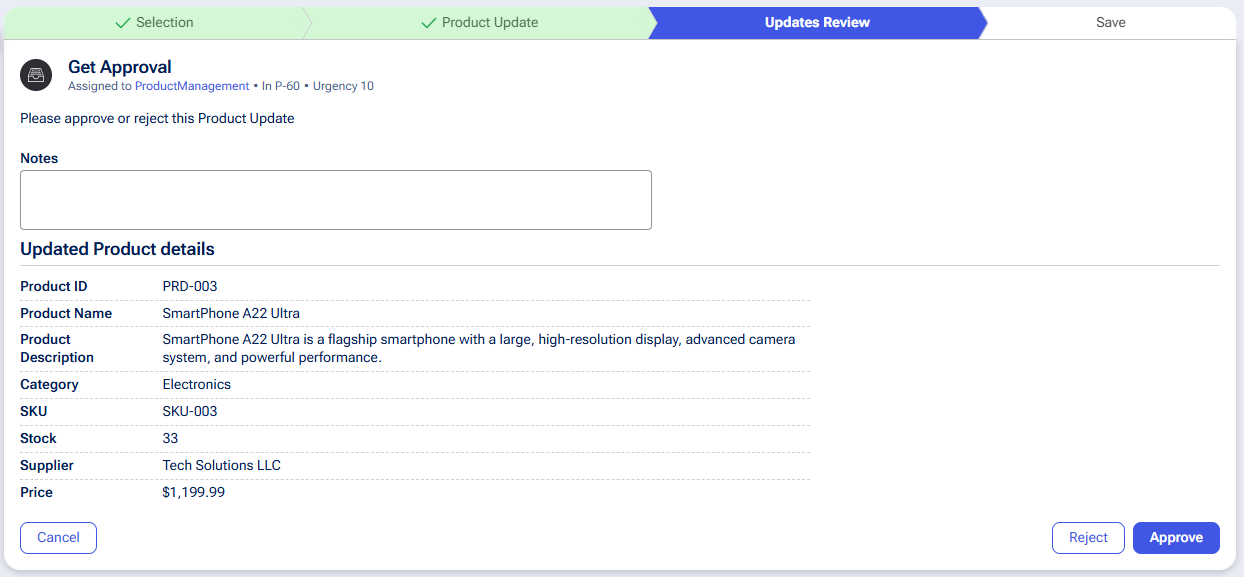
- Updates Review: An approver (e.g., a portfolio manager) reviews the changes in the Review Product Update step and either approves or rejects them.
- Save: If the changes are approved, the system saves the updated product information to the system of record.
- Approval Rejection (Alternate stage) – if changes are rejected then system will not save product updates to the system of record.

3.1 Define Product Selection Data Reference Field
In the Case Type's data model, create a new field named Product Selection. This field will be used to select the product and capture updates.

Use the following configuration:
- Type - set Data Reference
- Data object – select Product
- Data Page – select Product (D_Product)
- Options – Single record

3.2 Select Product step
- Add the Product Selection field to the view. Click the field and configure with the following settings:
- Mode: Single-Select
- Display as: Autocomplete
- Data Page: D_ProductList (to source the list of products)
- Display field: Product Name

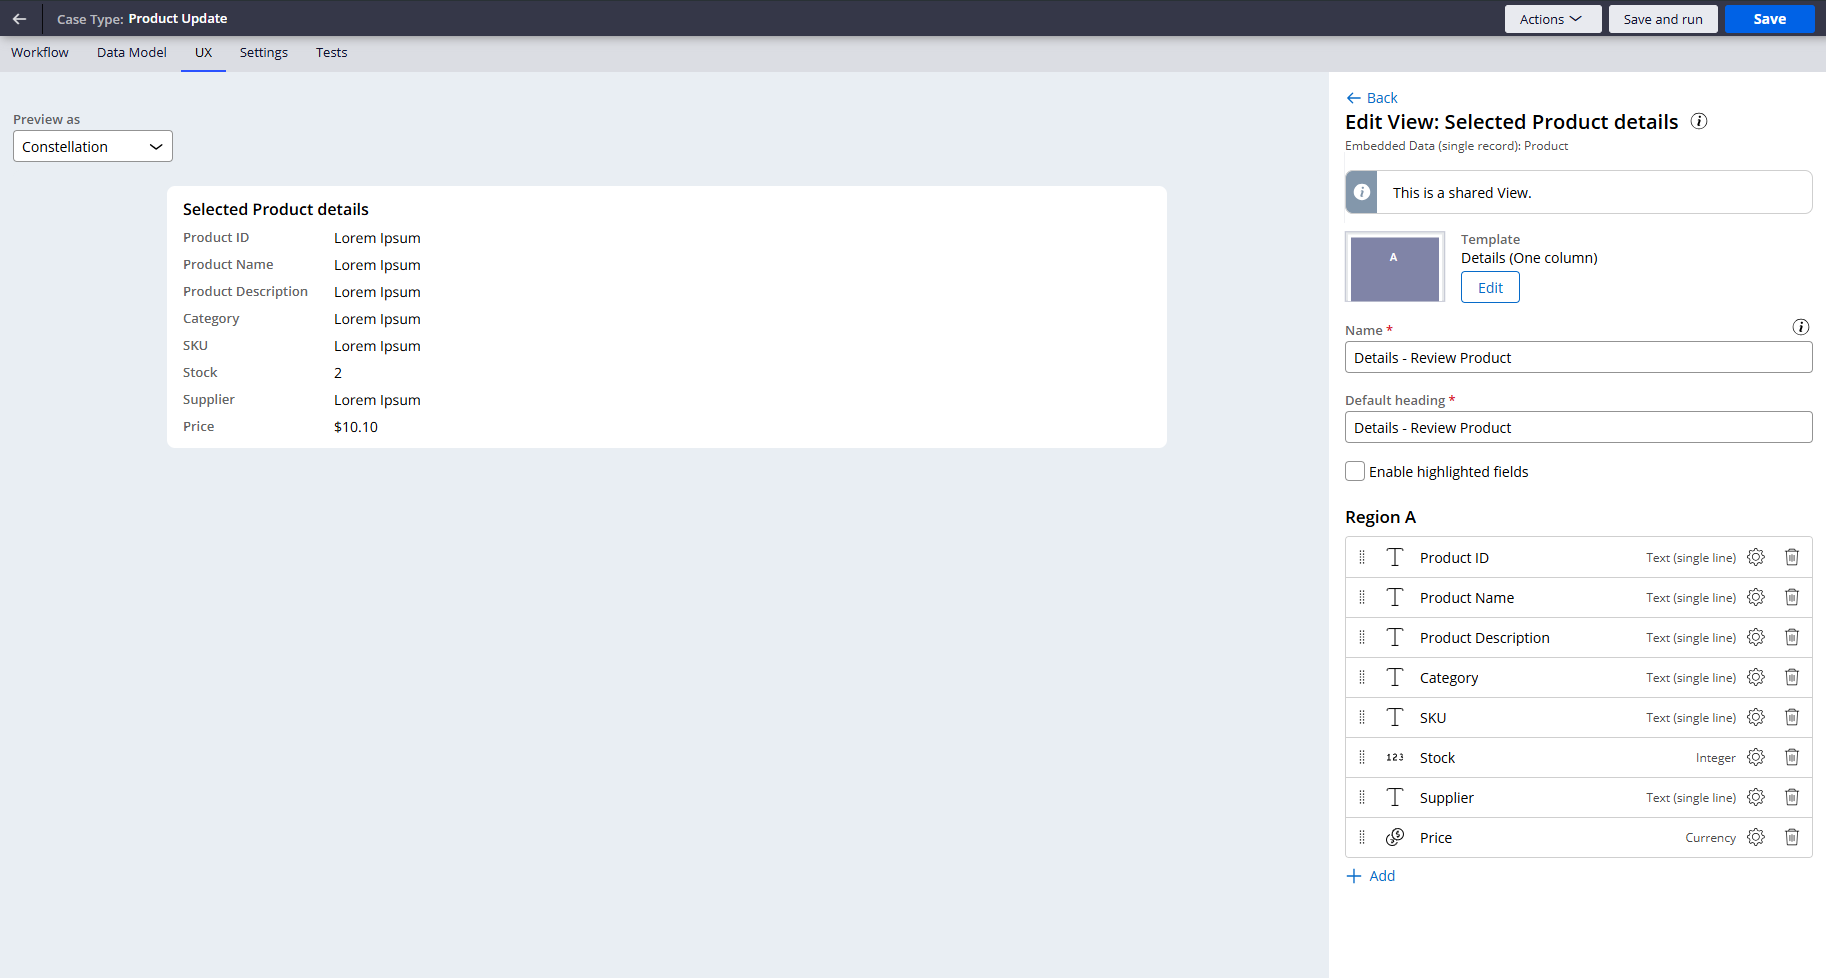
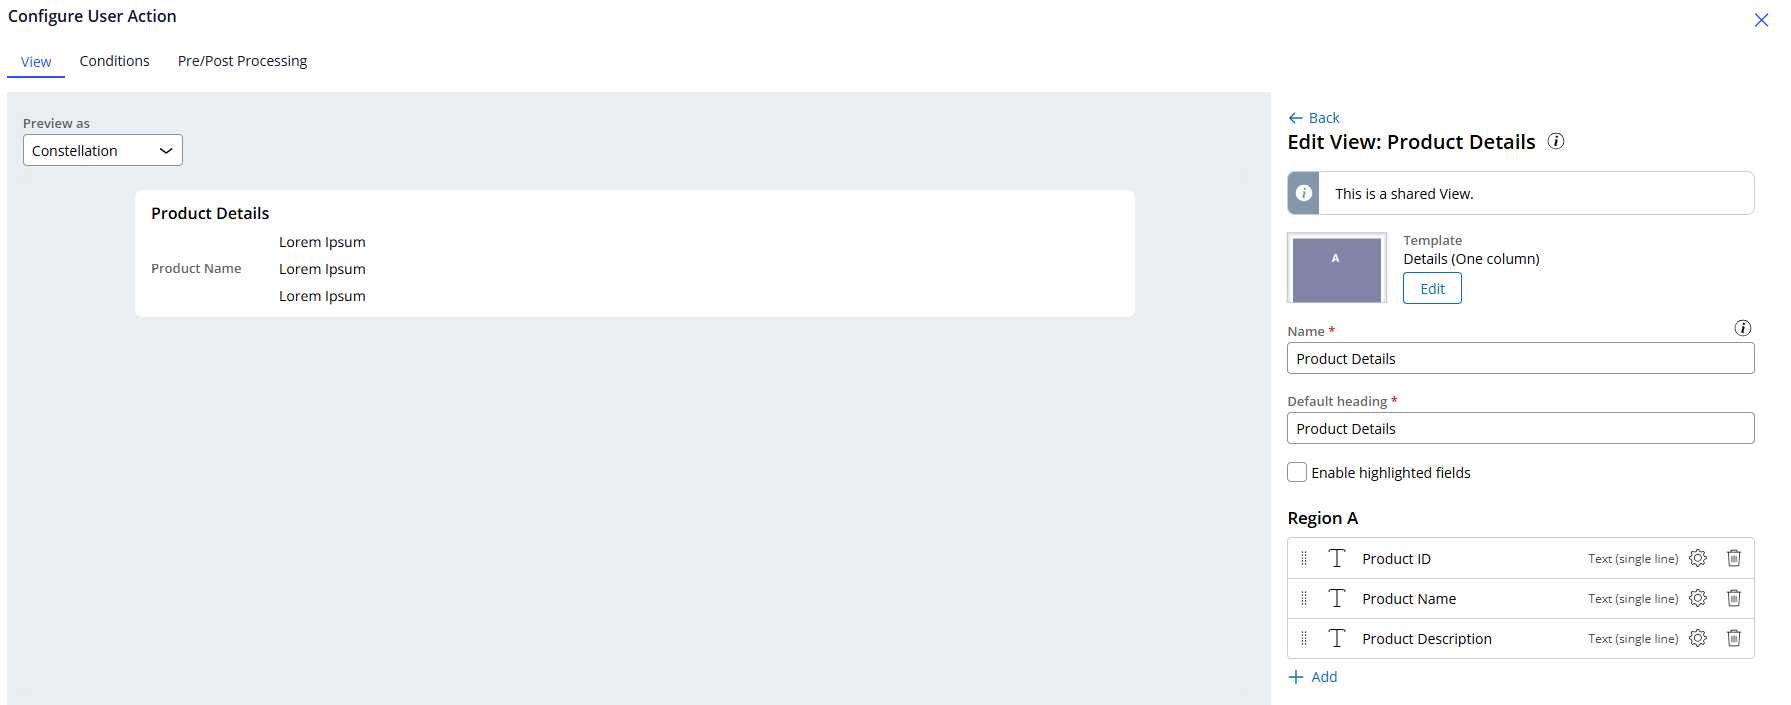
- Under Show details, create a new view named Product Details to display read-only information about the selected product. Add fields like Product ID, Product Name, and Product Description to this view.
This configuration allows the user to easily search for and select a product and immediately see its key details before proceeding:

3.3 Product Update step
After a product is selected, user moves to the Product Update stage to make changes.
In the Product Update step, add fields from the Product Selection Data Reference field. Mark the fields that the user can modify as editable. Keep identifiers like Product ID as read-only to prevent modification.

This provides the user with a form pre-populated with the current product data, where they can input their changes.

3.4 Review Products Updates step
This stage introduces the approval logic.
- Add an Approve/Reject step to the Updates Review stage.
- Assign this step to the appropriate user or work queue (e.g., the PortfolioManager work queue).
- Configure the flow so that an "Approve" action transitions the case to the Save stage, while a "Reject" action can move it to an alternate stage (e.g., Approval Rejection) where case can be resolved or routed for rework.
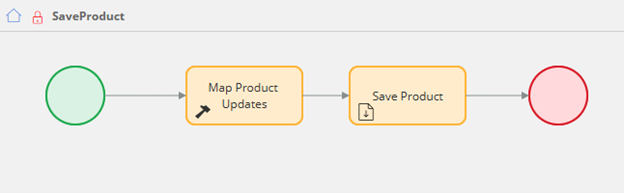
3.5 Save Product step
The Save stage is executed only when the changes are approved. In this stage, we persist the updated data to the system of record.
- Create a new process named Save Product.
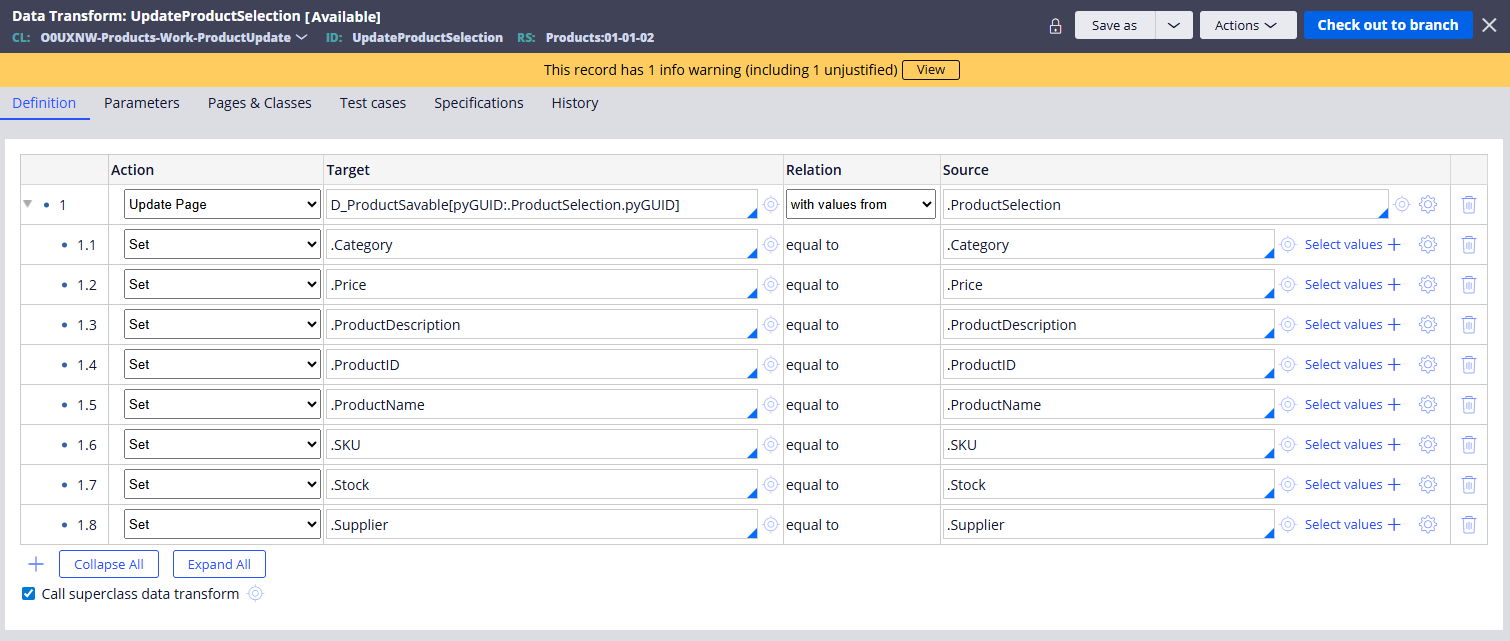
- Within this process, add Run data transform step. Create a new data transform named UpdateProductSelection in the ProductUpdate case type class.
- This data transform will map the updated data from the ProductSelection property (which holds the user's changes) to the D_ProductSavable data page.
- Configure the data transform to set the properties on D_ProductSavable with the corresponding values from the ProductSelection property in the case. Pass the ProductSelection.pyGUID as a parameter to the data page.
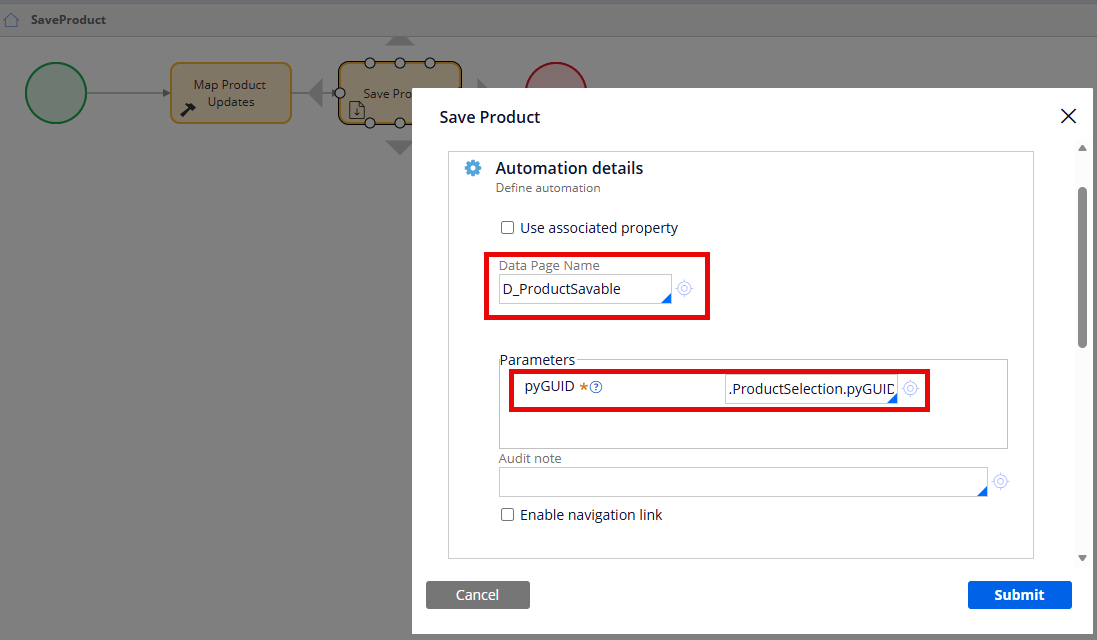
- After the Run data transform step, add a Save data page step to the process.
- Select D_ProductSavable as the data page to save.
- Pass the ProductSelection.pyGUID as a parameter to the data page to ensure you are updating the correct product record.
Once approved, produ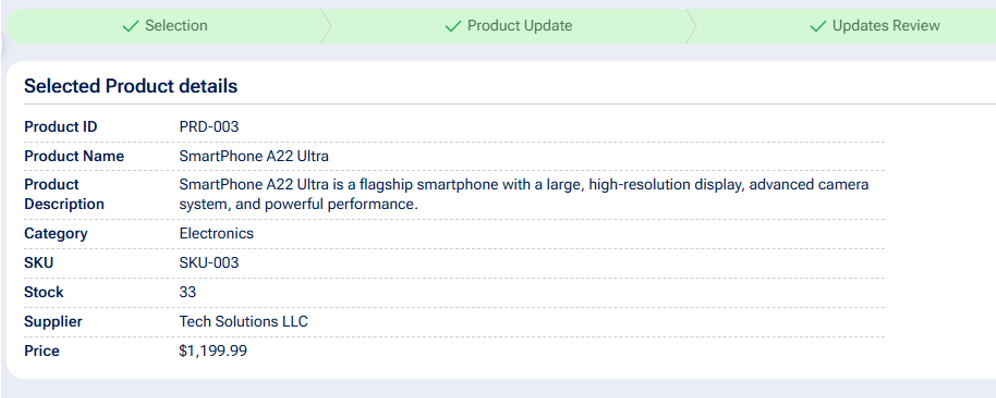 ct details are updated in the system of record:
Pegasystems Inc.
IN
@Kamil JaneczekIt would be great to have the ability to use existing forms in the data object to allow update instead of creating a new form, add individual fields and make them editable. I think we can use existing form if we copy the data to an embedded field but we need additional field and additional logic.
Blue Zone Consulting Partners
US
@Kamil Janeczek@stefd1 Hi Kamil and Dawid,
Thanks for sharing this tutorial, I think it is a good approach, and I can see a good value is resolving a common case for a business that asks for this type of functionality.
I tried to replicate on my side, and pretty much everything worked smoothly 🙂. I'm just curious, in the demo video I see that when you get to Updates Review stage, I see the Portfolio manager can do a comparison between the old and new values by checking the Details tab of the case. However, when reusing the ProductSelection property, I could not achieve the same outcome...
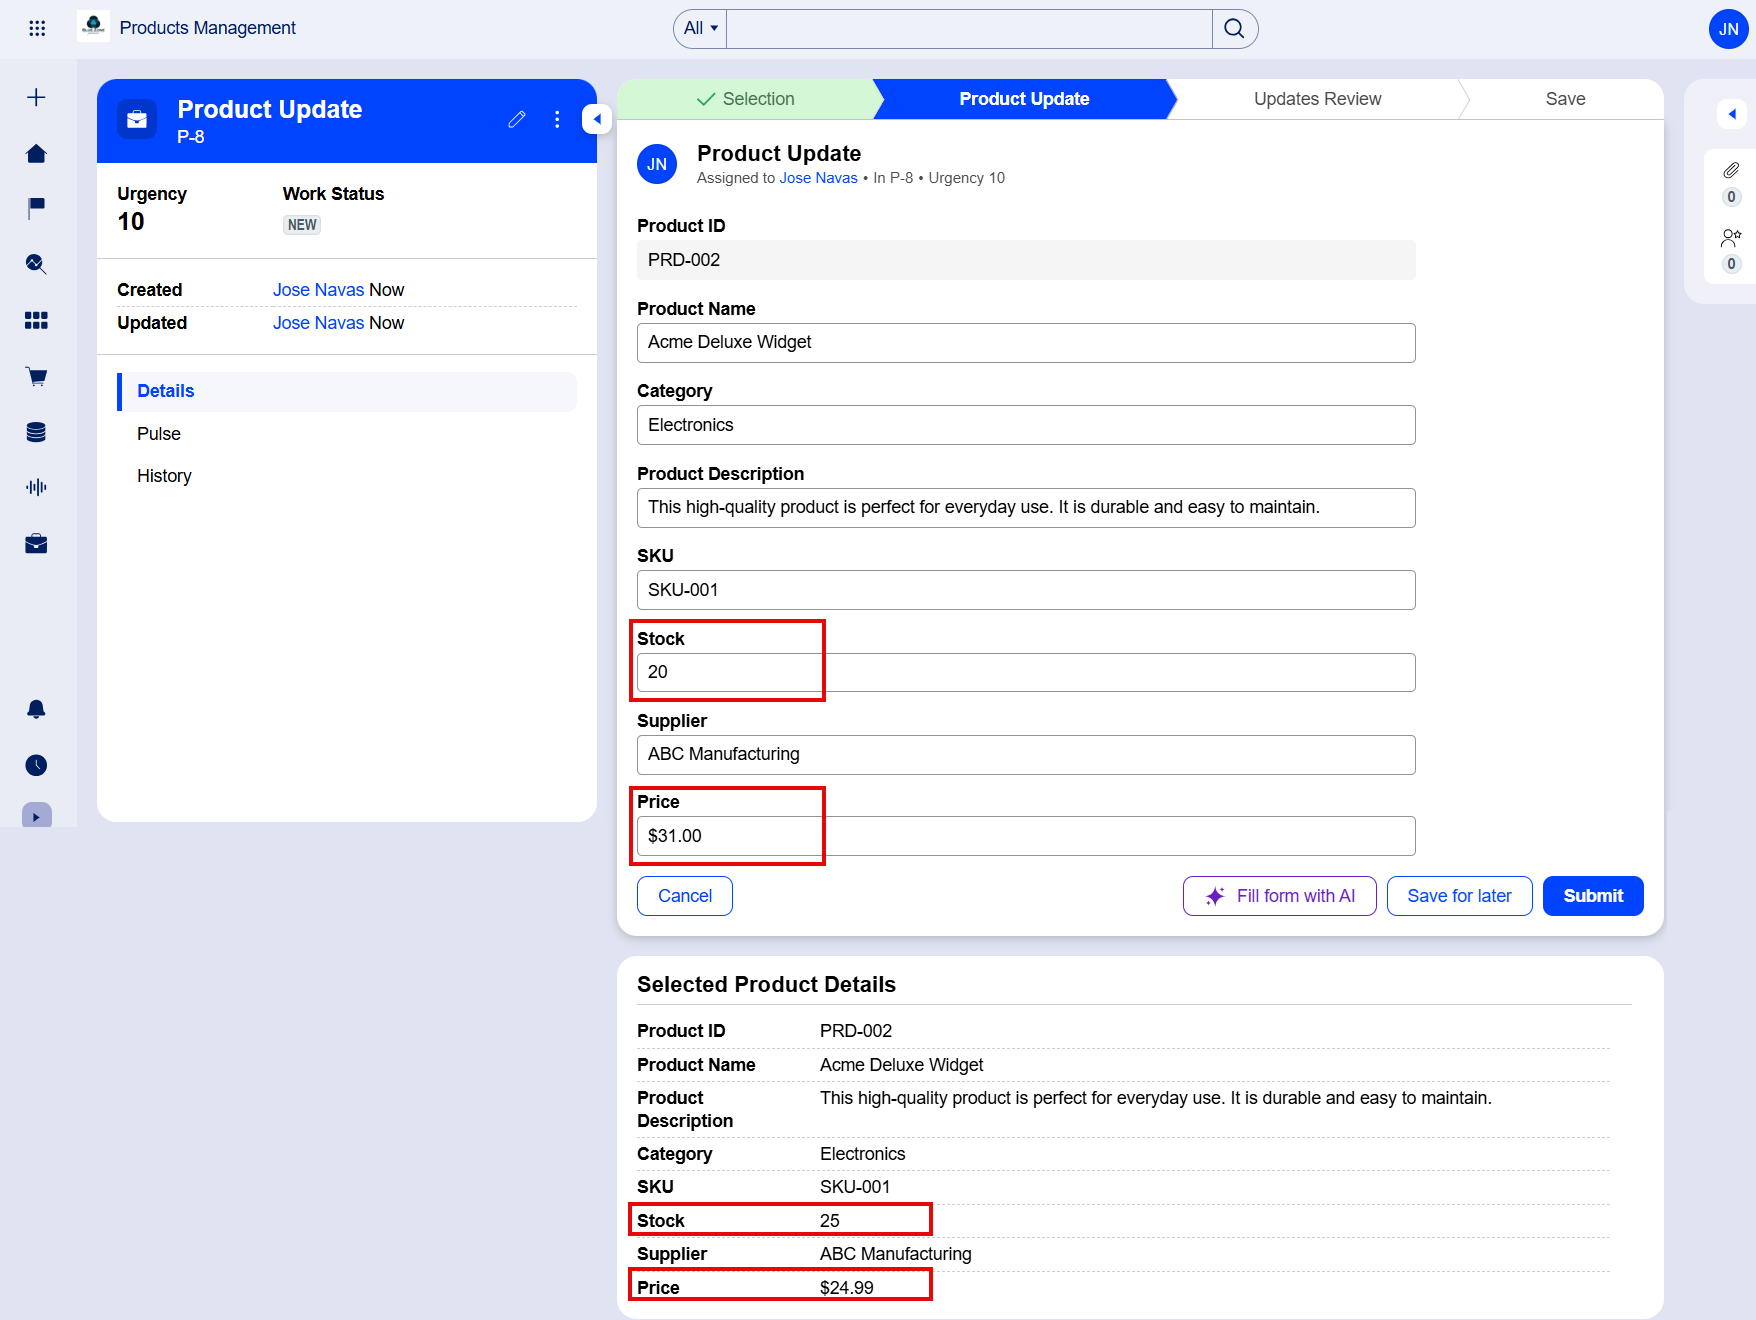
Figure 1 Product update.
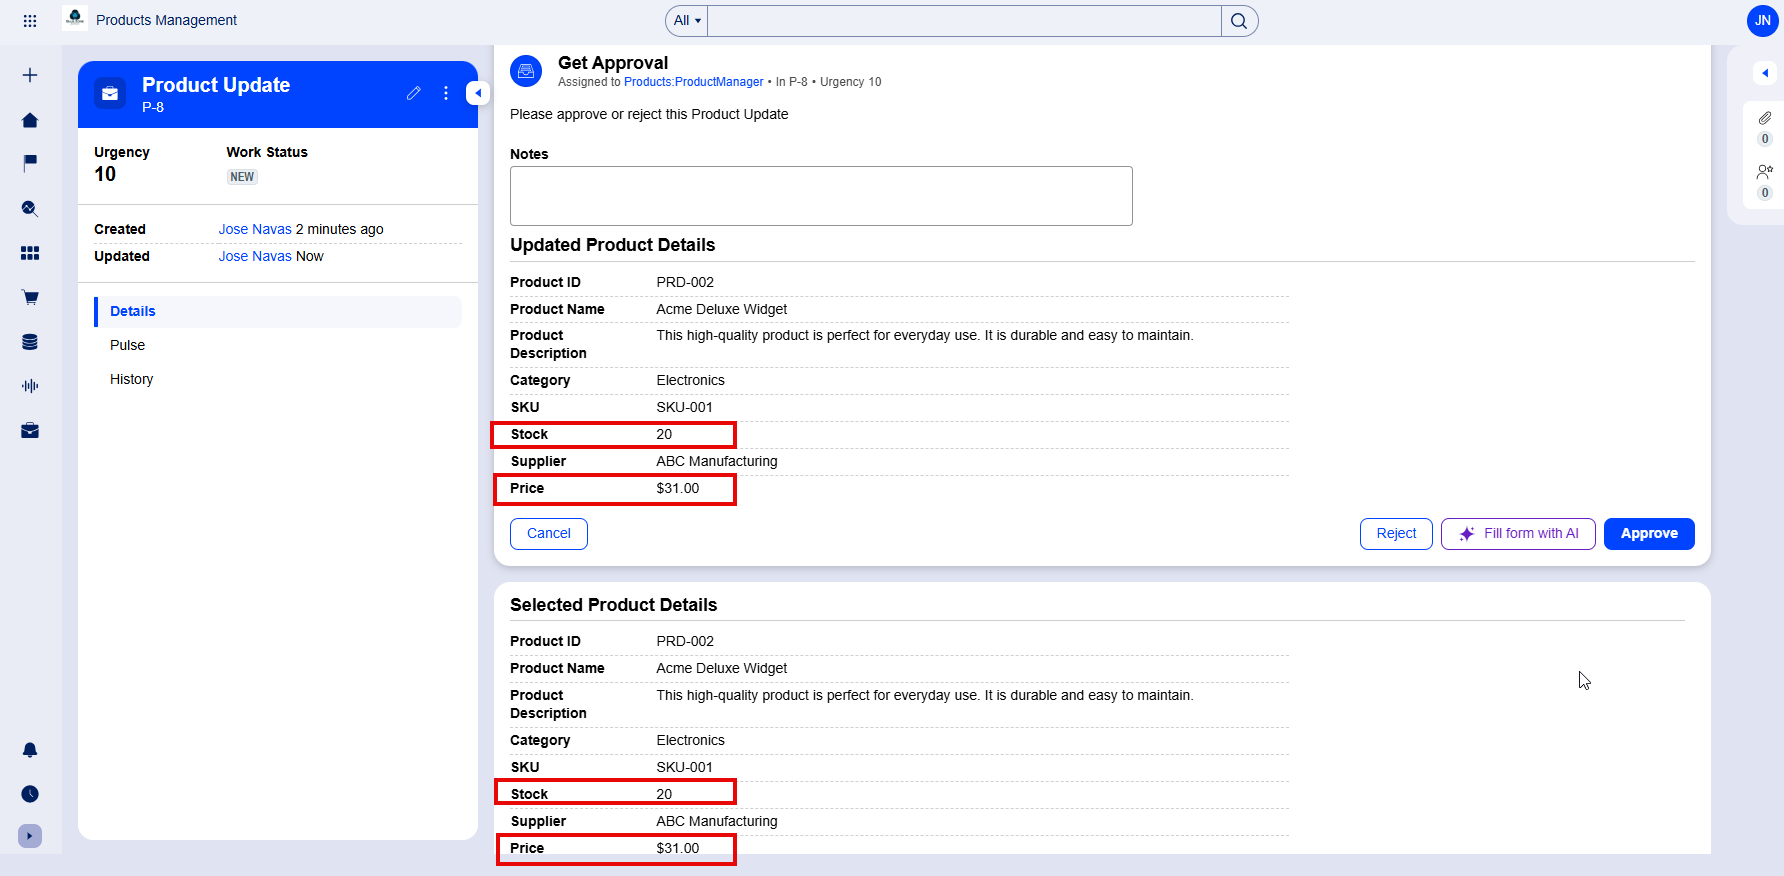
Figure 2 Updates review (Portfolio/Product manager).
Did you have to use a different property to show the original values in the Details tab?”
@Kamil Janeczek@stefd1 Hi Kamil and Dawid,
Thanks for sharing this tutorial, I think it is a good approach, and I can see a good value is resolving a common case for a business that asks for this type of functionality.
I tried to replicate on my side, and pretty much everything worked smoothly 🙂. I'm just curious, in the demo video I see that when you get to Updates Review stage, I see the Portfolio manager can do a comparison between the old and new values by checking the Details tab of the case. However, when reusing the ProductSelection property, I could not achieve the same outcome...
Figure 1 Product update.
Figure 2 Updates review (Portfolio/Product manager).
Did you have to use a different property to show the original values in the Details tab?”
Finally, if I can add something to this discussion is to remember to enable Reference data is copied to the case, because otherwise once you get to the Updates review, you will still see the old values.
Thanks again for this tutorial.
Regards,
-Jose
Pegasystems Inc.
PL
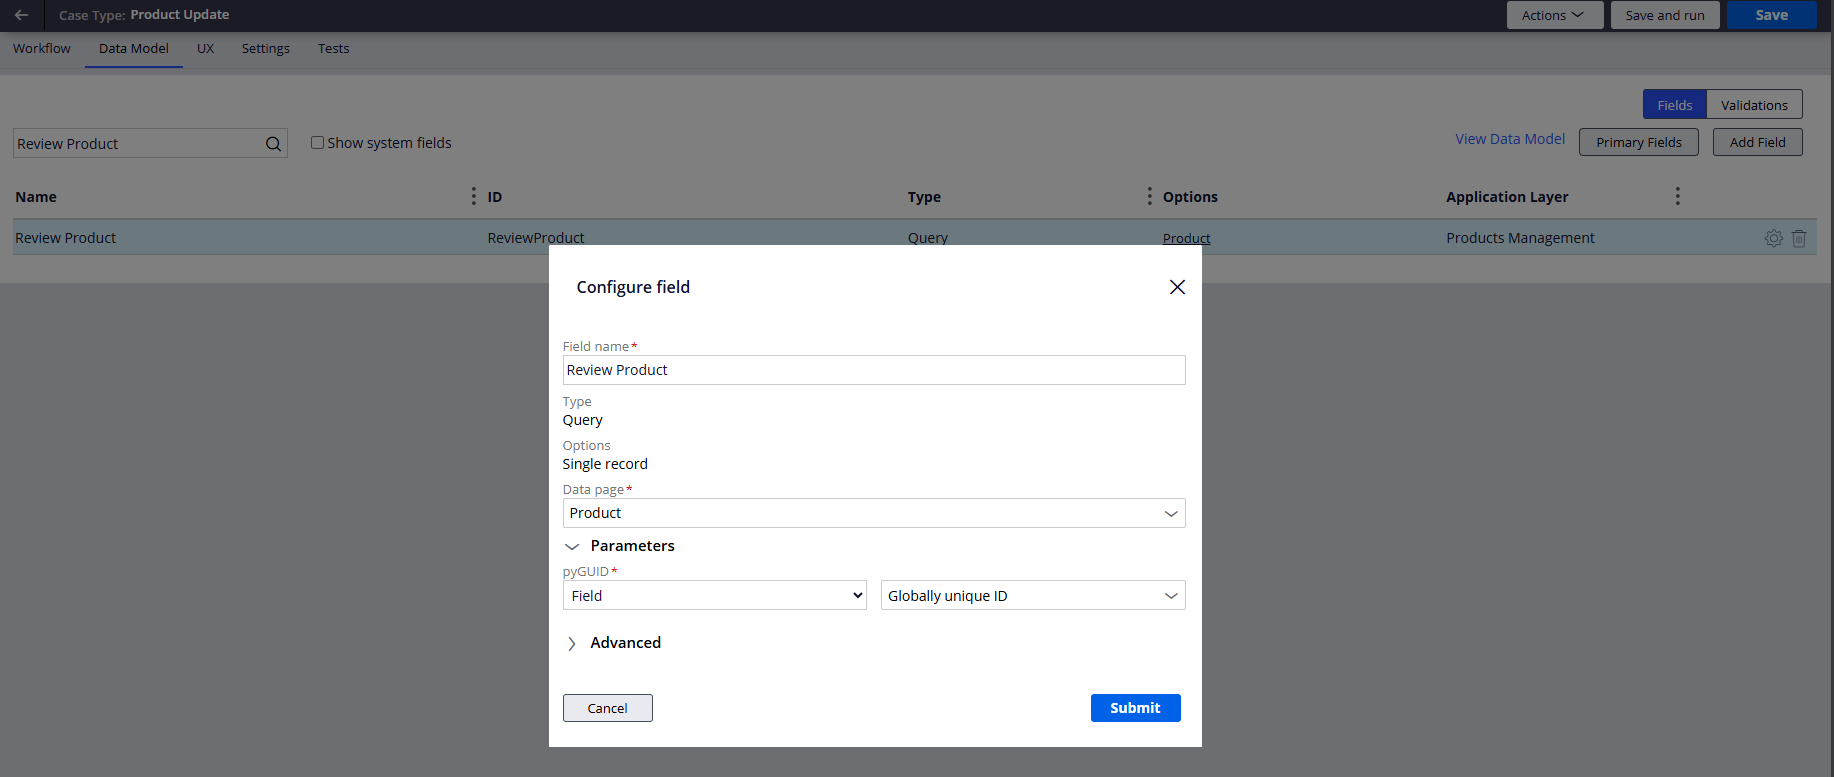
Hi @josenavas, thank you for sharing your feedback.
In my case, to show original values I have indeed used a separate property of the Query type on the Details tab.
1. Property Review Product defined on the Case Type Data Model:
2. Added on the Details tab with updated label:
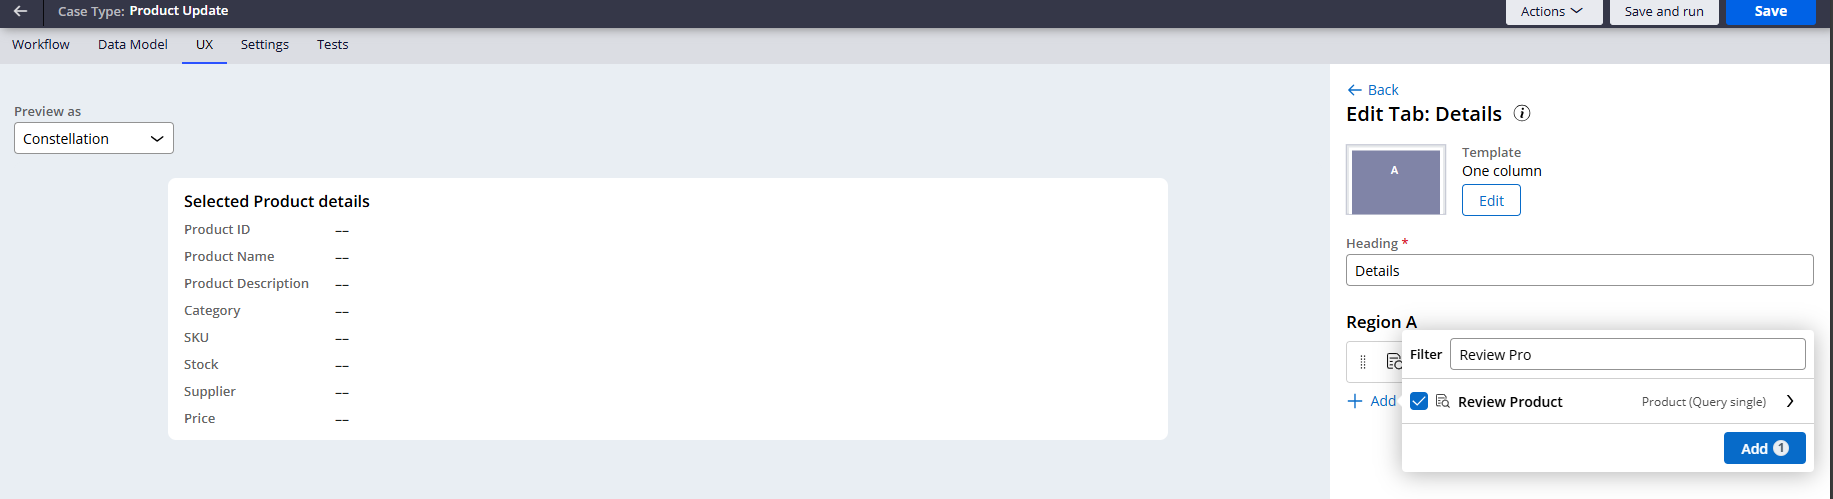
3. Required fields added to the View: