Conversation
Pegasystems Inc.
GB
Last activity: 11 Feb 2026 10:52 EST
How to hide the "go" button in Assignments, My Worklist and Task Lists
Secure Your Assignments, Don't Just Hide the "Go" Button
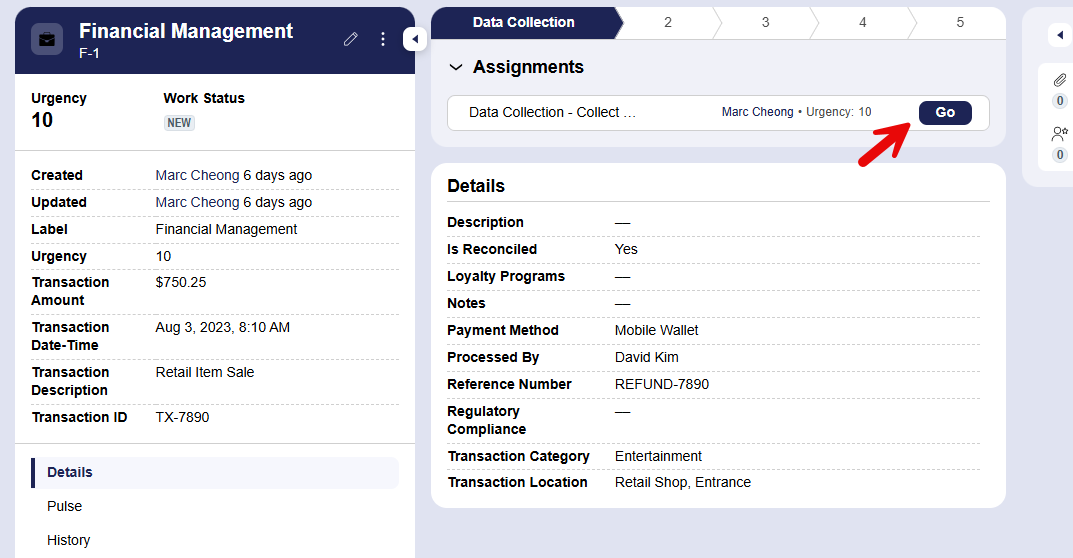
A common requirement we see is the need to conditionally hide or show the "Go" button on an assignment card in the Case view.
In our traditional UI-Kit applications, the typical approach was to apply a visibility condition directly on the button's properties in the section rule. While that worked, it was a form of "security by obscurity." A savvy user could still potentially access the assignment if the underlying action wasn't properly secured.
In Constellation, we follow a more robust and secure paradigm: we secure the action, and the UI automatically reacts. The "Go" button for an assignment is only visible if the logged-in user has the necessary permissions to perform that assignment. If they don't have the permission, the "Go" button is hidden by default. There's no need to configure visibility on the UI element itself. You, the reader would be right to argue this is what should of happened in Traditional UI applications as well but this best practice was not always met.
Securing the Flow Action
The most direct method to control who can perform an assignment is to secure its corresponding Flow Action with a privilege.
Step 1: Create a Privilege
A Privilege is a rule that defines a specific permission that can be granted to a user's role. Think of it as a key that unlocks a specific capability.
-
In Dev Studio, navigate to Records > Security > Privilege.
-
Click Create and give your privilege a descriptive name. For this example, let's use
CanPerformApproval. -
Save the new privilege rule into your application ruleset.
Step 2: Apply the Privilege to the Flow Action or Assignment
Next, we'll tell Pega that performing a specific assignment requires the "key" we just created.
-
Assignment level:
-
Identify if this is worklist (Assign-Worklist) or queue level (Assign-Workbasket)
- In the header of Dev Studio, click Create > Security > Privilege.
- On the Create form, enter values in the fields to define the context of the privilege.
- In the Label field, enter text that describes the purpose of the privilege.
Begin the name with a letter and use only alphanumeric, ampersand, and dash characters. As a best practice, start the name with a capital letter. In compound names such as ReconcileProblemWork, capitalize the first letter of each word.
- In the Apply to field, press the Down Arrow key and select the class that defines the scope of the privilege.
The class controls which Access of Role to Object Rules you can link to the privilege.
- In the Add to ruleset field, select the name and unlocked version of a ruleset that stores the privilege.
- Optional: To change the default identifier for the privilege, click Edit, and then provide a unique value in the Identifier field.
- In the Label field, enter text that describes the purpose of the privilege.
- Click Create and open to open the Privilege form.
- Click Save.
-
- Flow action level:
-
Identify the flow action associated with the assignment you want to secure. You can find this in the assignment shape's properties in your case lifecycle.
-
Open the Flow Action rule form.
-
Navigate to the Security tab.
-
In the Required privilege field, enter the name of the privilege you created in the first step,
CanPerformApproval. -
Save the Flow Action rule.
-
Step 3: Grant the Privilege to the Correct Role
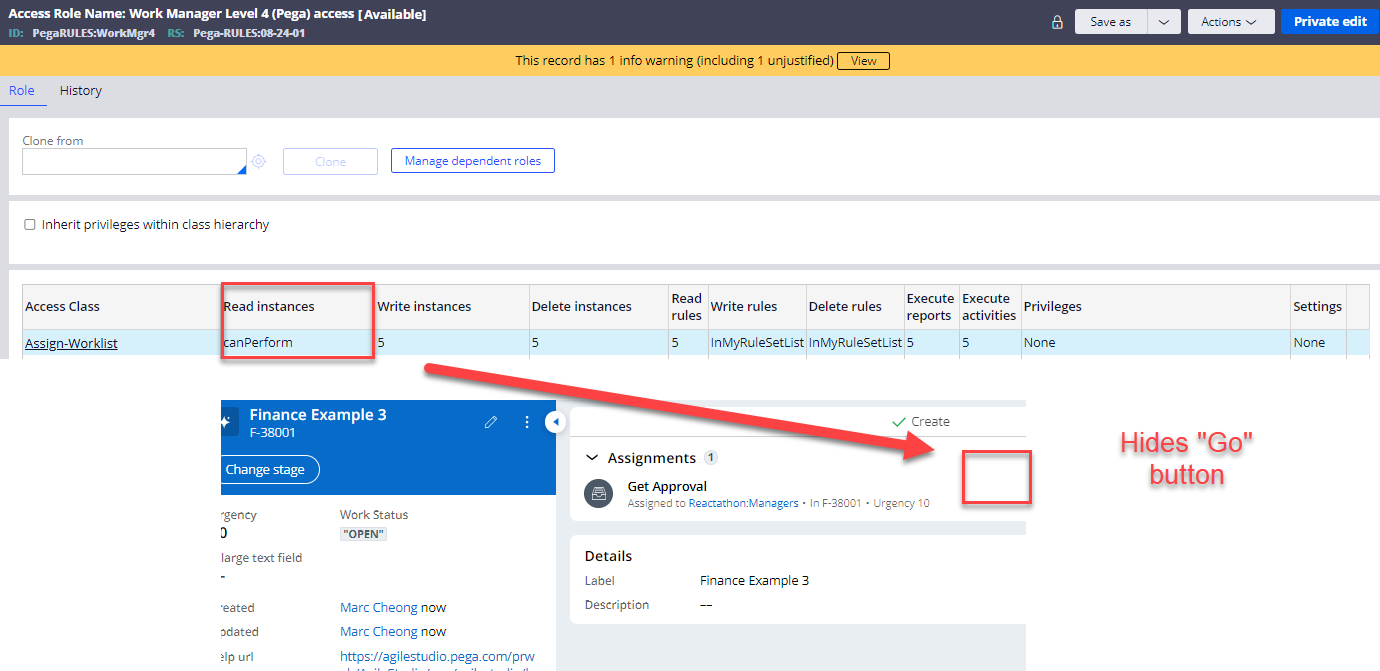
Now that the action is locked, we need to give the key to the users who should have access. You grant privileges to Access Roles.
-
Open the Access Role for the persona that should be able to perform the action (e.g.,
YourApp:Manager). -
Add the
CanPerformApprovalprivilege to the list of privileges for the appropriate class (e.g., your case type class orAssign-Worklist). You can do this directly in the Access Role form or by using the Access Manager tool. -
Ensure that the Access Roles for users who should not perform the action (e.g.,
YourApp:User) do not have this privilege.
The Result
With this configuration, the Pega runtime automatically handles the UI.
-
When a user with the
YourApp:Managerrole views the case, they will see the "Go" button because they possess theCanPerformApprovalprivilege. -
When a user with the
YourApp:Userrole views the case, the "Go" button will be hidden because they lack the required privilege. The system prevents them from performing the action, and the UI reflects that state.
Advanced Scenarios: Attribute-Based Access Control (ABAC)
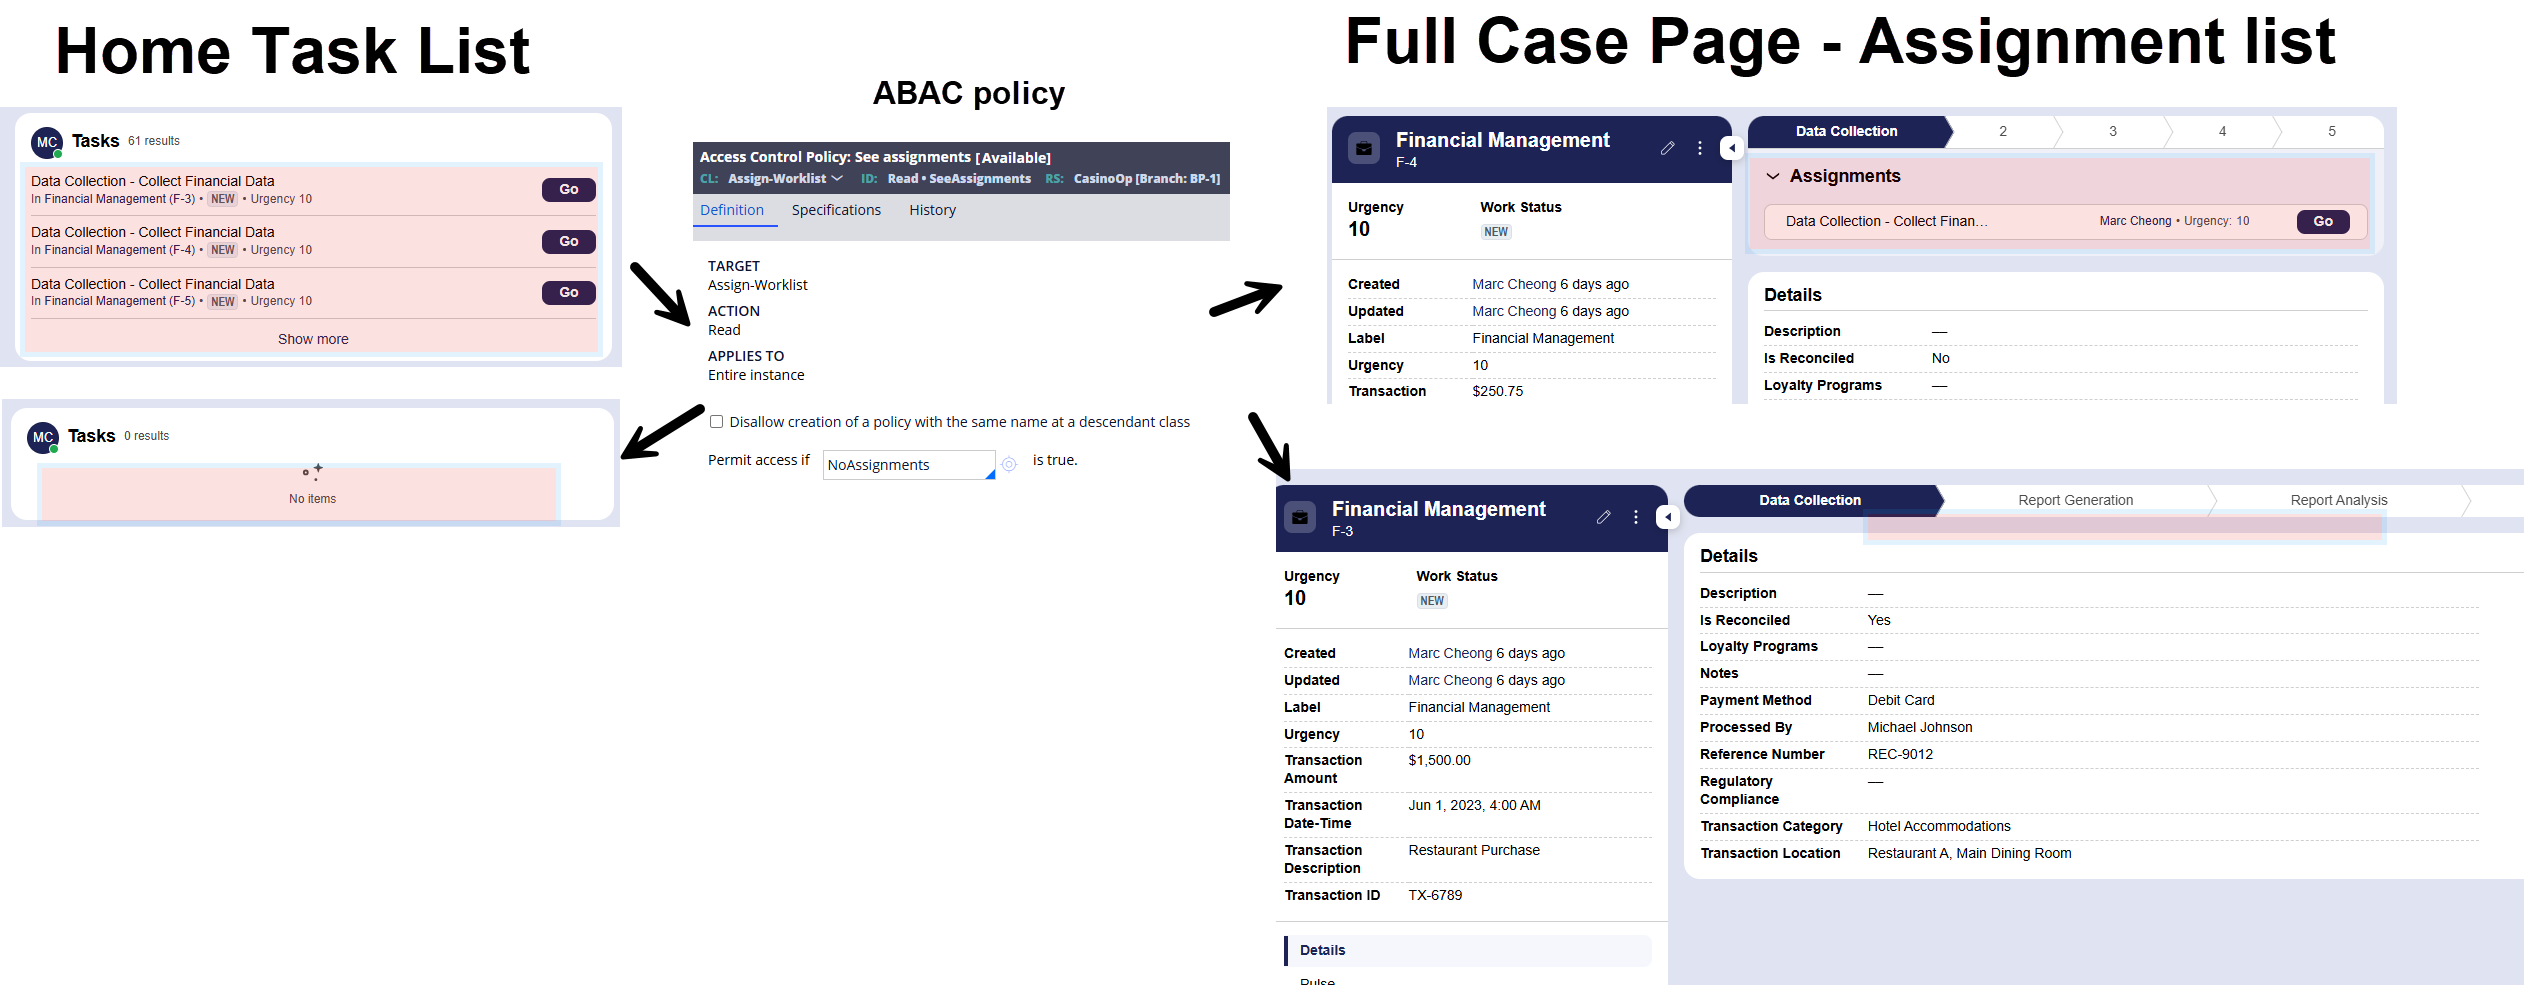
ABAC will hide the assignment/task entirely, not just the "Go" button
For more dynamic scenarios where access depends on case data (e.g., hiding the button if Case.Amount > $10,000 and the user is not a manager), you can leverage Attribute-Based Access Control (ABAC). This involves creating an Access Control Policy with a condition that compares attributes on the case with attributes on the user's operator record.
This is a more advanced topic but is the next logical step for complex security requirements.
Conclusion
By securing the action itself rather than just the UI, you build more robust, maintainable, and truly secure applications. This is a fundamental principle of the Constellation architecture.
Credit: @MACIEJ Dybal for collaborating on this one (and countless others)
References for Further Reading
-
Pega Academy: Application Security
-
Pega Academy: Attribute-based access control (ABAC) security model
-
Pega Documentation: Configuring Action buttons for a Flow Action
-
Pega Documentation: Role permissions and privileges in Access Manager
Constellation 101 Series
Enjoyed this article? See more similar articles in Constellation 101 series.
FusionAIx
NL
Great to see such a elaborate post. Yes, in the past you could obscure, but that didn't address the real issue: the application should be secured.
Some additions:
- In previous versions, while generating the application, all Accessgroups (even the <app>:Users) received role PegaRULES:User4, and thus the canPerform Access when (like shown in our screenshot) was always true. I started reverting to <app>:User1.
- The advanced scenario is only working > 25.1 #keepcurrent :-)
In my opinion the advanced scenario is basically the only scenario which is relevant for customer facing applications, as you do not want to have a potential data-leak (assigned operatorID / email).
For all others; we have discussed in our Webinar, there are also other areas where you need to look into while securing your application.